Sunday 30 December 2012

Miniature Design Studio Pictish Miniatures

So I lied! I managed to finish something else before the year petered out.

I came across Miniature Design Studios a little while back, and after the exchange of a few e-mails with Dave at MDS, finally got round to buying some metal from him.

When I bought these figures, I ordered three "Unit Builder Packs", each of ten figures, one lot of archers, one lot of crossbowmen and a set of javelin-armed skirmishers. At my request, Dave very kindly put a mixture of the available poses of each figure type in each pack. Unfortunately, but for very sound reasons, Dave no longer offers this pack size.

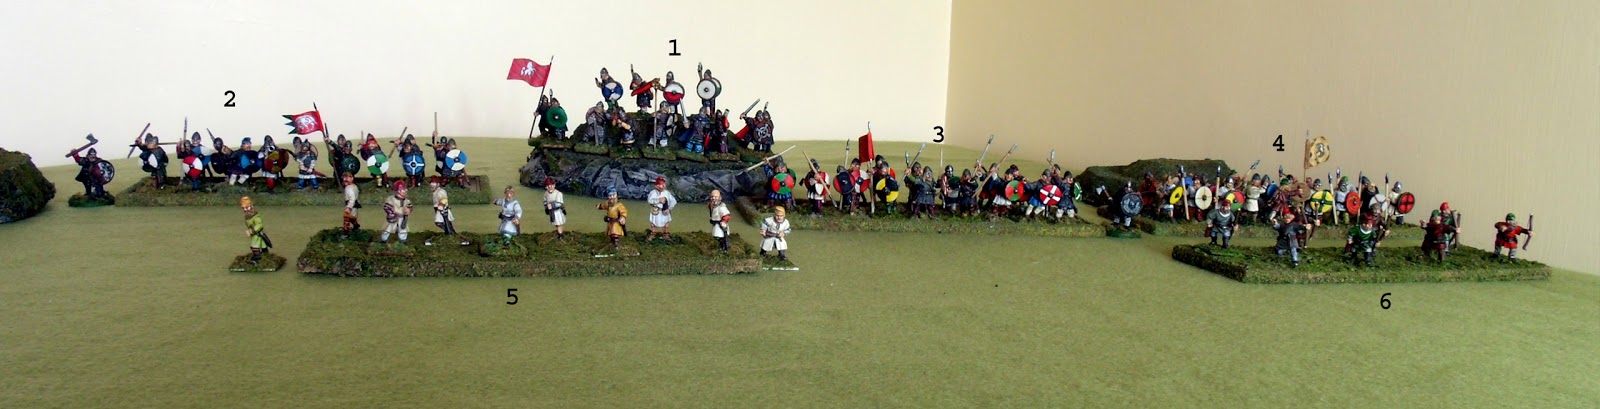
The packs arrived two days after being ordered, well packaged and complete. Beat that for service! Size-wise, I think the figures fit very nicely with my "usual suspects" (Gripping Beast, Black Tree, Crusader, Newline, etc.), but are at the slim end of the spectrum rather than the epic proportions of, say, Renegade. Quick piccie here to let you draw your own conclusions. I am perfectly happy to mix any of these.

Left to right, Crusader, MDS, Newline, MDS, Black Tree, MDS, Gripping Beast

Castings are crisp and neat, in a hardish metal that responds better to scalpel and file than burnisher. Having examined all thirty figures, precisely ONE had any visible flash (and very little of it there). Mould lines were small and fine, and easy to remove. No evidence of pinholing or miscasting anywhere on any figure. The castings do have a number of tiny "pigtails" adhering to them, as seen on Perry castings. Look out for these - they aren't always easy to spot and do nothing for the final finish if you miss them!

Poses are nice, quite dynamic in most cases, and thoroughly believable. The anatomy is realistic, and as I said above, the figures are slim rather than bulky. Since they are intended to represent the lower echelons of a Dark Ages subsistence farming culture, I reckon this is no bad thing!

The javelinmen came in three poses, immediately generating a nice sense of variability among them. This was enhanced by the addition of a good selection of separate shields. Two different sizes / designs each of round and square shields, plus an iconic "H" shaped example mean there's no way this lot are going to look uniform! Helpfully, two of the poses actually have both hands moulded to hold a weapon which makes arming them with a number of javelins quicker and simpler. The javelins themselves are moulded separately, on small sprues as sets of three. A total of 12 are supplied, enough for a couple of the figures to carry two weapons each. I'll put my hands up and say I'm not a big fan of white metal spears / javelins. I prefer to make them up from brass or steel wire, but these ones are nice: they are in scale, with realistically sized heads and note they actually are javelins, not spears that need to be cut down and reshaped. Front and rear views of the three different poses.


Don't throw those bloody spears at me!

The archers come in five poses, two examples of each of which were delivered. The range here, loading, firing and kneeling, some in cloaks and some without, is fantastic. The bows are moulded on the long side, allowing you to cut them down if required by your views on Pictish archery techniques. These are strung with 8/0 flytying thread fixed with cyanoacrylate.

Speeding the arrows' deadly flight.

The crossbowmen are currently two poses only. Both wear cloaks and give the impression of being very sneaky! The crossbows are moulded separately, which I think is a nice touch. Additional poses are in the works and if they follow the lead of these two as the other figure types have, these should be very nice indeed.

Don't quarrel with a crossbowman - you'll lose!

None of the figures carries a secondary weapon. If you're bothered these can easily be added via a bit of greenstuff. I've done this with other minis I got but these are "as is" to show what MDS provide before I muck it up!

The MDS range is expanding all the time, and it's well worth checking in on the website and the Facebook page to keep abreast of things currently in the work. As I understand it, at the time of writing additional crossbowmen are in the works, along with spearmen in cloaks (the masters look brilliant), plus cavalry (yay!) and a chariot (not for me, thanks).

Dave has rationalised his prices, as I noted above. This is to provide some capital for the expansion I mentioned. I think it's worth  pointing out that even after this, these minis work out at precisely £1.10 each. This is still significantly cheaper than most of the other manufacturers I buy from. Given that many Dark Ages armies are figure-dense due to the relatively low points cost of the troops, this is an important consideration.

For the record I am kicking myself for not buying loads more figures before Dave changed his prices. However, I confidently predict he will be seeing a thick slice of my disposable income in 2013.

Recommended without reservation.

Lads! Lads, I've got a plan...

To quote Michael Caine.

This is probably going to be the last posting for 2012. I think its rather unlikely that I'm going to finish anything much before the new year.

However, I have plans for 2013. Here goes...

Finish the Pictish army (naturally, well, there's barely five minutes work there is there?)
AVOID building a Viking army!
Build a Sub-Roman army (this is predicated on Gripping Beast getting their plastic generic Dark Ages warriors out. Hint hint!)
Scratch up some earlier Saxons to make my Anglo-Saxon army more versatile.

And terrain... LOTS of terrain. I blame two books. Leslie Alcock's Arthur's Britain and the Warhammer Age of Arthur supplement.

Alcock's work is getting a little bit dated and the scholastic view is that there can in no way possibly have been such a person as King Arthur because of the tall, mismatched stories. But then, as Geoffrey Ashe put it "...as a warning to skeptics who argue that anyone credited with giant-killing and dragon-slaying must be fictitious, I would point out that (Davy) Crockett himself, a U.S. Congressman, became the hero of tall tales as far-fetched as any told of Arthur". So there!

Alcock's work and especially the ideas over warfare and the reconstruction of South Cadbury were just compelling. It hooked me and reeled me in!

 The AoA supplement is out of print and makes good prices second-hand on Ebay but is well worth it. The scenarios are quite broadly applicable - defence of a river crossing, attack on a retreating raiding force, siege of a decaying town, and are quite easily mutable to make the engagements bigger or smaller.

All of these require terrain. A dyke and a fortress wall. The dyke is a fairly simple construction. A deep ditch and an earth bank, with limited revetting, no obvious construction and without actual gates - just bits where there are no ditches. I need about four linear feet so I'll make it in sections, with the opening separate so it can go in anywhere along it.

The fortress wall, now this is a real project! Based on Alcock's various reconstructions, with the addition of corners, watch turrets and gateways! Again, I'll make this in sections to allow it to sit at various points on the board. I see about three linear feet of wall, in various lengths, plus the bits and pieces.

Luckily, I had a real find not long before Christmas. Feet and feet of pieces of the waste poly foam I use, in bits about six inches square! What more could I need?


Saturday 24 November 2012

Children of the Circle

Picts, preparing to make somebody's life very, very unpleasant.


Pencils on black pastel paper.

Enjoy!

Sunday 18 November 2012

Anglo-Saxon Army for WAB


Well, here’s my Anglo-Saxon army. Really, it’s Anglo-Danish, due to the presence of huscarls, but a bit of jiggery pokery and mixing these figures in among the thegns would make it suitable for earlier periods too.


Anytime you feel like it...

We have the army general, a Jarl, plus one of the three Aeoldermen, designated the army standard bearer. These are drawn up with the single unit of huscarls, equipped with two-handed axes, with leader, musician and standard bearer. Here right in the centre on the highest ground they can dominate the battlefield (1).


Then, two units of armoured thegns (2 and 3), each unit having a leader, musician and standard bearer. One each of the other two Aeoldermen is attached to these units, to bolster their leadership.

A single unit of ceorls (4), with leader, musician and standard bearer provides some support for the flanks and acts as a reserve, albeit not a terribly mobile one.

Finally, two units of geburs (5 and 6), one armed with slings and one equipped with bows round out the army with some fire support.


The strengths of this army are the large number of steady, well-armoured infantry that can fight in strong formations (using shieldwall) with spears. This is amplified if you have huscarls in the army.
The mixed unit rule, whereby you can intermix armoured and unarmoured troops and have them fight as the former, makes even relatively cheap troops noticeably more formidable.
Its weaknesses are its relatively low mobility and a dearth of missile troops. The latter can be solved, by swapping a fairly small number of thegns for a much larger quantity of sling armed geburs, but the mobility problem remains.

By varying the banners, and hence the origin of the army, you can make some changes that have quite an impact on how the army performs.

Fighting under the golden wyvern of Wessex, all the thegns gain veteran status, and a chance to re-roll a single attack per unit. In my case this might make the difference between winning and losing two rounds of combat, and that might make a difference between winning and losing the whole battle.

The eagle and saltire of Mercia allows thegns to be designated as light infantry. In skirmish formation, the double rate move does go some way to overcoming the mobility problem. A Mercian army has a chance to actually seize and hold an objective in the face of a more mobile army, rather than to simply wait until the enemy in place and have to dislodge them.

Under the Invicta, Kentish men (or men of Kent) as shown here, were famed for their aggression . Thegns and ceorls can swap thrusting spears for throwing spears. Thus a charging unit can attack in two ranks in the first round. Two ranks, probably striking first and the gain of momentum is a potential battle winner.

Generally, this is not the army that can dash across the table to secure the strategic terrain or seize a key structure. It doesn’t dash anywhere, but tends to trundle very deliberately. However, anything attempting to interfere with that trundling had better be numerous, resolute and prepared to be crushed flat by a spear-tipped steamroller. Likewise, if it gets itself set somewhere it wants to be, then driving it off is no easy task.  With its light troops guarding its flanks and buying time to re-orient the heavy units, trying to outmanoeuvre this army might not be as effective as you might think. If the characters can hold the units together, and provided I don't roll too many 1's so the warbands charge like maniacs, it's a winner.

This is the army that ground Harald Hardrada and Tostig Godwinson into the earth at Stamford Bridge, and came within an ace of sending the Bastard of Normandy back whence he came.

Come on have a go, if you think you’re hard enough!

Thursday 8 November 2012

Saxon Great Hall, Part 3


The final part of the saga! You could be forgiven for thinking that there was an enormous amount of work went into this, based on the time it's taken to write. In fact the building, painting and whatnot was fairly quick,compared to the problems involved with supplies, computers and cameras!

Anyway, first thing was a layer of flock outside, muted down a bit with a burnt umber wash. 

Painting followed the usual scheme - lots of drybrushing in progressively lighter shades. I think it worked well enough.

A large chair (for the thegn) was put on a low dais at the doorless end, where the master and mistress of the hall would have sat. This were plastic card, scrap balsa and a bit of greenstuff. The rushes on the floor are sisal string held down with PVA. A wash of burnt umber followed by a drybrush of a light, dusty colour ties these in. You could add tapestries, and all sorts of other decorations but I limited myself to a shield on the wall for colour.

 Best seat in the house.

I added opened shutters on the windows, plus two doors closed, and one open. I felt it was easier to add these later on, to avoid them breaking off during construction. 

Not exactly double-glazing...

The final touch was some decorated panels over the lintels of the doors. These can be very colourful and decorative, making a nice accent. I drew these out, about four times the final size then shrunk them to fit on the computer.

How decorative!

Here it is, finished. Not perhaps the dwelling of royalty or even an eorlderman, but a building belonging to a successful thegn, and step up from the Anglo-Saxon equivalent of a used car salesman!


Who lives in a house like this?

Enjoy!

Some Limited Conversions

I needed some command figures for the second set of thegns I have as part of the Anglo-Saxon army. I had a few spare figures from Gripping Beast left over. These were ordinary spearmen, but a little work with wire and green stuff turned them into a standard bearer and horn blower.

First up the standard bearer. Here he is, with a shot of the original figure (another example obviously), for comparison.   First job was cut away the original forearm, and make a slot in the shoulder to allow the upper arm to move into its new position. A hole drilled into the upper arm to take a piece of soft wire allows the new upper arm to be formed. I put the banner staff in place at this stage, attached to the end of the wire armature. I found that this allowed me to model the hand in situ more easily and accurately. After I was happy with the hand, I modelled the tunic sleeve, then made good the cuts and bends on the mail shirt.


The staff is a piece of steel rod with a point hammered and ground. The banner is the one I posted here, if you remember. Glued down onto a pit of paint tube and bent to shape, I think it looks the part.

The hornblower is slightly simpler. A cut or two around the joints of the arm, a couple of bends and some modelling of the hand and the horn from green stuff. The starting figure again is pictured with the conversion for comparative purposes.


I know that they're pretty minor conversions, as far as these things can go, but they're just the thing to do the job I want doing.

Enjoy!

Tuesday 6 November 2012

Dark Ages Bibliography

I don't know whether or not others will find it useful, but I thought I'd put together a list of references that I've found useful (or even not so useful) in putting together my Dark Ages stuff.

I've deliberately left game rulebooks and supplements out of the list. These are specific to whatever setup you use, and having a pile of rulebooks for something you don't play probably isn't useful.

Anyway, on with the list.

Wargames Research Group

Armies of the Dark Ages, Ian Heath, WRG
Probably as near an indispensible reference as there is, in my opinion. If you really could only have one book, this would be a compelling choice. Follows the usual WRG format of an overview of the armies of the period, potted battle histories, plus a huge number of black and white line illustrations with informative captions.

Armies and Enemies of Imperial Rome, Phil Barker, WRG
 Arguably a bit too early, but contains a good deal of stuff that is both interesting and useful, especially for an early Dark Ages player.

Availability of WRG books seems to be a little bit hit and miss, but they are well worth investing time hunting down on Ebay.

Osprey

The various Osprey series probably needs no introduction. I bought my first MAA book about 27 years ago and have carried on ever since. Don't expect tremendous depth from a book with only 48 pages, and you are usually not too badly disappointed. The colour plates of course can be a great source of inspiration. Particular volumes I've found useful include:

MAA154 Arthur and the Anglo-Saxon Wars, David Nicolle and Angus McBride.
Becoming slightly dated as the archaeology and its interpretation has moved on, but still a solid source, especially the late Angus McBride's plates.

MAA247 The Roman Army from Hadrian to Constantine Michael Simkins and Ronald Embleton
Useful as a source for Romano-British armies.

Warrior 17 Germanic Warrior AD 236–568 Simon MacDowell and Angus McBride
A very broad subject indeed, but MacDowell provides a useful jumping-off point for more detailed research. The illustrations have proved very useful indeed.

Warrior 50 Pictish Warrior AD 297–84 Paul Wagner, Angus Konstam and Wayne Reynolds
Very little is written about the Picts, so the choice of references isn't large. The illustrations are useful, but not in the same league as McBride's work. Whilst I have unashamedly used this book on many occassions, given the very sketchy source materials the authors have had to work from, I have lingering reservations about how truely authoritative it can be.

Warrior 9 Late Roman Infantryman AD 236–565 Simon MacDowell and Gerry Embleton and
Warrior 15 Late Roman Cavalryman AD 236–565 Simon MacDowell and Christa Hook
The influence of late Roman tactics and equipment, especially armour, on Dark Ages warfare, is profound. For this reason alone both of  these books are worth having. MacDowell's written work is very good, clear and authoritative. Unfortunately the illustrations do not equal it, in my opinion. I do not especially like the style of either illustrator, and whilst the colour plates are useful, I have not found them as easy to work from (for example when sculpting helmets) as similar offerings from McBride or even other work by the same people.

Warrior 5 Anglo-Saxon Thegn AD 449–1066 Mark Harrison and Gerry Embleton
Very useful. Harrison's written work is a good starting point, and Embleton's illustrations are useful, certainly better than his work on the Roman Infantry. I think this is currently out of print, but worth seeking out.

Fortress 92 Strongholds of the Picts, Angus Konstam and Peter Dennis
Interesting and useful, with illustrations and text that are very handy for applying to the general principles of how Pictish fortresses might have been constructed. The black and white illustrations are in many cases too small to be helpful and are merely tantalising, but the decent bibliography allows you to get to the originals.

Fortress 80 British Forts in the Age of Arthur, Angus Konstam and Peter Dennis
 Konstam  and Dennis's works are useful if sketchy sources, and could use a more brutal hand with the editing in a number of places. However, the descriptions and the colour plates are fantastic as source material and inspiration for building model fortifications.

Fortress 56 Rome’s Saxon Shore, Nic Fields and Donato Spedaliere
Text OK, generally informative, illustrations not too great at all.

Academic Sources

I make no pretense of having any academic qualifications in this field (I'm a chemist), but it is gratifying to find the volume of academic work available that there is. Some disciplines appear almost to hide their work from the lay reader. None of the sources mentioned here are in very heavy going - anyone who can handle the work of Phil Barker will be all right.

The Grammar of Anglo-Saxon Ornament, Professor Rosemary Crump
Part of the Corpus of Anglo-Saxon Stone Sculpture, and available on the web here. An essential and very accessible guide to Anglo-Saxon stonework, invaluable in producing wargame buildings.

The Hebridean Iron Age: Twenty Years’ Research, Professor Dennis Harding
If you want to build a Pictish structure, read this paper. A fantastic piece of work, available here.

Symbols of protection: the significance of animal-ornamented shields in Early Anglo-Saxon England,  Tania Dickinson. 
A great guide to early medieval shields. Less detailed than Dickinson and Härke's co-authored work, but easier to find.

The Anglo-Saxon weapon burial rite: an interdisciplinary analysis, Heinrich Härke
A guide to who was buried with what, and an attempted to rationalise why. If you want some evidence for why most men had spears only, this is it. 

I'll update this with new references and new sections as and when. I hope it's useful to someone.

Enjoy!


Tuesday 16 October 2012

Anglo-Saxon Characters

Finally, the characters and command for my Anglo-Saxon (Anglo-Danish) army.


The (Wessex) Wild Bunch

These are all actually Vikings from Crusader Miniatures' Dark Ages single figure range. I would (and have) argued that as Anglo-Danes the difference in appearance is negligible, and besides that they are really nice minis.

As expected from Crusader, these are good, solid figures, strong looking and well animated. The appearance is of well-equipped, well-dressed men which nicely fits the role I have for them. No flash and minimal joint lines as per usual made pre-paint preparation a doddle. Paint was quick and simple and because these are the focal point of the army I splashed out on shield transfers from Little Big Men Studios. If you haven't tried these before, give them a go. They're very easy to use and the results speak for themselves. Steven Hales at LBMS is a really helpful guy and their mail order service is exemplary.

This specimen is the Eorl acting as leader. The Eorl of where varies (see below). Irrespective, most of the time he's going to be with the standard bearer, close to the huscarl unit slap bang in the front and centre of the army.
I'm in charge!

These two are Eolderman, and would be expected to be at the front, attached to whichever of the units of thegns or ceorls needs bolstering at that moment.


Lastly, the other Eolderman acting as army standard bearer. This is where the comment about Eorl of where exactly comes in. By a bit of jiggery-pokery and drilling down into the base of the figure, I can remove the standard and replace it. This way, I can ring the changes between the armies of Wessex (see above), Mercia and Kent, all of which have small but significant differences that give them a range of strengths and weaknesses, making it that bit more fun. Wessex is at the top, and here are the other two.

Gimme me flag back!

So here they are as Mercians, with the eagle and saltire.

Lord have mercy!

And Kentish men. Or men of Kent. Or both...

Invicta!

Finally, here's a couple of group shots, from other angles, just for completeness.


Enjoy!


Monday 15 October 2012

Crusader Miniatures Scots Skirmishers

What it says in the title. I finished these just before the computer died and so couldn't post them.

These come as a pack of eight, with shields but no weapons. The website shows four pose options, but the pack was rather a disappointment in that I got four of the same pose! Since that sort of uniformity looks so wrong in a rabble like this it was out with saw, scalpel and greenstuff to change arm positions, hair and add a hood to one. I added hand weapons as well, a mix of swords (home cast scabbards fixed in place and embellished with greenstuff), axes (ex-Gripping Beast) and daggers (sculpted in situ with greenstuff).

The javelins are brass wire hammered and ground to shape (the pack doesn't include spears), and the shields are a mix of the large Crusader examples from the pack plus spares of various shapes and sizes taken from Black Tree, Newline and Gripping Beast figures undergoing restoration. I'm not unhappy with the end result.

Well, here they are. The first unit of my Pictish army to take to the table.


Enjoy!

Friday 12 October 2012

More Artwork

At long last, some actual progress!

I've been working on these for a little while as part of my Anglo-Saxon command and characters. These are banners for three of the old Saxon kingdoms / earldoms.

At the outset I suppose I should point out that these make no pretence of being historically accurate in their actual execution. The period in question predates true formal heraldry by rough a couple of centuries at least (depending where you put your timepoints exactly), so I'm guilty of anachronism and artistic licence at least!

Anyway, on with the artwork. I used PhotoShop to do the shadows and highlights. Since my old Iwata bought the farm I no longer have an airbrush that's up to that kind of work.

First up is the gold wyvern on red of the Earls of Wessex. This is W&N ink on Bristol board. Whilst it appears there's no evidence that the wyvern was specifically identified with Wessex at the time, its actual existence and use is definitely attested to.


Second we have the white horse on a red field, the Kentish Invicta. There's a supposition that this is derived from the banner carried by Horsa the Jute. Ink and watercolour on Bristol board.


Third and last we have a flag for the earls of Mercia. The cross of Saint Alban, yellow on blue, has a long association with Mercia, and the silver double-headed eagle was actually attributed to Leofric of Mercia in the period in question. The superimposing of the two is all my own dirty work I'm afraid. This is acrylic and ink on Bristol board.

Please feel free to copy for personal use, if you feel that the ahistoric status of these banners is something you can swallow! If not, well, the rest of my army is as historically accurate as I can make it, so as Max Malini said: "Honest to goodness, I only cheat a little!"

Enjoy!

Thursday 11 October 2012

Had a buy-up

Just bought three reference books on Arthurian matters:

Leslie Alcock's "Arthur's Britain" and "By South Cadbury That Is Camelot" and "Camelot and the Vision of Albion" by Geoffrey Ashe et al.

Note to self: write out one hundred times "I must NOT start modelling the South Cadbury fortification reconstructions"...

Sunday 7 October 2012

WAB Pictish Army (Part 1)

In complete contrast to my Anglo-Saxon army, here comes something completely different.

If this army is labelled as Pictish, it would be suited as such for up until about AD900. After this point, it becomes an army of the Kingdom of Alba. The differences in appearence, equipment and so on would have been very small, and in game terms it makes very little difference either. 

The strengths and weaknesses of this army are pretty much the opposite of the Anglo-Saxons. Where one is weak, the other is strong.

One great strength of a Pictish / Alban army is its mobility. Nearly all troops have a base movement of 5, so skirmishers can absolutely roar across the table and be in places the enemy might want to be before they're out of the starting blocks. This is amplified if you take the option of using cavalry. I have, as the temptation is too great to avoid. A largeish force of light horse, equipped with javelins and hand weapons, can run rings around ponderous footsoldiers, and will make mincemeat of any unit that breaks.

Another advantage is that this army tends ot have a lot of missile troops. Although javelins predominate, short bows and even crossbows (during the Pictish period) mean that an attacker potentially has to trudge forward through a hail of fire before ever getting to grips with an army that can go on evading him all day long.

Finally, troops are cheap. You can place enough men into the field to turn the game table black. The downside of this of course is that it isn't a cheap army in monetary terms! I was eagerly awaiting Gripping Beast's plastic generic Dark Ages troops, but found that Miniature Design Studio troops will get round this problem.

The biggest single disadvantage is the parlously low Leadership rating of most of the troops. Although you can put a huge army into the field, it's a swine of a job keeping them there! You need to go out of your way to put characters with units and / or use every single bit of rank advantage you can. Fighting a mobile battle, using missile fire and hit and run tactics helps, but if a unit of spear gets into a tussle with a group of Saxon Thegns, there's pretty much only one result.

The other great disadvantage is a dearth of well-armoured infantry. There is basically a single unit of armoured troops (the Toisech) allowed to you in the core units. If you want to, or can afford to, or are willing to swap the cavalry for them, you can add some heavy infantry through the Dogs of War options available.

Most troop types only have bucklers for protection, so against an enemy with missile fire, you can find your large army evaporates very quickly...

As a Pictish army, the spearmen can be designated as pikemen. Whilst this provides an advantage in that they are pretty much guaranteed to strike first, it's worth remembering that pikes and bucklers are a poor answer to heavy infantry. This disappears with the changeover to Alban, along with the crossbow (unfortunately).

Tuesday 2 October 2012

Back in business!

Guess who's got a new computer? Plenty to do getting it ready and fully up to speed, but hopefully should be back to normal in a few days!

Saturday 1 September 2012

Pictish Curragh, Part 3

Right, with a master for the hull, the next thing is to mould the actual hull itself. First, add a handle to the master. I used a piece of scrap timber bradded into place.

The next thing you need is a carrier for the sheet plastic to hold it in place while you push the master through. Mine was scrap chipboard, a bit thicker than the master, cut on the scroll saw. The clearance needs to be enough to allow the master to go through reasonably easily whilst not catching.

Now take your sheet styrene and pin it to the carrier. My actual version used 60 thou sheet. Remember that there's a fair bit of stretch needed in the moulding process and the final item needs to be thick (and hence strong) enough to resist handling. I marked the outline of the hole in the carrier. If you do this it's easier to centre the master.

Here's the whole thing, with the master ready and the styrene sheet pinned in place.

 
Ready for action! Note cheap and nasty plastic card for a practice run.

Polystyrene starts to soften at about 70C, and at 95-100C reaches its glass transition (the point where it goes from hard and brittle to rubbery). You need it a bit above this but well below the melting point. Hot enough to stretch, cool enough to be stable. So, set your oven to slightly over 100C and let it warm up. I would recommend doing this when you're alone in the house or with prior agreement, if you take my meaning... I would advise very strongly AGAINST trying to do this over a naked flame. Quite apart from the fact that everything in the process is flamable, the chances of you managing to heat all the parts evenly are about nil. Now, domestic ovens aren't usually calibrated, and the temperature dials are not wholly accurate (you can take the man out of the GLP laboratory, but you can't take the GLP out of the man...), so get some small pieces of plastic. Heat one, assess the stretchiness, and adjust the oven up or down. Repeat until you're happy with the temperature.

Place the carrier with plastic on it in the oven, with the master. Wait a several minutes for everything to reach an even temperature. Then, USING GLOVES (I stress this!), remove the carrier, then quickly take the master and plunge it through the hole to stretch the sheet plastic to shape. Push hard enough to make sure the master is all the way through. Now LET IT TO COOL COMPLETELY WHILE HOLDING THE MASTER IN PLACE! Let everything get back to room temperature before you start mucking about with it.

Now you only get one go at this, and it might be that one or two go wrong. But it does work - and here's the proof! This one still has the excess sheet plactic in place. I had on practice with the chatty brown styrene, which didn't work, then this one, which did.

Moulded and firmly set.

Next I carefully (very carefully) cut around it at the point the master finished (marking it with a pencil or pen helps), and there you have your hull ready to add the details to.

Here's one I prepared earlier!

Now, just add the details! Doesn't sound like a lot of work if you say it quick, does it?

Enjoy!


Sunday 12 August 2012

Saxon Great Hall, part 2

Making the roof offer many options, including the following: carve it from solid foam, make it up from foam sheets, foamboard, MDF, etc, etc.

I chose to make the sides of the roof from foamboard, using a single piece, scored in the middle to allow a fold, and ends made of MDF. I felt this offered a combination of strength and lightness. It was also driven by the fact that I didn't have enough foamboard to do the whole roof...

Roof parts, ready to go.

Cutting the foamboard is easy with any sort of knife. I cut the MDF with my mitre saw, then primed the edges with PVA. Assembling the roof is a pretty simple job using PVA, and some tape to hold everything in place while the glue dries.

The roof glued up and drying.

I added some internal structure to the roof (rafters, basically) with coffee stirrers. Some small wooden blocks, with compound angle cuts, will be glued inside the roof later to act as location markers. These will project below the level of the bottom of the roof, and be positioned to account for the thickness of the walls. They will keep the roof steady, in a position so that it retains some squareness, and doesn't appear to have been put on whilst the workmen had been sampling the local ale a bit too enthusiastically. Note also there is no chimney. Chimneys and smokeholes apparently have a nasty habit of drawing sparks and heat from open fires up and setting the roof alight! The smoke would have collected in the high roof (keeping down pests as a side-effect) and gradually percolated away through gaps, but it's probable the interior was a bit gloomy and smoggy!
Roof structure 

The roof could be thatch or shingles. I've got plenty of thatched buildings, so I went with shingles for variety. The Regia Anglorum's Wychurst website has some wonderful photos of their reconstructed great hall. These give a sense of the size, shape and layout of shingling. Shingling is a highly labour-intensive process, whether in scale or in real life. My shingles were cut in strips from Slaters planked plastic card. An alternative would be heavy cartridge paper (the same material I used for the quoins on the church) glued in place, but that would be even more laborious. It's worth noting that even though the shingles would have been split from solid timber with a froe, they were generally tidied up and fettled to fit, so the actual surface would have been quite smooth. Even more than planking the walls, this job is best approached in bursts. The shingles in the reconstruction are curved at the ends. There is no reason to assume this is universal - thankfully!  Getting this stage completed was stymied a bit by a lack of planked plastic card! When I finally managed to get to my local model shop, they had every size except what I wanted, so I had to succumb and mail order some. To cut a long story short, 2mm planked plastic card seemed to suddenly have become as rare as hens' teeth, and it took an age to locate and get some, so the build stalled, for quite a while. I formed the ridges from strips of 20 thou plastic card 6mm wide, folded in the centre, and applied lapped over. Fortunately, this was  less tedious than the rest of the roof. I'm about 85% happy with the result, but I think I'll shingle slightly smaller roofs in future!

The shingling finished - at last!

The temptation to really go to town with internal fixtures was pretty strong, but I managed to restrain myself. Some benches, built along the walls using balsa strip, foam and Wills Kits plastic board would have provided the seating (and sleeping) accomodation for most people.

 Comfy!

A central firepit was constructed from chunks of fired Fimo clay, glued down with PVA. 

Central heating and built-in oven

Basework outside involved some shreds of waste foam to make the ground look a bit uneven, then sharp sand. Next up was a coat of black spray over everything.

Roof off, showing structure

Roof on. Would you buy this house off-plan?

Here's a couple of shots of everything with the primer on, just as a taster. The last stage will be the painting and the final details. Anyway, I'm off on my holidays, so see you in a couple of weeks.

Enjoy!

Friday 10 August 2012

Well, you asked for it...

To all who said nice things about the boar banner and wanted to know what else I'm working on, here's a work in progress shot of a Pictish banner.


This is (so far) coloured pencil on cartridge paper. The next stage is a great deal of knotwork, scrolls, triskeles and spirals. These will be in the borders and on the squares where the banner pole would go, as well as the tails. Inking these in is a one time only, one chance job, so I'm doing a lot practice off the original before proceeding. The knotwork will be a good deal bigger in this one than the gold scrolling on the boar banner (occupying the full width of the two separate border areas), so with a bit of luck it should really pop on the finished item. Once the knots etc are done, I'll expand the colours outwards as well.

Lots still left to do, but for now, enjoy!

Wednesday 8 August 2012

Something new at last

Finally back in a working condition with my home computer.

I have finally scanned my first painted banner, ready for use.

Here it is, large as life and twice as nasty. From here it was be pasted into something like Word where the size can be altered and a second copy added in to produce the other side. Feel free to copy and use the file for your own purposes, but please don't try to sell it to anyone. This is a fairly low-resolution version, but it's still a biggish file. By the time you get it down to about 1.5 x 1 cm it probably won't matter too much.


This is largely Winsor and Newton inks on cartridge paper. I'm not unhappy with the result, but I'm pretty sure the guys at Little Big Man Studios aren't quaking in their boots quite yet! For future reference I would increase the size of the scrollwork around the sides and try to make that more contrasty. This after the effort I made to keep it small! The gold work is a gold gel pen, outlined with a Faber sepia ultra-fine graphic pen. The shading / highlight has worked reasonably well on the boar and on the banner tails, but the colour differences have disappeared a bit on the red.

I've got a couple more on the stocks at the moment but I'll refrain from scaring you with too much of my artwork for now.

Enjoy!

Tuesday 7 August 2012

Now it's all kicking off!

I've had a massive computer failure! Currently I can write and post stuff like this (cos I can do that anywhere), but anything requiring pictures, photos or scans is right out. Added to all of this joy is a total lack of access to all my soft copy resources. So, when I thought "Never mind, I'll look for some nice pictures to copy for the shields on those Saxon character figures and paint 'em", I then thought "Oh no I flaming well won't, cos all of that stuff is on the PC as pdf files!" Gah!

I'm getting back to a working position, re-installing more or less everything but it's hellishly slow - it took over FIVE HOURS for the Windows updates to sort themsleves out last night!

Oh well! Sassafrassarassum Windows failures!

Thursday 2 August 2012

Lots going on, just not here...

At a glance it might look like I'm not doing a fat lot at the moment. This isn't the case - it's just that none of it is on here!

I've got a bunch of Pictish skirmishers on the go, along with a re-model / repaint of most of my Pictish cavalry.

Saxon command and characters continue to progress as well.

The common theme with these is that I'm working on some artwork for the banners for these units. Now, I'm no great shakes with computer graphics packages, so I've gone the old-fashioned way. I'm drafting these on paper, then inking and painting them. The plan is to scan them, then shrink them to size. It's a lot easier doing knotwork and scrolls on an A4 size version than doing it on the final banner I can tell you!

The kicker is that my scanner is playing silly beggars at the moment. I would have liked to do some work in progress shots so you can see how it's going but that's a non-starter right now.

Monday 9 July 2012

Pictish Curragh, Part 2


OK, with a couple of sets of photocopied plans, it's time to get a start. To plunge-mould the hull, I'll need a master. Here goes!

First, I cut a nice piece of 20mm thick straight-grained timber a bit longer than the longest dimension of the hull, trying to avoid knots wherever possible.

 Timber blank, ready to go

Next, I glued a deck plan onto the top, and drilled two small holes, at a couple of marked points.

Blank with top plan in place

Where these points are doesn't matter, (I picked where the hull contour lines met the centre line) provided they're lined up on both bits of the plan. They allow you to line up the second bit of plan (glued to the bottom of the timber), by putting a couple of cocktail sticks through the timber, and spiking them through the corresponding points on the bottom plan. This has the effect of allowing you to ensure that critical things like the centre line of the hull are perpendicular.

Bottom plan, arrows show location pins

So, with the plans glued in place, it's time to rough out the hull. I used my scroll saw, as it's quick and easy, but a fret saw will serve. The first cuts are to form the outline - aim to just leave the line, so there's a little wood to work back to.

Cut in progress...

...And finished!

Next, using a sliding bevel on the plans, I set the table on the saw to allow me to rough out the hull sides. By setting this to the shallowest angle, there's no change of over-cutting the hull, especially if you stay well back from the gunwale area. You can miss out this step and go straight to carving, but it's easier to de-bulk the wood like this first if you can.

Set the angle...

...And make the cuts!

From a rough-cut hull, it was a case of working gradually with planes and spokeshaves to shape the hull. If the tools are sharp, it's pretty quick work. Doing it over a bin made cleaning up a doddle! Keep checking the hull shape, regularly. The sections drawn on the plans will act as a guide, but it must be symmetrical! The symmetry is much more important that the actual shape you get. Remember to keep doing this at all stages from now on.

Getting shipshape now.

I got to a point where I had to abandon the edged tools and go over to a rasp for final shaping and removing toolmarks.

 Now that's what I call rough!

Now, some sanding, to get a really smooth finish. The random orbit sander made short work of this. Every home should have one, and not just for modelmaking, either!

 A proper smoothie!

The more observant among you may have noticed above that I managed to gouge a deep notch in one side of the hull with the spokeshave. For the people who were making a cup of tea at the time, here's a replay, with the PM8 acting as pointer.

Oh dearie me!

Annoying, but not insurmountable. The best stuff for fixing these sorts of problems, I've found, is some sort of two-pack wood filler, like this one. Now, this stuff is at the obnoxious end of the scale as far as modelling materials go, particularly from a safety perspective. Both components are irritants, and it absolutely must be used in a well-ventilated area, or the fumes will whisk you away to Dingley Dell in no time flat!

The remedy for holes...

While I had some mixed it up, I also took the opportunity to fill a knot that wasn't apparent until I cut into the timber. The advantages of this stuff are that it doesn't shrink, it doesn't crumble and it's gone off ready to make progress on in about 15 minutes.

Problem solved!

A bit more sanding, and it was job done. This whole stage took about an hour overall, including the waiting time for the filler.

Job's a good 'un!

Enjoy!