Showing posts with label Modelmaking. Show all posts

Friday, 8 August 2014

Airfix 1/72 Scale Mersserschmitt BF109-E3a - Royal Yugoslav Air Force

Here's the latest build completed. It's another Airfix 109-E, but this time in the markings of the Royal Yugoslav Air Force.

The RYAF had bought about 70 Bf109's paid for with an exchange of minerals/metals. The Bf109E3a was the export version of the same E-3 the Germans flew. Apparently the Germans were less than forthcoming with spares etc, and provided an after-sales package that would have no chance of winning any sort of customer service awards anywhere.

The RYAF flew a selection of modern fighters and bombers at the start of the war, and was much stronger than (for example) the Belgian or Dutch Air Forces. However, they were outnumbered about eight to one on paper by the Axis forces, and in practice due to serviceability issues, the RYAF couldn't put their entire force into the air when the Germans attacked. Despite being short of spares, fuel and even machinegun ammunition, and lacking thecombat experience of their enemies, the Yugoslav pilots' morale was unaffected, and there were occassions when there were more aircrew wanting to fight than aircraft for them to fly.


Obviously this is not an out of the box build. The Airfix kit depicts an E-4 or E-7, which had a differently shaped canopy with a lighter frame, and (according to photos) no head armour for the pilot.


Here's obligatory shot of the cockpit before it got closed up. The detail provided by Airfix is pretty good, and once the canopy is closed, almost invisible, so there's little need to add much else. I went with straps on the rudder pedals (the seat has harness moulded on), trim wheels, throttle/mix levers and a seat adjustor from stretched sprue. The undercarriage legs/doors were hotted up with brake pipes added from fine wire.


The alternative canopy was a vacform from Pavla. I bought it on Ebay, as a pack with a second canopy from a 109-K - goodness knows when I'll use it! It was a very long time back when I last did anything involving vacforms, so I was a bit nervous starting this.


I followed the usual practice of carefully cutting out the part. Pavla mould the canopy including some pieces of rear fuselage and canopy, so it's easy to cut out the proper part, and probably it allows the canopy to fit on different manufacturers' kits. Sanding, checking, more sanding and more checking eventually gets the fit OK.

A little bit of filler around the canopy blends the join, but a little bit of sanding on the fuselage behind the canopy is necessary to deal with a slight width mismatch.


Once sanded, the canopy is a treat. It's very much thinner and clearer than the kit offering, and allows more of the cockpit to be seen. I drilled out the machinegun  and cannon barrels, and the exhausts which improves their look no end, and added a vertical reinforcement bar in the underwing radiators.


The paintwork was simple: RLM70 over RLM65, both out of the pot Tamiya acrylics which airbrush beautifully, followed by about three coats of gloss ahead of the decals.


The decals are from a company called Kora (set  7234). They are thin, flexible and in perfect register, but the white is a little bit thin over RLM70. They're absolutely fine over the RLM65, but if I had a do-over, I would underpaint the upper wing markings and the tail stripes in white. After this, it was another coat of gloss to seal and then detail painting. Guns, trim tabs, landing lights and the like were done with a brush, as was the panel line wash, using acrylic ink.


The wheels are resin extras that come in with the decals, and the detail is superb.


Here she is after the final addition of things like pitot tube, aileron balances and the radio aerial from stretched sprue, and a coat of matt to flat things down.


L-10 was part of the 142. Lovacka Eskadrila, from 32. Grupa at Krusedol airfield. Second Lieutenant Miodrag Aleksic flew the plane to score an aerial victory over a German Bf109-E (and at least one other kill) during the invasion in 1941.

Merry meet again!


Monday, 4 August 2014

Airfix 1/72 Scale Messerschmitt Bf109-E7/Trop

Here's a departure (or a return, if you like). My route to wargaming was via model aircraft. I can remember how it happened: my dad and I built an Airfix Junkers Ju88 - he built the fuselage with me watching to show me how, then I bodged up the wings! I carried on until my early twenties, picking up AFVs, figures and wargaming on the way. I dropped it around then, but got bitten by the bug again early this year. I suppose, like wargaming or some bacteria, it never really leaves you: it just lies dormant, and you can relapse at any time...

Well, here's my first completed build, Airfix's Messerschmitt Bf109-E7/Trop.

Cockpit detail as provided by Airfix is pretty good - vastly better that I remembered from the earlydays of a misshapen pilot sat on peg! I added straps on the rudder pedals from tape and trim wheels from stretched sprue. Here's a quick shot of the cockpit before closing up the fuselage.

Assembly is quick and easy, and the aircraft goes together without difficulty, and minimal filler! The kit includes the additional tropical dust filter for the supercharger.

Detail in the wheel wells is nice, and shows up nicely with a bit of washing and dry-brushing. The underfuselage drop tank fitment is one of the things that visibly makes this an E-7 rather than an E-4. I added the vertical strengtheners in the underwing radiators from stretched sprue.

I fitted the canopy at this stage, and it needed a touch of filler to makeit fit perfectly. After masking up, a quick coat of RLM02 will give the sense of the internal colour of the cockpit framing. 

Next thing was a coat of white primer from a spray can. My experience with miniatures makes me gravely suspicious of how well acrylics straight onto plastics will last!

I masked the wheel wells with cotton wool, then blew on a coat of RLM78, mixed from Tamiya acrylics. I had a try out with Humbrol's aircraft acrylics and had a total disaster. I couldn't get on with them at all, and 
 came close to abandoning the airbrush. Luckily, Tamiya paints thin perfectly and spray effortlessly.

The RLM79, againmixed from Tamiya, went on next. The high demarkation line was normal.

The RLM80 mottle was sprayed by finding a "skin" from a videogame, and after printing it off to scale, using it to cut a set of masks or friskets. I put on a couple of coats of Kleer to give smooth surface for the decals, and also to give an easy-clean surface to go with detail painting.

I sprayed in the white fuselage band, then added the decals. These are Airfix's out of the box offering, an aircraft of the legendary JG27. There is an alternative in the form of a Bulgarian Air Force 109-E4, in dark green over light blue, with extensive yellow trims, which also looks pretty nice. The decals are easy to apply. They didn't silver, except in a couple of barely noticeable stencils. Propellor, spinner, guns etc were hand-painted and added as late as possible, to avoid breakage.

The very last pieces were added at the very end: the radio mast and aerial, aileron balances and pitot. Here's an effort at an "in action" shot.

The last shot is an effort at a sepia-toned versionThis aircraft, Schwartze 8, is sometimes described as the mount of Leutnant Werner Schroer, the famous Luftwaffe Expert who was Hans-Joachim Marseille's commanding officer. Although Schroer did fly Schwatze 8, it was literally only a couple of times, and the regular pilot was a chap called Franz Elles.

Franz Elles began operations in 1940 with 1 Staffel, I./JG-27 and saw action during the battle of Britain under the command of Edu Neumann. Transferred in early 1941 with I./JG-27 to North Africa, he flew as wingman to the famous Knights Cross holder Karl-Wolfgang Redlich. Elles amassed five "kills", four Hurricanes and a Douglas Boston. Elles was shot down, defending his leader's tail in a close air combat with P-40s on 11 December 1941, 40 km SE of Ain-el-Gazala. He was flying Bf 109F-4/Trop WNr.8537, "Rote 9" of 2./JG 27. He spent the remainder of the war as a POW in Canada. After the war, he joined the German diplomatic service and rose to become German Ambassador to the Central African Republic.

Merry meet again!


Saturday, 22 March 2014

Measuring in SAGA 2

On page 7 of the main rulebook, it clearly states "real warriors prefer steel". Not wishing to be thought of as less than a real warrior, I obviously started cutting metal!

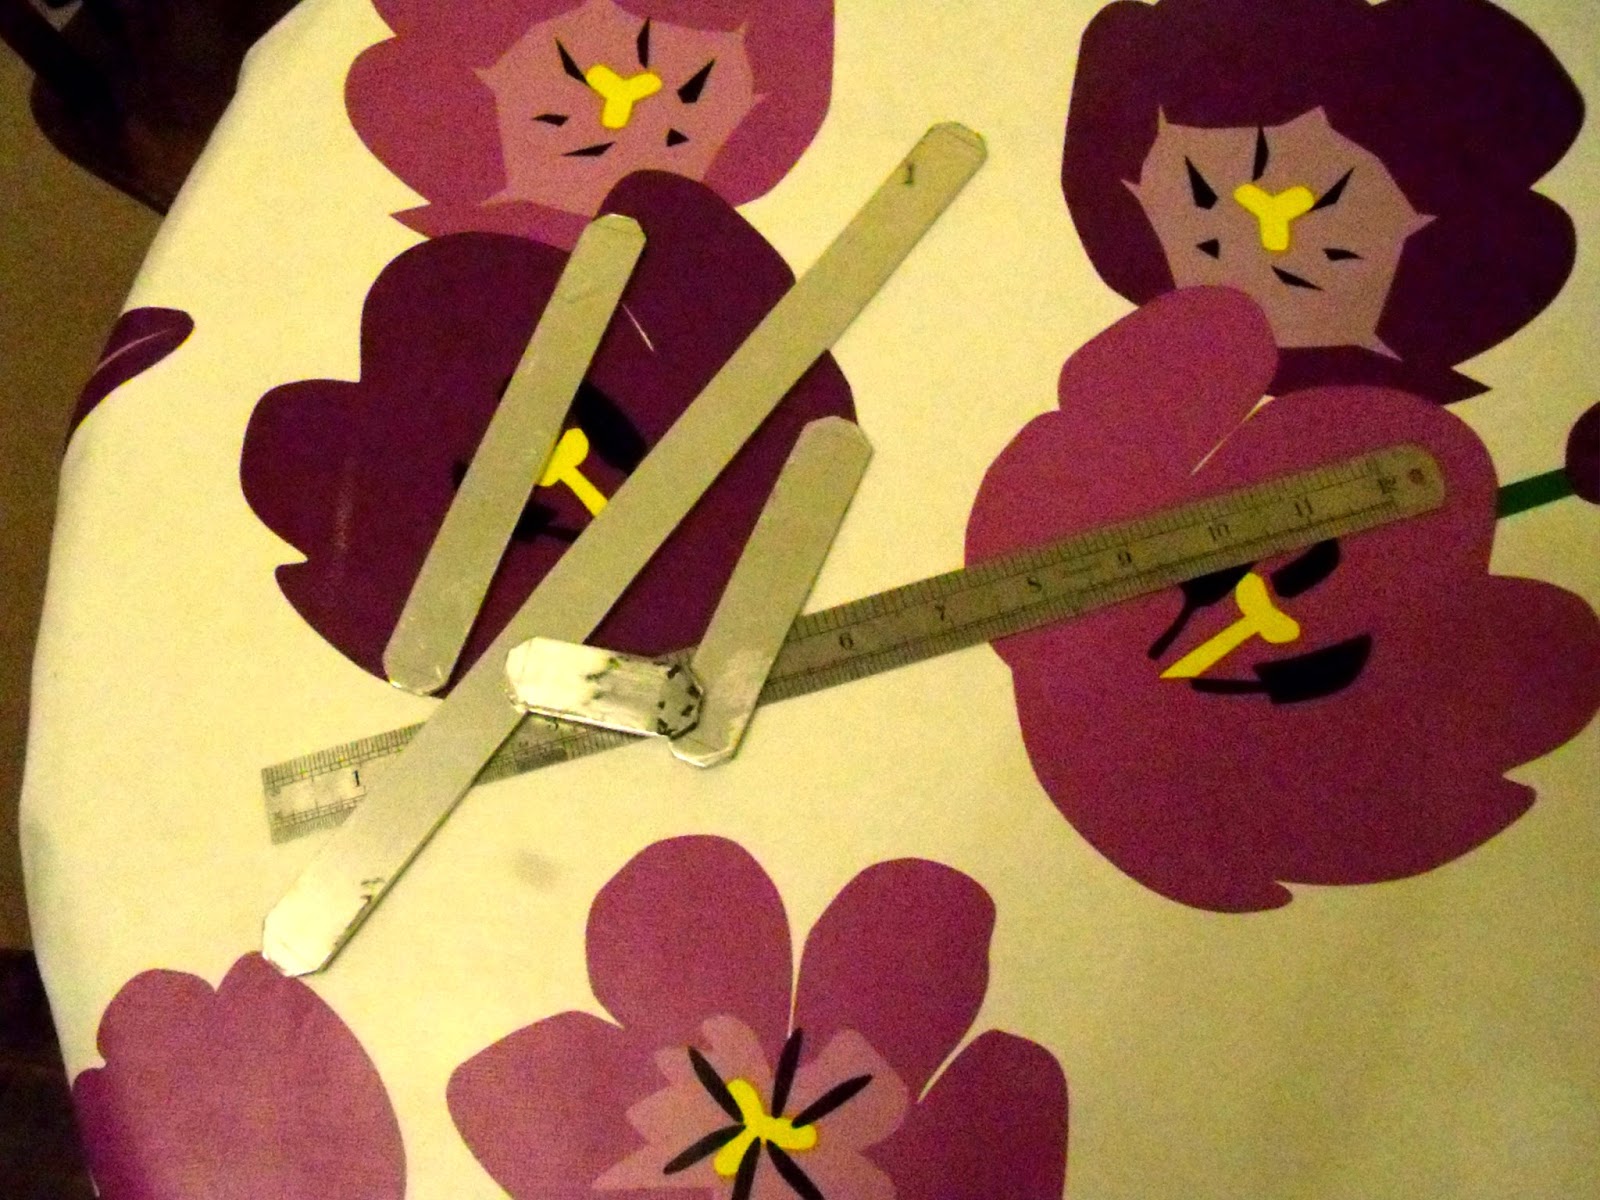
My intended raw material was recycled metal cargo strap. However, nylon seems to have replaced it totally. One possibility was cutting long strips from a sheet but I decided it was too much grief, so I had to put my hand in my pocket and buy a strip of metal. Unfortunately all I could get was aluminium. Now, someone is going to mutter how this is lightweight (well, it is) and not suitable for a "true" warrior. Anyone who subscribes to this view can be disabused of it rapidly by having the "Long" measuring stick jammed smartly up their nose, followed by twisting it round and round a few times. Aluminium or not, it'll bring tears to their eyes, guaranteed. Even Ragnar from the rulebooks could be brought round this way!

I formed the finished sticks by carefully cutting to length, then marked out a mitre on each corner. About five seconds on the bench grinder mitres everything beautifully. All the edges were thoroughly de-burred at this stage, because even real warriors find great lumps of razor-sharp swarf in their fingers detracts from their enjoyment of the game!

 Still haven't tidied up much!

I toyed with the idea of chemically etching designs into the sticks. I've done this before on steel items and got good results, but aluminium is funny stuff, what with oxide coatings and such, and I wasn't sure how well I could get it to work. Engraving was my next idea.


Pondering what to do next

The results at this stage look far from promising: grotty, grubby loooking bits of metal with no appeal. I decided on a Viking raven design, but struggled with transferring it onto the metal to scribe it in. Carbon paper didn't work and the design was too small to use a pounce wheel. I decided I had to print off the design in decal form, then engrave.


Yuck!

At this point I started adding the decals, ready to engrave the designs, but as soon as I put one on, I had a sudden change of heart. The decals really popped against the metal, so I quickly printed off another one, and decided it was time for a little bit of magic: the buffing wheel on the bench grinder!


Filthy job!

 Once the pieces were buffed on a cotton wheel, first with grey soap to take off the worst of the gnarls, then finished with pink soap, I added the decals, followed by two coats of laquer to prevent tarnish and fingermarks. This is what you get. Job done!


Shiny!

All ready to use now. Merry meet again!

Monday, 17 March 2014

Measuring in SAGA

Most wargames call for some sort of measurement and SAGA is no different. However, where SAGA does diverge a bit is that there are only four measured distances, called (imaginatively enough) Long, Medium, Short and Very Short. The old reliable tape measure will of course deliver, but for speed and simplicity, measuring sticks are prefered in the game.

There are a number of ways you can proceed. The rulebook contains templates for measuring sticks, which are also available on the SAGA forum. Printing/copying these, cutting them out and sticking them to cardboard will give functional, if rather flimsy and short-lived measuring sticks. If you are time-poor, or not handy with making things, a number of companies will sell you a set of MDF ones, in many cases laser-cut with nice faction designs on them. Or you could make you own.

Of course, I made my own.

These, quick and easy, came out of a strip of hardwood bullnose moulding. The length (enough for several sets) came from a DIY store for a couple of quid. Just to prove I can do it, this was strictly a hand tools job. I marked off the lengths, cut them on a mitre box, then gave the ends a  light chamfer with a block plane. Some sanding (carefully, so as not to alter the length!) and it's job done. Fifteen minutes, end to end.

Excuse my mess!


They can be painted, waxed, varnished, engraved, tarted up with decals or marked with poker work (or any combination thereof!). I went with decals, with length symbols from the furthark and Aniron fonts, plus a couple of boars. Looking for other potential markings was the dodgiest bit of all. Surf the net for Saxon or even "English" symbols and it seems as if you're only ever one click away from some extremely unpleasant and unrighteous content! Those of you doing this on company computers - beware.

Spray booth is looking tatty - give it another coat!

Three sprayed coats of laquer was fine on the decals, but it was soon obvious it would need about thirty to make any difference on the wood, so I brushed on one coat of yacht varnish that sorted everything out. You need a nice glossy varnished surface to apply the decals over (old scale modeller's trick!).

 Ready to go!

 Here they are with the decals in place, and a couple of furhther coats of varnish to protect them from rough handling and aggression (by players or miniatures!)


Sorry lads, better luck next turn!

So here we are, demonstrating to the Anglo-Saxons hearthguard that they are just barely out of range to mash the Scots warriors - or have a go, anyway.

Merry Meet Again!


Thursday, 13 March 2014

Yan Tyan Tethera - Strathclyde Welsh Cavalry

“Yan tyan tethera” means “one two three”, in the Cumbric language once spoken across a wide tract of the north-west of England and south-west Scotland. The language now survives in some place names, and a few vestigial bits of dialect like this, used by farmers to count.

This was the language of a country, variously called Ystrad Clud or Alclud, Rheged or Strathcylde, that once stretched from Loch Lomond in the north to Rochdale in the south.

This part of Britain is generally not a soft, comfortable landscape. Anyone who has not visited it can get a fantastically evocative and extremely accurate view of it by reading George MacDonald Fraser's excellent "The Steel Bonnets". Whilst the main subject of this book is the later Border Reivers, the geography that forms the backdrop is unchanged. Much of the country is bleak, formed of bare, stony fells and harsh-carved hills. In many other, gentler, parts there is only a thin layer of poor soil laying over the same rocks just below. Outside of the coastal plains, this makes for poor farmland, hard to plough and harvest. If it is hard to plough now, how much harder would it have been with an ox-drawn ard plough? The land does, however, provide adequate grazing, for cattle lower down, and tough sheep on the higher slopes.

This hard land has always bred hard people. Apart from Cornwall, this was the last part of England that retained its Celtic language. Long before the Angles arrived, the people of Strathclyde had already spent centuries fighting off the Picts and Scoti, and having resisted them quite successfully they went on to resist Northumbrian dominance longer than anywhere else in the North. The northernmost part remained a semi-autonomous area even later, allied to but separate from, the Kingdom of Scotland. 

Referred to in Saga as “Strathclyde Welsh”, these men, used to a mobile life following their herds, fight mainly as cavalry. Riding men, armed with spears and raiding indiscriminately, were of course a feature of this area even later. In a sense, these cavalry seem the direct ancestors of the later Border Reivers.

Here are the first of my Strathclyde cavalry warriors. These are all built using Wargames Factory Ancient Germanic Cavalry, with some weapon arms taken from Gripping Beast Dark Age Warriors, and a selection of GB Saxon thegn and West Wind Sub-Roman heads.

The only, very slight, issue is that the men with the shield arm held close to the body are problematic in terms of what shields to use. These figures are obviously designed to work with the elongated hexagonal shields in the kit, and the round shields simply do not fit convincingly, and nor did any others that I had in the spares box. A quick measure up gave me a figure for the maximum diameter I could use. A swift rifle through the workshop turned up a length of steel tube of this diameter, which was sharpened to make a disc punch. I used this to chop out a series of discs from a sheet of planked plastic card. A bead of thick cyanoacrylate added around the circumference, allowed to dry and sanded slightly flat formed the shield rim, and the boss was a small disc of plastic card, punched out, with a drop of CA in the centre. Lovely!

In order to get these finished, I built the horses "out of the box". The next ones will get a little more work, to make them more like Fell ponies. It won't be a lot - WF have done a good job with the sculpting, so a bit of feathering on the hooves and a longer mane will do it.

This first set are conveniently numbered yan tyan tethera (from left to right). Yan has a GB Saxon head and upright spear arm, tyan has a West Wind Sub-Roman head, while tethera has GB head. In the last two, the arms ars from the original kit.

Yan, tyan, tethera... 

A 28mm cavalry figure on the table for just over a pound is a really bargain, and with the tiny bit of work I've done I'd say these stand up well against figures I've paid a good deal more for. For those prepared to make the small changes required, I would recommend these without hesitation. As well asSaga, these will give good service as British light cavalry in Dux Brit or Dux Bell, which makes them even better value.

And again!


Comparisons are sometimes helpful, so here's one for you. From left to right we have a  Gripping Beast late Roman on a Conquest horse,  the three WF Strathclyde Welsh and a Newline Design Pict,.


Unlikely looking allies!

Here they are again, side on. I don't know if this matchup is any more plausible!

Let's do it!

Merry meet again!

Saturday, 22 February 2014

Wagons Roll! Part 3, Beasts and Men

With the wagons assembled, it's time to make them mobile.

Here are the yokes, with the cattle. The yokes were made by laminating two layers of 40 thou styrene sheet and filing/carving out the shape. Two pairs of holes were drilled, and neck holder were made up from soft wire to fix the oxen to the yoke. The yoke was attached to the shaft with a chain on the real thing.


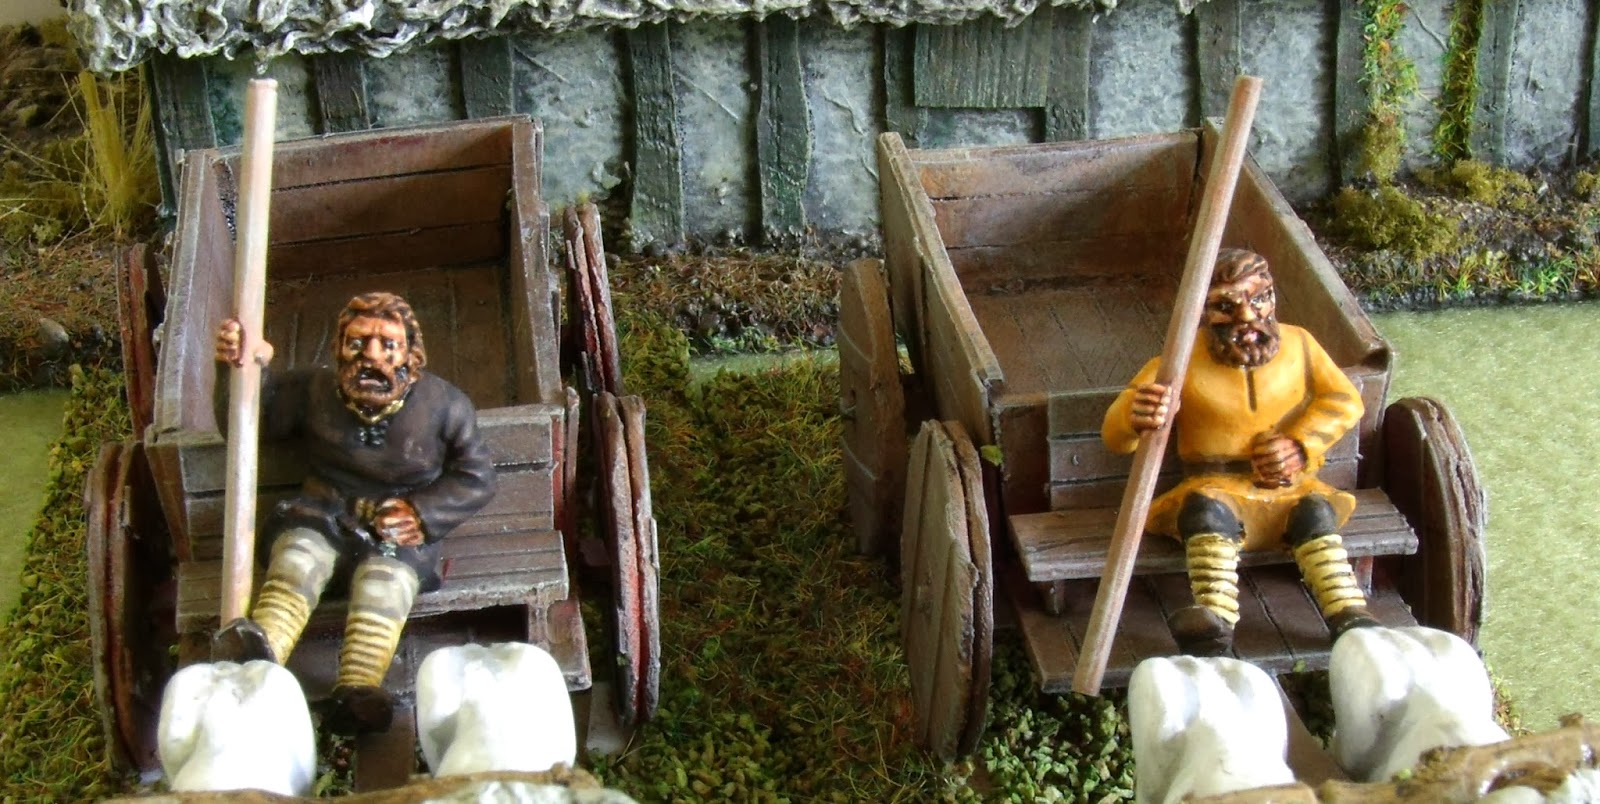
One final thing. A two-wheeled cart is normally "driven" by having someone walk alongside the ox and guide it. A four-wheeler actually needs someone sitting on the seat yelling and using a stick. My drivers were converted from Gripping Beast Dark Age warriors. These two photos show the original figures and how the changes will be done.


These next two show the results of the cutting and grinding. I've put them on the carts to make sure they fit. It's a trial and error process.


Here are both drivers, assembled, green-stuffed to bung up the gaps/re-texture where necessary, and given a coat of primer. 


So, here's the two wagons, painted, hitched and based, just awaiting their drivers. The basework is some flock from Treemendus. It's fantastic stuff, totally awesome to work with, totally different to the "normal" flock I'm used to. Highly recommended.


After getting the drivers painted and mounted up, all I needed was a bit of static grass to get them on the table. Here's a quick closeup of the drivers. I think the conversions have worked well enough.

Rough looking pair! 

So, time for a couple of shots of the finished articles. These two, with the two-wheeler I built here, give me enough transport for the wagon train scenarios in both the Dux Brit and Saga rulebooks. Tons of fun!


Like Arthurian Britain's answer to Eddie Stobart!

Merry meet again!


Thursday, 13 February 2014

Wargames Factory Ancient German Cavalry

I want a Strathclyde force for Saga. This is a very largely mounted force, and putting about thirty horsemen on the table can be an expensive option, so I looked around for ideas to build this force economically. I can convince myself that there is some versatility in this force by using it as reinforcements for Dux Brit (whether as British or Saxon core units, or as Germanic mercenaries).

I liked the look of Wargames Factory’s Ancient German Cavalry as the source for these troops. Twelve in a pack for about fifteen quid (at the time) was good value, and fully dressed (tunics and trousers) make them suitable for converting to other things.

I’d heard very bad things about WF’s products, so I was loath to buy these sight unseen. At Vapnartak I was able to pick up and look over a pack before I put my hand in my pocket and although you can’t do a complete review under these conditions, I was happy to take a punt.
You get eight sprues in a pack, four each of horses and riders, with three figures per sprue.

First, the horses. These are kitted in halves, with separate heads. You get three sets of bodies and four heads on a sprue, so the potential for variations is very large. Anatomically, I am happy with the models. Positions, poses and musculature all look OK, and the eyes are in the right place! These seem to be based on a shorter-legged, heavier-boned, more barrel-chested animal than Conquest Miniatures plastic horses. I’m pleased about this.

Horse sprue, front

Horse sprue, rear

The heavy-limbed "pony" phenotype is much more appropriate for Dark Age/Early Medieval context that the more improved breeds that Conquest use. Assembly is simple, and although the fit of parts is imperfect, it’s as good as that I’ve found with either Conquest or Warlord horses. The horses are modelled with simple bridles, a single girth and fore and aft saddle straps, of the type seen on reconstructions of the four-horn saddles associated with Roman and post-Roman cavalry in the pre-stirrup era. The saddles (on the figure sprues) fit extremely well onto the mounts.

The riders are kitted as bodies with the shield arm moulded in place, with separate weapon arms and heads. First of all, the riders fit beautifully onto the horses without lots of cutting and grinding (which is a novelty!). The figures are of a slighter build than GB plastics (or metals!) but are perfectly fine, close in shape to MDS Picts.


Rider sprue, front


Rider sprue, rear

Each sprue has three bodies, six weapon arms and NINE heads! Four have their hair in versions of the Suebian knot, one has an Imperial Roman-style helm, and the remaining four are generic beardies suitable for a wide variety of end uses. The sprue carries three short spears, which are useful, swords and knives which can be adapted (they are too early in style for my purposes as they are), two round shields and two hexagonal ones, the former great, the latter for the spares box, plus a horn and a horse skull standard!

Despite the slight dimensional differences between WF and GB plastics, GB heads seem to work with these figures to add some additional variety or to up-armour your riders with helms. The only issue is that GB put the socket for the join on the head, WF put it on the body, so a bit of work is needed to bridge this. I used a bit of scrap sprue.

A few dry fits suggest that weapon arms from GB Dark Ages Warriors will match up, immediately giving a further source of weapons and even more variation.

Casting quality is good, and the plastic is a nice, soft grade (less brittle than Renedra use for the GB figures) which is very easy to work with. Fit of parts varies - issues with the horse body halves are noted above, but the riders go together seamlessly. Cleanup is quick and easy - limited mould lines and no flash anywhere.

The sculpting is generally good. I like the folds in the clothing but some small details (hair, fingers,eyes) are quite "soft". However, I think it's fair to point out that many metal miniatures I've worked on suffer just as badly, but that anyone expecting Musketeer Miniatures quality is going to be sadly disappointed.

Here's one example I've put together quickly. He will need a little bit of greenstuff to sort out the head/body joint, and the filler on the horse sanded down (obviously!) but I think it shows the principle.

 Works for me

I'll post again once I've got some painted up. In the main, I would say I'm happy with these. They are perfectly capable of putting the force I want on the table at a very reasonably price, and I reckon they will look the business when they do. These don't fall out of the box and assemble themselves - they need a bit of work, but I like that work!

Merry meet again!