Showing posts with label general. Show all posts

Saturday, 21 June 2014

Summer Solstice


Greetings to all on the Solstice,
May the blessings of the Lord and Lady be with you,
And good cheer accompany you.

To the Oak King, farewell and thanks for the bounty of summer.

To the Holly King, greeting and blessings for this half of the year.

Merry meet, 
Merry part,
Merry meet again.

Blessed be!

Thursday, 1 May 2014

Beltane Blessing


Blessed be this day of Beltane,

Wedding day of the Goddess and the God.
Holy day of Sacred Marriage,
Holy night of Sacred Union.


My blessings I give to all of thee,

and thy blessings I call from thee upon me.
So as I will, So Mote It Be!

Friday, 14 March 2014

Good News Day

First of all, Bors was well received by his new owner. Not a big gift, but given with heartfelt thanks for the help he has given me.

Second, I've passed the milestone of 75,000 hits on this blog. Many, many thanks to anyone who reads and comments.

Merry Meet Again!

Sunday, 2 February 2014

Vapnartak 2014

This year's was a great show. More traders, more demo games, more participation games. The fact it was a better day weather-wise probably didn't hurt, as the place was absolutely rammed.

The York Club had marked out the parking area very thoroughly - which was just as well as the recent rain had turned the parking area into a swamp. More like quagmire than Knavesmire!

I managed to get a few photos of some of the downstairs games. My camera went phut before I got to the competition games upstairs, but the standard was incredibly high. The money positively flew out of my pocket, as per usual, with orders from Gripping Beast and Warbases, plus a buy-up with Irregular, Caliver, Treemendus and others.

These chaps are here every year. More a diorama than a game, but a fantastic display.


 This is the Medieval Jousting demo/participation game, run by Curtey's Miniatures. Fantastic.


Yorkshire Renegades' Modern Day Afghanistan was beautifully laid out, and drew a great crowd.


The Ilkley Lads put on a Tomahawks and Muskets game. This was a 40mm show. The added details in such a large scale are really quite something.


 Falkirk Wargames Club ran this huge Dark Ages game, "The Slaughter of the Danes, Cruden 1012". Big table, loads of figures, and using a home-brewed set of rules based on Basic Impetus, fast moving and eye-catching.


For something different, Border Reivers' "Battle of Trafalgar Square 1984" was splendidly off the wall, and fantastically presented.


The League of Extraordinary Kriegspielers' efforts are always worth seeking out, and this year was no exception. "Battlefield 1922, Wake Island" had so much going on it would have been worth an hour watching them alone.


Another splendidly off the wall game was this one from The Bunker. War of the Worlds, complete with fantastic fighting machines. You could practically hear Richard Burton's voice as you watched.


Couldn't work out who was running this breathtaking WW1 game, but hats off to them. Even though I have no interest in the period, I was hooked.


For sheer size, the Leicester Phat Cats Yom Kippur took some beating, and so were the Syrian forces on this side of the table!


And here's Daz from Gripping Beast, showing that if you get 'em young, you've got 'em for life!

Merry Meet Again!

Saturday, 18 January 2014

Hedges, to mark edges...

Hedges are great. Ideal as markers, cover or edges on the battlefield.

Now, I don't mean privet or box or anything lightweight like that. I mean a proper hedge. Hawthorn, or better yet, blackthorn. These hedges, if they are carefully maintained and trimmed,  every few years, can be "laid". This is a process where thicker vertical stems are cut partway through, then pushed over at an angle to provide an interlocking wall of growth, going horizontal and vertical.

Basically, you can't force your way through a well-laid hedge with anything much smaller than a decent sized tractor. And climbing over it isn't recommended either. The thorns will cut you to ribbons (with the added attraction that if it's blackthorn, the cuts inevitably seem to fester - yuck!). It's like a barbed wire entanglement - just more attractive to wildlife and much nicer to look at!

There seems to be evidence of deliberate hedging and hedge laying in the British Isles going back to the Bronze Age, so a set of hedges is a useful addition to a battlefield in any era. Over that time, different styles have devloped, in response to different requirements (to mark a boundary, or retain sheep as opposed to cattle for instance) and variations in climate. So it is possible you could get a hedging expert who will tell you your Yorkshire-style hedge has no place on a southern battlefield, but I'm prepared to take the risk!

I prepared my MDF strips by champering the edges:

 Six inch and four inch sections

Then added a thin coat of caulk to give some semblance of unevenness.

Some texture

And gave them a coat of brown emulsion mixed with sand and PVA.

Very earthy!

 This is a block of rubberized horsehair (from the nice chaps at Treemendus), to form the body of the hedge sections.

Funny old stuff!

The next thing is to cut the horsehair to size. Having tried (very sharp) scissors and (ditto) scalpels of varying sizes, I can't really decide what's the best tool for this. They all seem to struggle! Anyway, strips need to be about 20-25mm high by 10-12mm thick. A hedge this size is proof against most things except tanks. You can leave the top flattish, or straggly and tapered, depending on how well-maintained you want the hedge to look. Glue the horsehair down. I use impact adhesive. In theory, you could use them like this for winter-set games.

 Bare and cold-looking - Brrr!

Once all is dry, give the hedge a spray with diluted PVA glue from an atomiser bottle. If you don't have one, get one. Three bits of advice: firstly, clean it out carefully after use as any glue in the nozzle will block it; secondly, don't pinch it from your daughter or wife as this may dramatically reduce your life expectancy, thirdly, filter what you spray through it - this will extend the life of your atomiser. Sprinkle with an appropriate hedgerow mix (mine comes from Treemendus, and I think is better that other brands I've tried) and allow to dry. Once dry, I repeated the process on two of the sections, to give a sense that some bits of the hedge are desner than others (as per reality!). Finally, I gave them another coat of dilute PVA to seal everything in, and allowed them to dry again.

All covered in foliage - feeling warmer already!

Carry out your normal approach to groundwork on the bases, and varnish to taste. My experience is that these hedge sections are significantly less robust than fencing, and so benefit from being stored carefully - i.e. not under a Sub-Roman church!

 Finished, with groundwork.

Here they are, in use. First with some Saxons carefully picking a way through. Carefully because you never know what might be the other side.


Carefully does it!

And here, with my ECW dragoons. The native environment of dragoons is, of course, lurking in place like this to make life uncomfortable for other people. This, therefore is a good test of the suitability of the hedge sections!

Ideal for an ambush!

Merry Meet Again!

Saturday, 21 December 2013

Greetings on the Solstice


At the departure of the Holly King,
And on the arrival of the Oak King,
May good fortune and happiness be yours.

Merry meet,
Merry part,
Merry meet again.

Blessed be.

Thursday, 24 October 2013

Fields of Crops, Quick and Cheap!


Want some very quick terrain? Try this.

Get a coir fibre mat to represent growing crops (cereals, mostly). I bought a short pile (20mm) version from my local “if we don’t sell it, you probably don’t need it” farmers’ stores, for the princely cost of about four quid.

Then you cut it into appropriately sized rectangles with a big knife.

And that’s it.

I suppose I should wipe my feet!

If you want a bit more, a simple variation is to cut out a section in the middle of the piece, so that it looks like any troops in the field are standing in the crops, not floating in mid air. A word of advice. Trim a piece off each side of the inner piece. That way it's easy to get in and out. The off-cuts could be used to make narrow, but (in my opinion) totally unconvincing hedges.

Dense enough to hide in - but is it realistic?

There’s a school of thought that says that coir matting doesn’t look like a cereal crop field, and I can see why, especially if you just do the above - cut off lumps of it and plop it down on the table. So, invest a fraction of the time it would take to make another terrain piece and ginger it up a bit!

The colour tends to be a bit dark, but I’ve seen plenty of old, weathered barley crops that look that colour, and if it’s a big deal there’s always drybrushing.

Another argument is that as it is, it’s too dense. I got around this by carefully setting my table saw to cut less than the depth of the pile of the mat, then running the section through to produce parallel rows of stalks. This took a long time, as the single-kerf blade took several passes to cut each row. Norm Abram’s stack head dado cutter would have done it in no time! Oh, and the mess it creates is breathtaking! Then, trim it short around the edges, and add a bit of flock/static grass/clump foliage there, to represent the weedy bits on the headlands of fields. Lovely!

Miles more authentic, this one!

Here's the same piece, with the centre cut out.

Take a stand in the middle of a field!

Here's a close up. These ruffians are the first btach of Pictish raiders, with an armoured noble to try to keep some semblance of order among them. Good luck with that...


Right lads, here we go...

Merry meet again!


Sunday, 6 October 2013

Building A Gaming Table

There have been a few discussions over on Lead Adventurer’s Forum about building gaming tables. Much as I would love to have a dedicated table, there isn’t a cat in hell’s chance of that happening, so I need something portable, collapsible and because it's me, cheap.

I went with 9mm MDF – reasonably light, and inexpensive. The sheet cost £15, and B&Q cut it into quarters more me on their big saw. I could have cut it myself, but to be honest how am I going to get a 8’x4’ sheet home intact in a Ford Ka!

 So, I’m left with four pieces of MDF, each 4’x2’, that are reasonably easy to handle and store and also drop nicely onto my dining table to make a 6’x4’ surface. Now, MDF will warp, especially when you lean it against the wall to store it. 

Sheet material in easy-to-handle bits.

So, to prevent this, I added a timber framework. I bought several lengths of 25mm square PSE (planed square edge) timber. I took my time and picked out a selection that were straight, had nice clean grain and were as knot-free as possible. Despite this, even with sharp tools it spelched like hell when it was cut and drilled - horrible stuff!

Ready for a frame up

I cut the pieces to length, and added them to the sheets. Two long pieces, and then once these had dried, four shorter cross members. The timber was glued to the MDF with Gorilla Glue and clamped.

Basic joinery.


I reinforced the joints with brads (probably unnecessarily), toenailing them in. The pencil mark is a guide.

Nail 'em up, I say!


The cross members were fixed to the long pieces with screws. I used these drywall screws, because the application doesn’t need to be over-sturdy, they’re nice and thin (and so less likely to split the end grain), I had about 500 of them lying around and I’m too tight-fisted to buy anything else!

Does the job!


The final step was to drill a set of holes into the long cross members. These were carefully measured and positioned, so they line up neatly. This allows me to put a small bolt into place to hold all three pieces together once they’re in situ.

Holes!


This is probably overkill if I use the sections on my dining table, but if I’m using (say) a set of trestles or sawhorses, it might be very helpful.


M6 Coach bolts do the job!

Just to prove it lines up, here's a shot of the working surface with the bolts in place.

Flat as you like!

Total cost, under £28, and it can all be done with hand tools. Power tools make it quicker and easier but aren’t actually a requirement here. The work took about four hours in total, in four short bursts of an hour or so each.

As far as it goes, this is the end of the "build" as such. I'm not going to bother colouring the surface or adding any detail. No matter what I do in that way it isn't going to be universally applicable, and in the interest of "future proofing" the project, it's isn't worth trying. I can make up a playing surface using felt, card or even fleece blanket in suitable colours for different environments, and store these separately. It's easier (for me at least) just to have a flat surface I can move and store easily, and keep the terrain and environment as add-ons. Of course if you wanted, a coat of suitable paint would be an ideal starting point. Just remember to prime your MDF with PVA first, unless you have a bottomless paint pot!

Merry meet again!

Thursday, 3 October 2013

One Hundred Followers!

I've got 100 followers! I never thought there would be 100 people interested enough to come and read what I'm writing, never mind come back regularly enough to actually be followers!

I want extend my sincere thanks to everyone who reads and comments. Please keep coming back - I'm glad you are enjoying it!

Merry meet again.

Monday, 23 September 2013

Wagons Roll! Part 1, Two-Wheel Cart

Wagons were essentially the only form of inland transport in Britain until the development of the railways and canals, and in point of fact continued to be significant right up until the twentieth century. Wagons are therefore great for adding colour and interest to battlefields across a vast swath of time. Design obviously changed over time, but these are typical for the early medieval period.

Hot on the heels of Paul's wagon build here, I started this one. Actually I was palnning this ahead of Paul's post, to fit in with the Dux Brit wagon train raid scenarios.

The wagon dimensions are fairly crudely done, without plans or drawings or any very formal structure. One oneline source gave me a measurement for Roman wagon wheels (about 1000-1200mm). Drawings of Roman two-wheeled wagons then gave me a set of proportions I could use: length of the body about two wheel diameters; depth of the body about half a wheel diamter and so on.

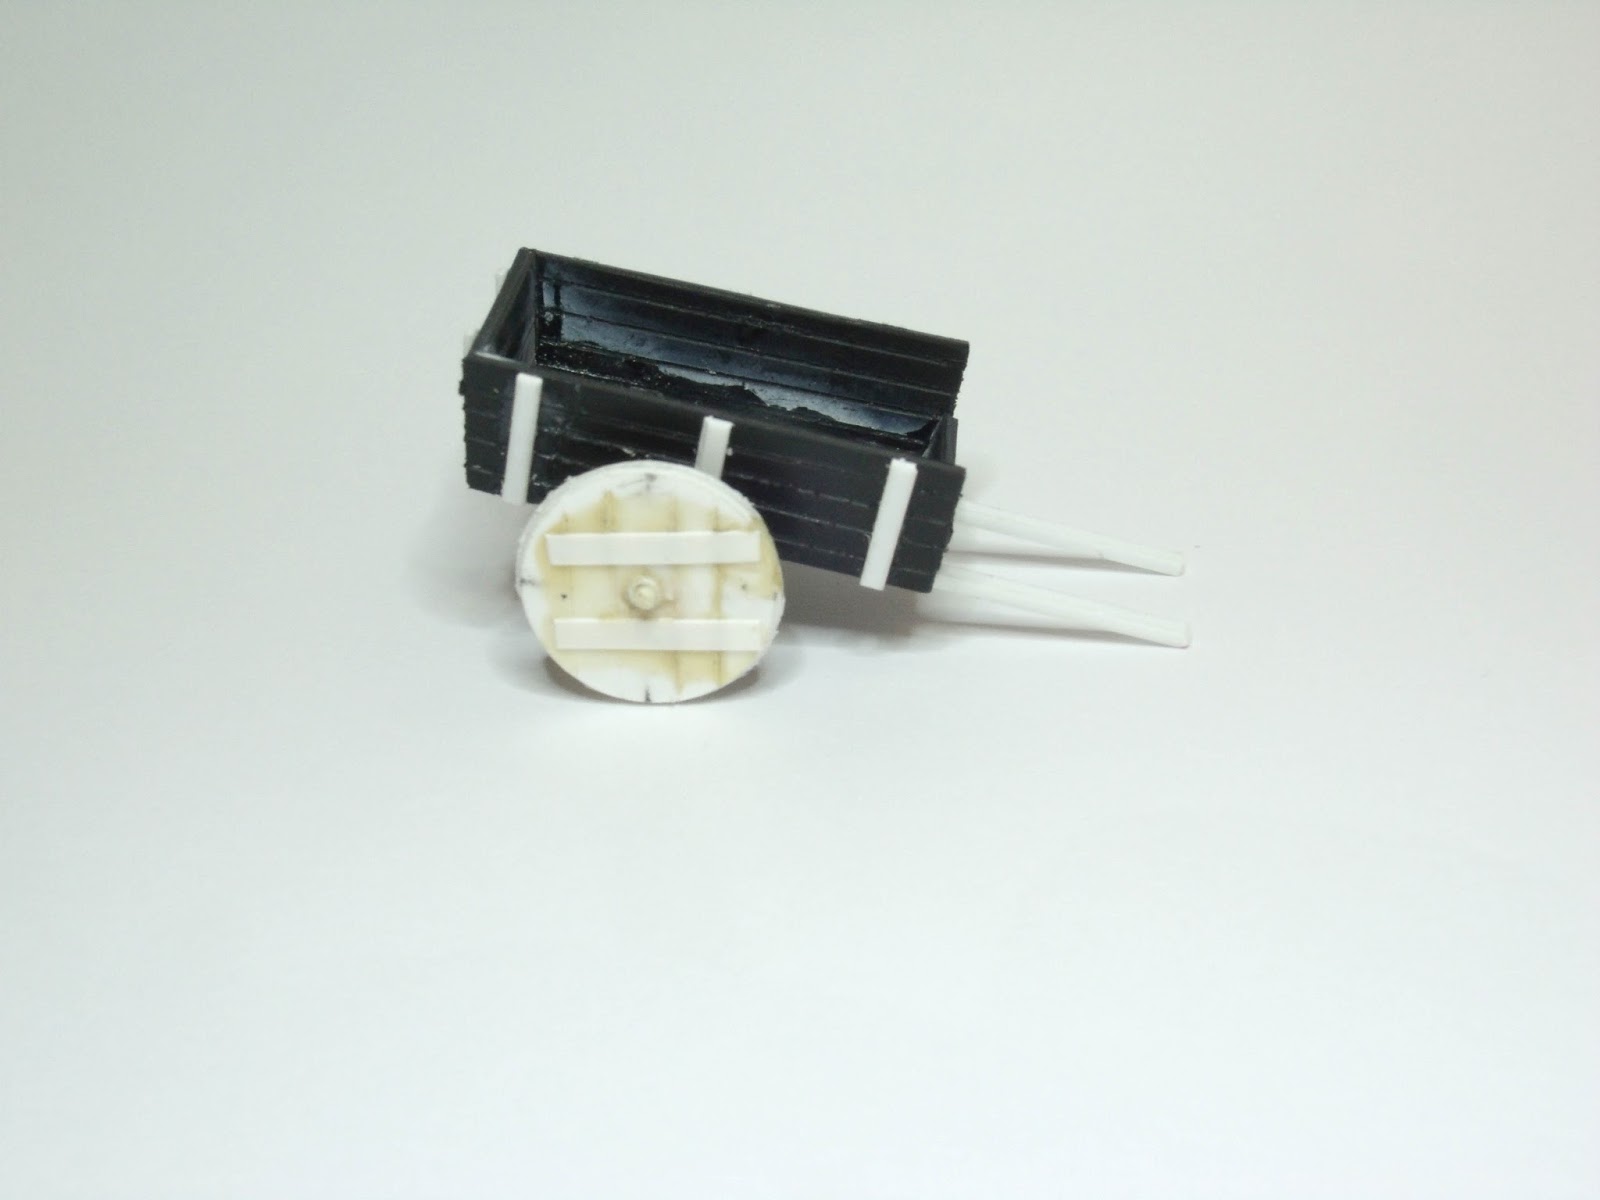
This is the body - the box is made up of five pieces of 60 thou plastic card, with plank detail engraved with  a scriber and wire brush. The reinforcers are 40 thou card. The axle box is laminated from several thicknesses and drilled for the axles.


Here's another view, down into the body. The whitish stains are from cyanoacrylate vapour - just like CSI!


The wheels are simple discs. The Romans, Saxons and Vikings built spoked wheels, but these then disappeared from Britain for different periods. These very crude wheels, without iron tyres, represent a low point in British vehicle design and contruction not matched until the Austin Allegro in the 1970's! Two layers of 30 thou card, cut with a hole saw, are scribed for detail and sandwiched back to back with the plank detail at roughly 90 degrees on the two sides. I added bushings from plastic tube, and the plastic rod will form the axle itself.

The axle stubs got glued in place, followed by the wheels. The bushings and axles were trimmed, and some details added to the ends to represent the pins holding the wheels in place.


Since this wagon will be drawn by a single animal, there are two shafts, parallel, sticking straight out in front. In this case, I'll be using my Dark Age cattle. I carefully measured the width of the animals' bodies and the length required to reach the shoulders before adding any glue. Here it is, on its wheels, ready to be loaded and moved. Or nearly... Note there's no seat. You might rest your behind on a box or rolled cloak to sit and drive, or (perhaps more likely), lead /guide the beast as you walk beside the wagon


This piccy shows how the wagon looks next to the draft ox. Now, you could go with a complex harness, as close as possibleto what might have been used in real life. This has to be balanced against the need to be able to removed so the cattle can be used separately. So I went with the simplest possible harness - a single strap over the back, made from metalised plastic.


The basing was slightly tricky, as it had to be shaped to allow the pre-based ox to be in the correct position, account for the thickness of the bases, and allow me to use both ox and wagon separately when required. I came up with what I thought was quite a cunning solution.

I roughly cut and chamfered a piece of MDF, then drilled a suitably sized hole partway through it with a Forstner bit. 


Next, I carefully aligned the the cart with the based ox in place, checked it twice, then glued the cart in place. Then removed the ox, so that works, at least.


A bit of caulk here and there on the base, and some sharp sand was followed by a coat of black primer over everything. The cart was painted mainly by drybrushing, with a few places touched in to represent metal and rust. The harness strap was glued in place and worked to represent leather. Flock, burnt umber wash and drybrush were followed by a few bits of clump foliage and static grass to fix the groundwork.


So, here it is, ready to roll. But what happens when you want to use the oxen for something else, I hear you cry. You use this, is what you do. This little greebly sits in the recess, giving something for the cart shaft to sit on.


Just like this. So, you can use the cart without the ox! At some point, I'll make some cargo (sacks, barrels, baskets and what not) to load on board. But it works well enough.


Here's the finished article, with a Sub-Roman levy attempting to get a bit more speed out of the delivery vehicle. He's not having much luck, though.


Merry meet again!


Friday, 6 September 2013

If you will play these rough games...

So, last night I was fencing.

Step forward, extend to the attack. Opponent parries in quatre, I cut under and lunge, then my right knee gives way. I land in a big untidy pile on the floor. But I won the point!

Only sprained, fortunately, but painfully, annoying and so embarrassing having to hop round on crutches!

Well, I should get some painting done at least. Serves me right for playing rough games!

Friday, 9 August 2013

Lack of Progress...

It's lovely planning holidays and having relatives visit, but it isn't making anything here progress!

Actually, it would be grossly unfair to blame either of those things for my inertia.

I'm part-way through the regular infantry for the British faction for Dux Brit, and well on with the final main element, the missile troops (in this case, slingers). Maybe if I hadn't decide to blow time building the first reinforcement units and concentrated on the core army I'd have got further!

Also not helping is a nearly unavoidable desire to make more non-historic figures to go with Nimue. I wonder if I could busk having Merlin as an alternative to one of my units of spearmen? Perhaps not...

The Sub-Roman church is nearly finished, but in typical Pareto analysis fashion, the last 10% looks like taking 90% of the time. And as for the Pictish curragh, well, best to not go there.

Merry Meet Again!

Monday, 22 July 2013

Fifty Thousand Pageviews!

Many, many thanks to everyone who has take the time to read the stuff I have put up. I would not have imagined that I would ever have got to fifty thousand pageviews.

Merry meet again!

Saturday, 29 June 2013

Hundredth Post! Trees, going cheap!

Well, I never thought I would get to one hundred posts. Three or four maybe, but not one hundred.

As regular readers know, I have ambitions to be the cheapest modelmaker on the net. So, here we have my take on making trees on the cheap. Given the underlying theme of stinginess and skinflinting that has underlaid  this blog, I thought something like this would be totally in keeping for my one hundredth post!

Now, trees are not expensive, not on a per-item basis. If you just want a few, somewhere like Minibits is the place to go. There stuff is really, really nice, reasonably priced, and they are VERY nice people. The trouble is that you might need a LOT of trees. For a piece of terrain two feet by one,  (as per Dux Brit rules...) that might potentially be up to a couple of dozen of them. That number of trees starts to come to serious money. 

This is a roll of MIG welding wire. This is a gash one, it’s rusty and won’t feed so I picked it up for nothing. They retail at about five quid, for roughly 200m of wire. Now, this stuff is very stiff, springy and unyielding. Great for feeding through motor driven welders, but not for much else.
So, a metre of wire is two and half pence. Keep that in mind – it’s important. Six metres of wire, say 15p total?

 From stiff, springy wire...

Now, a few seconds with a blowlamp, heating the wire red-hot and letting it cool slowly anneals the stuff so it twists, bends and flexes, becoming malleable and ductile. Heating five or ten metres of wire in one go is the way to go. A few pence worth of gas is all it takes.

To soft, malleable wire!

Cut the wire into roughly 10cm lengths, like this. Mount the whole lot in a vice and start twisting! Let out some filaments as you, to provide branches as you go along. Squash the end down to make a sort of “spike” to get the thing into the ground.

Twist!


Until it gets tree-ish!

Now, mummify the whole thing with masking tape. Watch it, this is a nasty prickly job! A metre of tape will do half a dozen trees, so call that roughly two pence worth. Are you keeping a running total?

All taped up.

Give the whole thing a coat of something to add texture. This is acrylic modelling medium, a quid a tub from Lidl. You could use PVA mixed with sawdust otherwise. Adds less than a penny to the cost of the build.


Roughed up a bit.

Paint everything your favourite shade of mud/chocolate/bark/other substance brown. I use emulsion match pots, and all the half dozen trees uses about a penny’s worth of paint.

Basic brown...

Drybrush with lighter browns, greys and bit of green to represent moss or algae. Less than a penny.

Bring out that texture!

Liberally dabble all the branches with suitable glue, whether impact or PVA, and add clump foliage. This is where the price goes through the roof! The bag of clump foliage cost six pounds, and I think I’ll struggle to get more than fifty or sixty trees out of it! So, ten pence per tree to the total. Keep adding up!

Now we're getting somewhere! 

Once the glue is dry, mount all the trees on a block of wood or a bit of waste foam, and give the whole lot a spray with diluted PVA. I buy PVA at the builders' merchant's, five litres for nine quid, so my 5ml costs less than a penny! Diluted out in my spray bottle, it’s simplicity itself. A line of PVA and some flock give you ivy up the trunk if you want...

All sealed up!

A coat of matt varnish dulls everything down and finishes the job.

OK, so let’s recap. Fifteen pence worth of wire, two pence each for gas and tape and three pence worth of paint, comes to 22p for the painted armatures. Add SIXTY whole pence for the clump foliage, and a penny’s worth of PVA. We’re up to 83p all up. I’m going to be horribly pessimistic and round it up to an eye-watering 90p to include other costs (matt varnish, impact adhesive, etc). We have six trees for 90p, or 15p each. Cheap enough?

Here they come!

Here they are in situ. Drosten, the Pictish noble are pulled his remaining elite warriors up onto a small wooded hillock, pursued by Arthur, Gawain and Arthur's companion infantry. On the whole, even with a bit of a bonus for cover and elevation, things are not looking good for Drosten...

Let's have this out like men, then...


So he's managed to persuade Arthur to settle it man to man, and Drosten's infantry have scarpered before Arthur changes his mind! The lighter-coloured tree on the left is a Minibits tree. I think the different trees work well together, different species growing naturally.

Merry meet again!