Saturday 24 December 2011

Sometimes, you can't get the words out of your head...

When I built my artillery bastion, Ray Rousell very helpfully commented "...now you need to make the rest of the fort to go with it!"

Well I hadn't planned to, and I resisted for a while, but his words kept haunting me and eventually I succumbed.  Cheers, Ray - now all I have to do is decide what the hell I'm going to do with it all!

I knocked up two more straight sections to go around the gun position, and an angled bastion to allow flanking fire along the wall.
All these parts wwere made the same way - waste foam, painter's caulk, timber strip, PVA and sand, with odd bits of Fimo-cast hurdle here and there for variety. I'm trying to draft out a convincing looking gateway, based on various sources, but trying to make a decent replica without it becoming too involved is beating me at the moment. For now, I have enough!

A rear view,

And an attacker's eye view.


Obviously I need a bigger backdrop to photograph it against, but I'm sure you get the idea.
It was fun project, although I can't say that it's contributed much to me to getting my Anglo-Saxon army repainted!

Enjoy!

Friday 23 December 2011

New Gun Crew, At Last

Back when I built my artillery bastion, I said that I needed a more suitable guncrew that the couple of old geezers I had mucking about with the gun back then.

Finally, I've finished them!

 They were converted from some Glorious Revolution artillery crew from Reiver Castings. My finished versions are here with a couple of examples of the originals. I bought a pack of these figures a while back because they represented excellent value for money and provided plenty of potential for conversion to all the various sorts of people who appear on battlefields who aren't infantry, cavalry or dragoons, like sappers, commisaries and the like, as well as gunners.

The main part of the conversions was to replace the existing heads with new ones from Redoubt. A couple of packs of these give vast variety, and they fit well, scalewise with these and others.

Being from a period roughly forty years later than the Civil Wars, some modification of clothing was necessary. The matrose with the linstock gained ties at the bottom of his trousers, laces at the neck of his shirt and a sword hung on a baldric. The linstock is scratchbuilt - the original disappeared sometime during the conversion process!

The master gunner was converted from shirtsleeves to a jacket, with cuffs and shoulder rolls, plus a sword and powderhorn.
 Above, they can be seen manning the small fortification swivel gun, looking a bit more like they know what they're doing than the two old codgers there before.

Below, here they are again, this time in the company of three other gun crew, built for a separate project that's ticking along in the background. These three are all ex Redoubt, and were a pleasure to paint. Note that the matrose on the left is supplied empty-handed - I built the swab for him.


Here are all five, mucking about with that swivel again. As Duke of Wellington may have said (according to some sources...)  "I don't know what effect these men will have on the enemy, but by God, they terrify me."


Enjoy!

Simple Pictish Buildings part 1 - Wheelhouse

Roughly contemporary with the Grubenhaus are the Pictish wheelhouse and figure of eight house, so these are obvious choices if you need battlefield buildings for fights in "points North" of the British Isles during the Dark Ages. I've tried to come up with a quick, simple design, like the Anglo-Saxon structures I've done previously.

The wheelhouse is the simplest, but may not, for reasons given below, float everyone's boat. Despite this, hopefully it's sufficiently visually distinct from a Grubenhaus, or indeed the more square / rectangular Saxon structures.

A wonderful, very complete resource for buildings that might be useful for Pictish wargaming purposes is Professor D.W. Harding's "The Hebridean Iron Age: Twenty Years' Research". This work, freely available on the web, is full of information and packed with fantastic ground plans of buildings that show the size, shape and general layout of everything from relatively small wheelhouses up to and including full-sized brochs. For anyone with access to a good library, or willing to spend a significant amount of money, I would also recommend this without hesitation.

As an aside, brochs are generally large structures, having diameters from about 9-10m upwards (180-odd mm in 1/56th scale) and correspondingly tall. Whilst a broch would make a breathtaking centrepiece for a Dark Ages wargame, it's a bit big as a minor feature to add a dash of colour or interest. For now, I'm leaving brochs alone and concentrating on things rather smaller, quicker and simpler.

The wheelhouse is so described because the internal structure, with the stone internal walls rising to provide a corbelled base for the timber roof, resembles a spoked wheel. For the sort of simple modelling purposes I'm going to describe, the internal structure is irrelevant, because it won't be there to be seen!

The three major characteristics of the wheelhouse are:
1 Drystone walls, of very significant thickness. The walls are frequently the best part of a metre thick, sometimes double-skinned with a rubble core.
2 A relatively shallow pitch to the roof, especially as compared with roundhouses in parts of southern England. This might be of turf, as attributed in this reconstruction in the Shetland Islands (see here also for further details), or heather thatch secured with weighted ropes as used into recent times.
3 Sunken into the ground. For whatever reason (security, ease, resistance to strong winds or whatever), wheelhouses are often set into an excavated pit, with only a small part of the wall structure visible. This is the caveat I mentioned above about visual appeal. Being half-buried, it isn't exactly a striking structure!

I based this model on the reconstruction above, with some details drawn from Professor Harding's work. The Shetland reconstruction has a roof angle of about 18 degrees. From this, the magic of trigonometry provides a vertical height for the centre of the roof! Being basically a cylinder with a slight point on it, there's no point in drawing a complicated plan.

A block of packing foam is cut to form a suitable cylinder, and marked up for the distance from the eaves to the apexs. The cocktail stick makes a nice, obvious marker for the centre point that can't get lost too easily.

Cylinder, with height and centre marked

The waste was trimmed away carefully - you want to keep this nice and symmetrical, if you can, and a doorway was cut in.
Roof shaped and doorway added

Walling allows many choices. If you make the thing out of close-cell foam, you can engrave the stone pattern with a pencil. On this cheap stuff I use, you need to add something over the top. One alternative is decorator's filler or tile cement, spread on and then engraved whilst wet. Quicker, but a bit more expensive is to use random stone pattern plastic card. "More expensive" is very relative - one sheet of Slater's random or coursed stone costs under £2 and will make about half a dozen houses like this, so it still isn't very dear.
 I've used Slater's 2mm coursed stone sheet, which looks fine to me. I've folded back the plastic card in the door entrance to give the impression of the stone going through the building, and added a lintel from plastic card.
I fitted the door at this stage - it's easier, when there's still decent access. Now let the whole thing dry totally. You don't want to pull the wall surface off during the next stage!

Based, with door and revetting installed

Find a suitable bit of foam for a base, and cut out a hole to take the hut. Glue the base to a sheet of (e.g.) MDF, then install the hut into the hole. Trim and shape the base to give the impression that it's rough ground, and cut a slot to represent the path down to the subterranean doorway. Don't make this too steep.
Alternatively, make it look like it's paved, in steps. The sides of the slot can have stonework added to give the impression of revetting.

Top view

The roof, being turf, is left till last with the rest of the basework. This is PVA, sharp sand and flock - lovely! The little bits of Green Stuff either side of the door are to smooth in where the plastic card doesn't quite lap over and I had to put an extra piece in.


Basic groundwork complete

Painted up, with various grey and brown drybrushings over a base coat of panzer grey on the stone / woodwork, it looks OK to me. The Pictish ne'er-do-well posing for scale effect is from Black Tree Designs. Wonderful figures, but don't mention the customer service...

A Pictish des res!


Enjoy!

Wednesday 14 December 2011

Saxon Church, part 1

The simple two-cell Saxon church seems to have been a relatively common structure once the conversion to Christianity got well established, and the same basic design carried on being built and used on to the end of the Saxon period at least. Of course, as towns became more affluent, larger and more elaborate structures might supplement or replace the original church, but in less exalted surroundings the two-cell model soldiered on.

The construction followed the plan here, but used a different method to that I applied for the Grubenhaus, cutting from panels to form a hollow structure, rather than carving from a solid block.

A pile of bits of foam sheeting...

Material stockpile

Becomes a pile of foam wall pieces! The end walls are rebated to allow the side walls to fit within. I think this allows a better appearence to the gable slopes (and it's simpler).

Cut to shape

After cutting out appropriate doors and windows, the wall pieces are joined together with impact cement and pins to reinforce some of the joints. At this point the structure is a bit wobbly and mushy, but don't worry. The addition of a base and roof will provide all the rigidity that you need.

Taking shape...

Fitting the base gives the building a bit more "heft". Whatever the final roof structure is, it will require a supporting underlayer. Foamboard works well. Impact cement should be plenty strong enough, but pin if you feel it helps.

Roof and base fitted

The next step is to assemble a roof, make the walls look like something other than plastic foam, and dress it up.

Enjoy!

Monday 28 November 2011

Grubenhaus, part 4 - finished

The finished grubenhaus. First step was a layer of PVA and sharp sand on the groundwork, blended up close with the walls and roof. Next came a coat of panzer grey overall followed by the flock. I drybrushed with a variety of browns, greens and greys to taste, varied in weight as the tones got lighter. The final colours were off-grey across the building and an ochre-ish shade on the grass. A coat of Pledge Future to seal and Galeria matt varnish on top were the final steps, except for a touch of static grass close to the walls.


And again with a Black Tree ceorl to show the scale.


The same surly perisher on the other side, showing the door. 


The back wall, with no door.

Quick and easy to make, cheap, and pretty effective. Every game table should have one!

Enjoy!

Sunday 27 November 2011

Grubenhaus, part 3 - end walls

Contructing the end walls is nice and simple. Strips of 1 mm balsa, with an angle cut on one end (set the angle from the roof using a sliding bevel), glued down. Small gaps don't matter, nor do deep notches where the planks go around the purlins. By aiming for 2-4 mm random strips, this equates to planks roughly 4"-8" wide in scale, which would seem about right. My rough calculations based on the West Stow reconstruction support this, but on the other hand, they could just as easily have gone to Jewsons...
The door is appliqued on, using thicker wood (matchsticks) for the frame.


Cut the floor ends to length once the wall is complete. You can make them slightly higgledy this way and it means you don't have to worry about cutting accurately to length when you fit the strips!


The other end has no door, so is simplicity itself.


At this point, glue the house to a base (MDF or according to taste). Once dry, give the fur a thick coat of PVA glue and "comb" it down to give a thatch effect. Doing this once the house is based helps to get the thatch nicely in contact with the ground. Once totally dry, if necessary trim any loose fibres.

I used the same finishing method I've used on my other terrain pieces (PVA, sharp sand, flock and emulsion paints). The completed piece will be along shortly.

Enjoy!

Saturday 26 November 2011

Grubenhaus, part 2 - the roof

Putting the roof on the grubenhaus is a more involved job than shaping the building. The main thing is that you will only get one go at the process: if it goes wrong, there is no way (as far as I know) of proceeding except to throw the whole thing away and start again. Whilst the components are cheap, getting to this stage has involved some investment of time, so I prefer to go carefully.

The roof components are shown here. The grubenhaus, with the purlins in place, a piece of fur fabric considerably larger than the house, and impact cement. If you feel that the fur fabric is not going to represent the depth of a thatched roof sufficiently, at this stage add an "under-roof" of foamboard or thick card, then proceed as below.


Apply plenty of glue to the grubenhaus roof and purlins, and a good layer to the back of the fabric. I've found that a largish sized woodscrew forced into the foam gives a decent handle, with plenty of purchase. And you definitely need it! Impact cement has a habit of getting all over everything, dripping and oozing, and the least little bit on your finger will stick to something awkward at the most inopportune moment. The vice helps to keep things under control. 


Once the impact cement has gone from wet to tacky (almost dry to the touch), fit the roof to the fabric. It's much simpler to do it that way around than to try to drape the fabric onto the roof. Place the roof down onto the glued area firmly. Once it's pressed down, the chances of you getting it apart in such a way as to have a second attempt are about nil, so go carefully!


Now simply roll the roof over onto the other glued section of fur, and there you go, a thatch! Albeit a pretty wild, out of control one.


The wild wooliness is then controlled. Wait until the glue is totally dry - if you don't, you'll never get the fuzz out of the knife you use! Then carefully trim away the excess fabric. I've found a knife works better than scissors, unless you've got ultra-nice heavy dressmakers scissors. My wife has, but let's not go there...


Next step is to dress up the ends, to cover up the foaminess.

Enjoy!

Thursday 24 November 2011

Grubenhaus, part 1

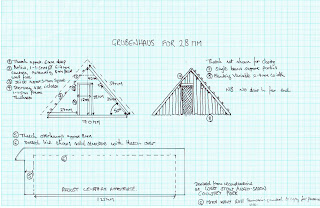
I put the plans and description of a Saxon grubenhaus up a little while ago. Making one for the wargame table is easy enough.

The basic material is the polyolefin packaging material I've used before on the field fortification and timber frame houses. Wonderful stuff, and since it gets thrown away otherwise, so very cheap!

A standard block of waste packing foam...


With all the bits removed that don't contribute to making it grubenhaus shaped! Blue foam (glue problems not withstanding), balsa or even offcuts of timber would all work as alternatives, albeit with more effort.


Purlins are added from cocktail sticks, attached with a good stiff layer of contact cement. You need purlins at both ends - I just hadn't got to the other end by the time I took the picture! The overhang of the purlins is given on the plan, but needn't be too precise.


The next thing to do is to add the roof, but that's a post on its own. Whilst you're clicking to the next post, this will give plenty of time for these bits to dry!

Enjoy!


Tuesday 22 November 2011

Newcastle's Whitecoats

The Marquis of Newcastle's Regiment of foot, known variously as the Whitecoats or Lambs, are probably best known for their defiant last stand at the Battle of Marston Moor. I'm only about 25 miles from the battle site, and when I drive past the image of the last stand often goes through my mind.

With this in mind, please meet my latest ECW foot, my take on Newcastle's Whitecoats.

Here they are, standing in a row, or two rows actually. Warlord figures, just for a change, but I modelled most of the shot with bonnets. Warlord only include one bonnet per sprue of foot, so the rest were added by me from greenstuff. This gives some variation, of course, but these bonnets would not have been a standard issue item.  One other thing I did with these figures was to paint the whole lot at once, except for the command. To be honest this was too much - I got heartily sick of shading twenty jackets, pairs of trousers or faces at a a time. Normally I do no more than a dozen figures at a time, and I think I'll go back to that from now on.


The command. The ensign is based on the designs in Osprey's Campaign series volume on Marston Moor. The sergeant, complete with partizan, is a spare pikeman body with arms added from the many extra pairs to be found in Warlord's Firelock Storming Party.


And the command again, from the side this time. The camera flash has been unforgiving as far as showing apparent shine on the ensign, unfortunately.


Shot, showing the bonnets. The fellow is the sash is getting to act as a file closer. I did a few shot with other headgear for variety.


Pikemen. The figure at the back is wearing a helm that I added using plastic card and greenstuff. I'd modelled helmets before on assorted Dark Age figures, but this was more difficult, largely as a result of the brim. I wanted nearly all of the pike to have helms, though and this was the simplest (OK cheapest, if I'm honest) way. There are various sources showing a wide selection of widely different helmets being used, from ultra-crude to relatively refined. Those I have modelled may err toward the former...


The regiment, drawn up three ranks deep this time. One disadavantage of the approach I've used for this and my Greencoat regiment (i.e. use two Warlord Infantry sprues per regiment  and cobble up the command from a single command sprue and whatever is left) is that the pike to shot ratio is way off what it ought to be. In this case, I have 16 shot and 12 pike (command is figured  as included with the pikes), for a ratio of 4:3. This ought to be more like 3:2 or even 2:1 in favour of shot, so I need to think about adding between two and eight additional shot to the regiment. I like the way Redoubt look with Warlord figures, so I'll probably go down that route.


Enjoy!

Sunday 20 November 2011

Size comparisons (Saxons)


Over at the Lead Adventure Forum someone asked if anyone had any comparison information between figures from various ancients miniature suppliers.

I answered with the usual "Well these are about the same as those but these ones are a bit smaller" sort of thing, but on the grounds that a picture is worth a thousand words, I've got these two.


Left to right, we have figures from Black Tree Design, Renegade, Gripping Beast and Crusader. The Vallejo paint pot is for external reference. All the miniatures are based by gluing the metal base to a 20mm square of 40 thou plastic card, with a strip of magnetic sheet attached to the bottom, so this should be uniform (at least, it's intended to be!)


A closer view, without the bottle, gives more of a sense of the shape and proportion. Heightwise there's virtually nothing between them. Black Tree and Gripping Beast are more slender: realisticly proportioned would be a fair term, with Renegade significantly more "blocky" looking. Crusader are somewhere between.

My experience is that the within-range variation is very small: all the figures from one manufacturer match each other very closely. Between-range variation within the same manufacturer seems to follow the same pattern: I've got Saxons and Picts from both BTD and GB, and Picts and Saxons in both cases match extremely well size-wise within and between manufacturers.

Enjoy!

Friday 21 October 2011

Thegns!

At last I've got something finished to show off!


These are Gripping Beast Saxon Thegns. These were the first, and only, thing I've ever bought from Gripping Beast that were not perfect. In the original set I ordered, one of the figures had a miscast arm - essentially it was missing the forearm and hand. I've never had a miscast from GB before or since (I've bought a fair few things from them too, by no means all of which are on here). I contacted them, and I was blown away by their response.

I had half expected them perhaps to say I should return the bad one and they'd send me a replacement, or to offer some credit against a future purchase. But no, the chaps at Gripping Beast sent me an ENTIRE PACK as a replacement, free of charge!

Let no one say that GB don't look after their customers. I've met the chaps from GB at a couple of shows, and they are great guys in the flesh too: chatty, helpful and fun, as well as selling great products. Their demo games are well worth seeing, I can tell you.

The figures themselves are among (I think) slightly older castings from GB, in that they have attached shields. Most of the later / current ranges have separate shields. The castings were slightly flashy, but since the metal used is soft, cleanup is very easy.


I bought these a while back but they languished half-done while I had the bit between my teeth with my ECW army. I finally gave them the attention they deserve and got them finished. There's a nice lot of variation between figures in terms of dress and accoutrements (pouches, weapons etc) and the faces are very expressive. Being from a time when uniformity in an army was a contradiction in terms, these are great. My painting probably doesn't do justice to the character and individuality you get in these figures. The GB ranges mix nicely with Newline Design, Black Tree and Renegade at least (in my opinion), to provide a wide selection of poses. Note that the figures DON'T come with spears. You will have to provide your own, or other weapons to your taste. The ones here are from a job lot of spears I bought from Newline Design, who, I might add are equally helpful, obliging and  all-round good chaps too.

Enjoy!


Monday 10 October 2011

Saxon Buildings

I'm resurrecting my Anglo-Saxon army. It has largely languished, part-finished and part-based for DBA since I came to the conclusion that no one was playing DBA in 25/28mm! At roughly the same time I got the ECW bit between my teeth and consequently nothing had happened for quite a while.

I decided to rebase the minis for WAB, re-paint a few and go that way. I'll post some stuff about the figures as I get them ready, including some new stuff that had sat around unpainted for too long.

However, in the mean time, here are some drawing for a grubenhaus and a small Anglo-Saxon church. The originals are A4 size, so if you print them as full A4 documents you can scale straight off them for 28mm.

Grubenhäuser are small, semi-subterranean buildings (literally "pit houses") that seem to have been common across the Germanic world, and Anglo-Saxon England was no exception.


There seems to be debate over the use of Grubenhäuser: whether they were dwellings or essentially just workshops. Some of the smaller ones that have been excavated contain what are identified as loom weights, which supports the hypothesis of being workshops, but this doesn't seem to be univerally the case.

The plan is for a much larger building than the 2 x 3 m structure that is suggested as a "typical" Grubenhaus, although it's certainly within the range of sizes of sunked floored buildings that have been excavated, according to the literature. See, for example Sussex Archaeological Collections, volume 140, 2002, pp 41-47

My dimensions came from the reconstruction at West Stow Country Park. I have a picture somewhere with someone helpfully standing outside the door and I scaled it from him. Scaling up or down wouldn't be difficult, especially regarding the length of the building - just chop it off!


The Church is derived from from this reconstruction of the Beckery Chapel at Glastonbury in Somerset. Again, I sized it from the doors and bodged the other dimensions to fit. This sort of "two cell" church is considered typical of Anglo-Saxon village / settlement churches. They were, it seems, often constructed from stone, frequently being the only stone buildings among the timber structures around them. Alternative construction methods other than true masonry apparently included rubble and mortar, cob and even reclaimed roman brick! Roofing might be thatch, timber shingles or possibly stone slabs.


Enjoy!

Monday 3 October 2011

Work in (very slow...) progress

I haven't put a post up for a while. It isn't that I haven't been doing lots of stuff, but I seem to be in one of those phases where everything is "in progress" and nothing is actually getting done!

Stuff seems to creep forwards but that's about it. Maybe I've got too many things on the go at once, but I can't make myself put any of them completely onto the back burner.

Oh well.

Friday 9 September 2011

Here Come The Cavalry!

After a slight diversion (see previous post), we’re back to something nore in line with the usual.


Here’s a regiment of Royalist cavalry, ready to smash Parliament’s horse or trample broken infantry. These are Warlord, of course, and despite having built several sets, I still like them a lot. They riders assemble easily, with no silly problems like the arms don’t fit because of the shape of the bodies or anything like that. The helmets fit nicely, although in my opinion if you use the hats, where the hair moulded on the hat meets that on the rider, a touch of filler is no bad thing. The horses require a bit more work – but nothing a little greenstuff won’t mend.
The cornet is based on that carried by Sir Nicholas Byron, showing a tree on a red field, with a silver banner bearing the words “Agitata Veresco”. I drew this on with a 0.25mm Rotring pen. The flag is made from foil from an old paint tube. I’ve tried tomato puree tube, but I found it was too thick and inflexible. Paint tube is thinner, and easier to work.


I managed to copy the same design onto the moulded trumpet banner, with great difficulty and a great deal of gnashing of teeth.


Basing is with the Renedra bases included in the kit, with a layer of magnetic sheet on the bottom, to allow me to use to movement trays easily, and keep them in place in the storage boxes.

Enjoy!

And now for something completely different…

These minis were produced (I think) by Grenadier Miniatures. I say “I think” because these are about 14 years old! I bought them back when I was playing White Wolf’s “Mage the Ascension”, and the cabal the characters belonged to were a band. I liked them a lot, and they reminded me of a time when I was a guitarist. I've recently discovered, however, that they are actually still available, from eM-4 Miniatures.

I found them in an old toolbox that I’d forgotten there were any modelling items in, and since I wanted a change, decided I’d paint them up. They're a classic rock lineup, with drummer, bassist, two guitars and a singer. All cool, and all armed to the teeth!

I’m pleased with the results, but I just wish I’d done them sooner – years sooner!  The Motorhead t-shirt on the guitarist in the red shorts, and the Indian Larry "Question Cross" on the singer stretched my ability, but I think they're OK.


The backdrop is a camping gas cylinder, in an attempt to make something vaguely industrial  / “gothic punk”. Well, a Dark Ages watchtower or half-timbered house wouldn’t work, would it? I think they put a whole new spin on “Guns’n’Roses”!

Enjoy!