Showing posts with label English Civil War. Show all posts

Thursday, 2 February 2012

Reinforcements!

When I did my take on Newcastle's Whitecoats, I commented that I was short of musketeers. Well, the problem is solved in the form of some reinforcements, courtesy of Perry Miniatures.

These are code SW5 from the Scots of the English Civil War range. The first thing I noticed was how delicate they seemed, especially compared to hulking brutes like those from (e.g.) Renegade. This caused me a bit of a dilemma - given that the figures were noticeably shorter and slighter than the main body of the regiment (ex Warlord Games), with very different equipment and muskets vastly shorter than the rest, would they look too "different"?

The figures are crisply moulded in a relatively soft metal, which is easy to clean to with a scalpel or a burnisher. There might have been one bit of mould line that needed a file but that was all. Flash was essentially non-existent but the ends and corners on the castings carry a lot of little curly "pigtails" that need to be checked for carefully and removed, since they add nothing to the final effect!

A buddy of mine immediately spotted the clever thing about this pack of figures. They are not, in fact, random Scots in random loading positions. They are actually sculpted going through the evolutions of loading their muskets. He was a re-enactor, and has an eye for this sort of thing.

So, here they are, from left to right:

Blow out your pan; charge your piece; put in your ball; prime your pan; bring your match to glow and finally, make ready!

 Going through the motions...


Personally, I think they blend pretty seamlessly into the rest of the regiment. Here they are, first drawn up two ranks deep in front of the house.

 Two deep
And now three ranks deep, out in the open.
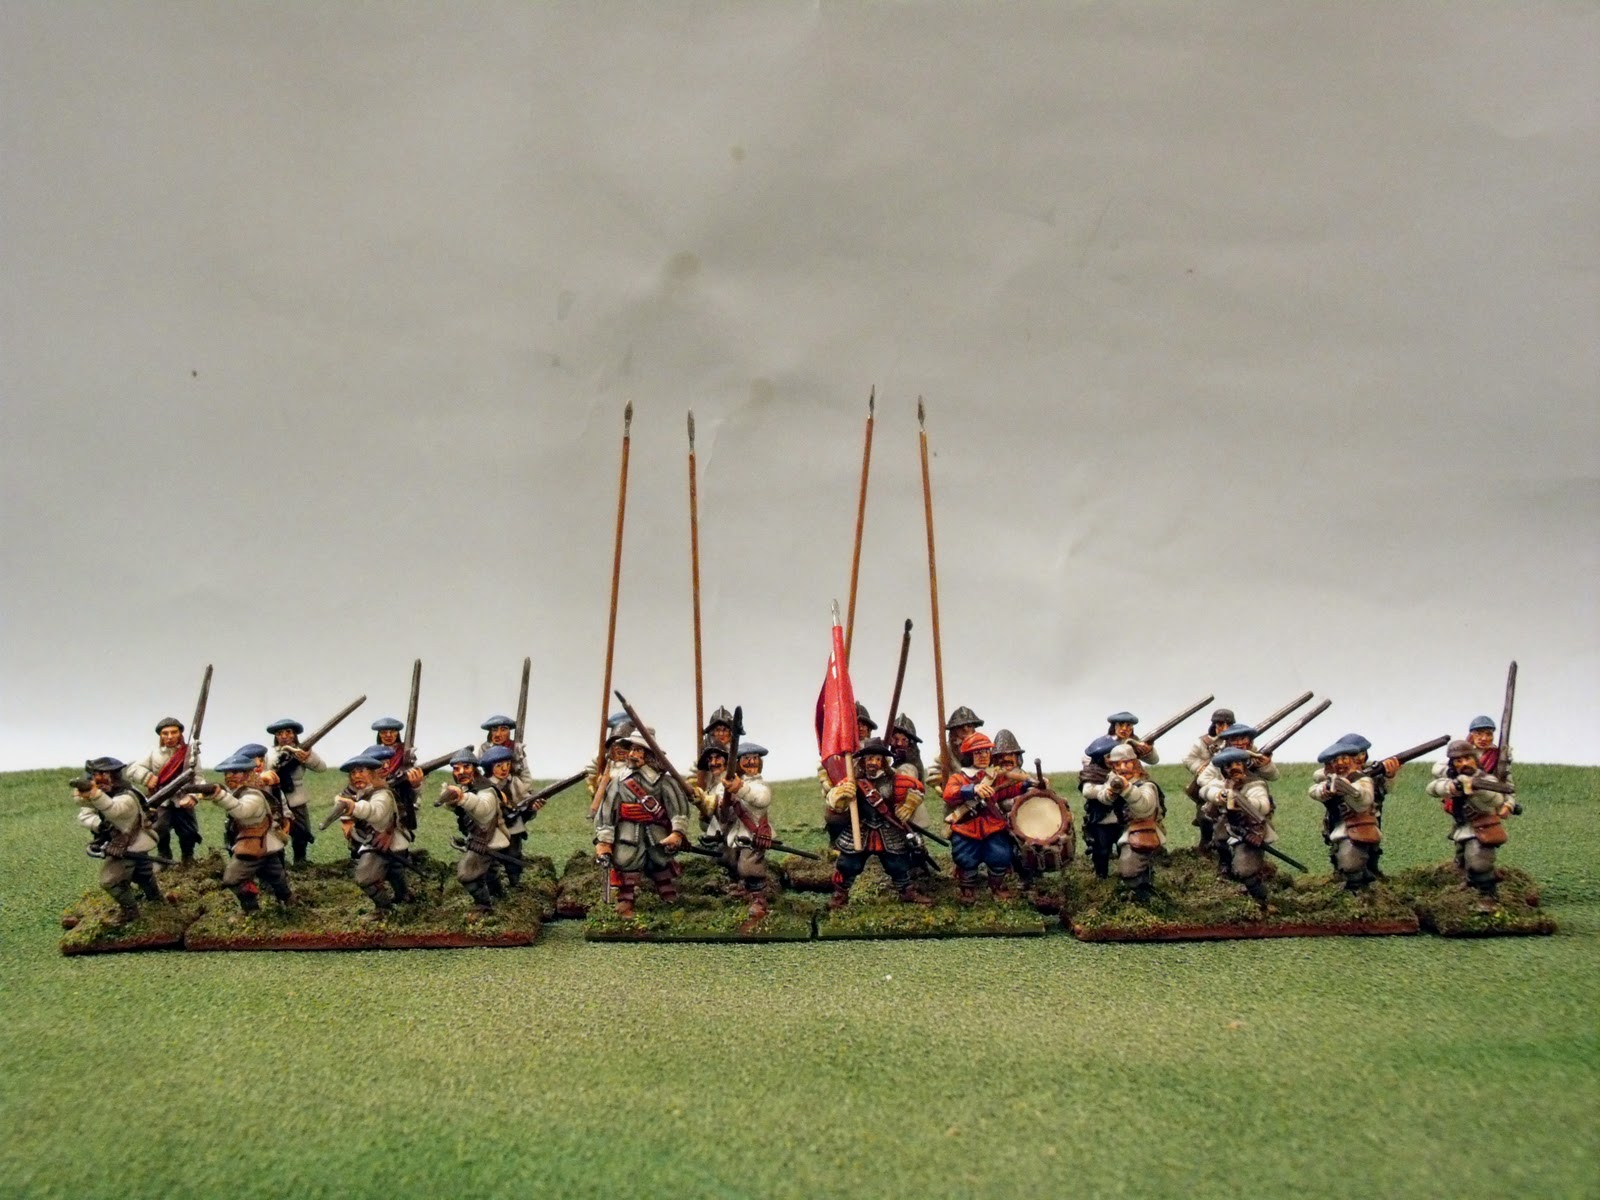
Three deep
I would recommend these figures without reservation.

Enjoy!

Wednesday, 25 January 2012

ECW Figure Size Comparison

There's always room for another miniature size comparison post, so here you go.

First, foot figures. From left to right, we have TAG, Perry Miniatures, Reiver Castings (painting incomplete), Warlord Games (plastic), Warlord Games (metal), Redoubt Enterprises and Renegade Miniatures. Basing is either a Renedra green square or 40 thou plastic card, with a piece of self-adhesive magnet beneath in all cases. No attempt has been made to correct for the thickness of the moulded bases on the figures. The scale at the back is set to 28 mm for comparison, and has a plastic card / magnet "shoe" underneath to correct for the figure basing.
 The foot

I did a quick calculation. The heights of the men in my team at work run from about 5'4" up to 6'2". If you take 6'2" as equivalent to 28mm, the lower figure gives you a miniature height to the eye of 24mm. We don't look that odd on a photograph, so why worry about it on the gaming table?


Now, mounted. From left to right we have TAG (x2),  Renegade Miniatures, Redoubt Enterprises and Warlord Games. I've set the scale to 40 mm (somewhat arbitrarily) for some sort of comparison.

The basing is a bit variable, although consistent within units. I've compensated with various shims (out of shot here), but again, no attempt has been made to account for the moulded bases.

The horse

Enjoy!

Saturday, 24 December 2011

Sometimes, you can't get the words out of your head...

When I built my artillery bastion, Ray Rousell very helpfully commented "...now you need to make the rest of the fort to go with it!"

Well I hadn't planned to, and I resisted for a while, but his words kept haunting me and eventually I succumbed.  Cheers, Ray - now all I have to do is decide what the hell I'm going to do with it all!

I knocked up two more straight sections to go around the gun position, and an angled bastion to allow flanking fire along the wall.
All these parts wwere made the same way - waste foam, painter's caulk, timber strip, PVA and sand, with odd bits of Fimo-cast hurdle here and there for variety. I'm trying to draft out a convincing looking gateway, based on various sources, but trying to make a decent replica without it becoming too involved is beating me at the moment. For now, I have enough!

A rear view,

And an attacker's eye view.


Obviously I need a bigger backdrop to photograph it against, but I'm sure you get the idea.
It was fun project, although I can't say that it's contributed much to me to getting my Anglo-Saxon army repainted!

Enjoy!

Friday, 23 December 2011

New Gun Crew, At Last

Back when I built my artillery bastion, I said that I needed a more suitable guncrew that the couple of old geezers I had mucking about with the gun back then.

Finally, I've finished them!

 They were converted from some Glorious Revolution artillery crew from Reiver Castings. My finished versions are here with a couple of examples of the originals. I bought a pack of these figures a while back because they represented excellent value for money and provided plenty of potential for conversion to all the various sorts of people who appear on battlefields who aren't infantry, cavalry or dragoons, like sappers, commisaries and the like, as well as gunners.

The main part of the conversions was to replace the existing heads with new ones from Redoubt. A couple of packs of these give vast variety, and they fit well, scalewise with these and others.

Being from a period roughly forty years later than the Civil Wars, some modification of clothing was necessary. The matrose with the linstock gained ties at the bottom of his trousers, laces at the neck of his shirt and a sword hung on a baldric. The linstock is scratchbuilt - the original disappeared sometime during the conversion process!

The master gunner was converted from shirtsleeves to a jacket, with cuffs and shoulder rolls, plus a sword and powderhorn.
 Above, they can be seen manning the small fortification swivel gun, looking a bit more like they know what they're doing than the two old codgers there before.

Below, here they are again, this time in the company of three other gun crew, built for a separate project that's ticking along in the background. These three are all ex Redoubt, and were a pleasure to paint. Note that the matrose on the left is supplied empty-handed - I built the swab for him.


Here are all five, mucking about with that swivel again. As Duke of Wellington may have said (according to some sources...)  "I don't know what effect these men will have on the enemy, but by God, they terrify me."


Enjoy!

Tuesday, 22 November 2011

Newcastle's Whitecoats

The Marquis of Newcastle's Regiment of foot, known variously as the Whitecoats or Lambs, are probably best known for their defiant last stand at the Battle of Marston Moor. I'm only about 25 miles from the battle site, and when I drive past the image of the last stand often goes through my mind.

With this in mind, please meet my latest ECW foot, my take on Newcastle's Whitecoats.

Here they are, standing in a row, or two rows actually. Warlord figures, just for a change, but I modelled most of the shot with bonnets. Warlord only include one bonnet per sprue of foot, so the rest were added by me from greenstuff. This gives some variation, of course, but these bonnets would not have been a standard issue item.  One other thing I did with these figures was to paint the whole lot at once, except for the command. To be honest this was too much - I got heartily sick of shading twenty jackets, pairs of trousers or faces at a a time. Normally I do no more than a dozen figures at a time, and I think I'll go back to that from now on.


The command. The ensign is based on the designs in Osprey's Campaign series volume on Marston Moor. The sergeant, complete with partizan, is a spare pikeman body with arms added from the many extra pairs to be found in Warlord's Firelock Storming Party.


And the command again, from the side this time. The camera flash has been unforgiving as far as showing apparent shine on the ensign, unfortunately.


Shot, showing the bonnets. The fellow is the sash is getting to act as a file closer. I did a few shot with other headgear for variety.


Pikemen. The figure at the back is wearing a helm that I added using plastic card and greenstuff. I'd modelled helmets before on assorted Dark Age figures, but this was more difficult, largely as a result of the brim. I wanted nearly all of the pike to have helms, though and this was the simplest (OK cheapest, if I'm honest) way. There are various sources showing a wide selection of widely different helmets being used, from ultra-crude to relatively refined. Those I have modelled may err toward the former...


The regiment, drawn up three ranks deep this time. One disadavantage of the approach I've used for this and my Greencoat regiment (i.e. use two Warlord Infantry sprues per regiment  and cobble up the command from a single command sprue and whatever is left) is that the pike to shot ratio is way off what it ought to be. In this case, I have 16 shot and 12 pike (command is figured  as included with the pikes), for a ratio of 4:3. This ought to be more like 3:2 or even 2:1 in favour of shot, so I need to think about adding between two and eight additional shot to the regiment. I like the way Redoubt look with Warlord figures, so I'll probably go down that route.


Enjoy!

Friday, 9 September 2011

Here Come The Cavalry!

After a slight diversion (see previous post), we’re back to something nore in line with the usual.


Here’s a regiment of Royalist cavalry, ready to smash Parliament’s horse or trample broken infantry. These are Warlord, of course, and despite having built several sets, I still like them a lot. They riders assemble easily, with no silly problems like the arms don’t fit because of the shape of the bodies or anything like that. The helmets fit nicely, although in my opinion if you use the hats, where the hair moulded on the hat meets that on the rider, a touch of filler is no bad thing. The horses require a bit more work – but nothing a little greenstuff won’t mend.
The cornet is based on that carried by Sir Nicholas Byron, showing a tree on a red field, with a silver banner bearing the words “Agitata Veresco”. I drew this on with a 0.25mm Rotring pen. The flag is made from foil from an old paint tube. I’ve tried tomato puree tube, but I found it was too thick and inflexible. Paint tube is thinner, and easier to work.


I managed to copy the same design onto the moulded trumpet banner, with great difficulty and a great deal of gnashing of teeth.


Basing is with the Renedra bases included in the kit, with a layer of magnetic sheet on the bottom, to allow me to use to movement trays easily, and keep them in place in the storage boxes.

Enjoy!

Thursday, 21 July 2011

Artillery Bastion

Artillery bastions built of earth were a common feature of warfare in the seventeenth century. Unlike earlier stone castles, they have not, as a rule, survived the passage of time well. One example that survives reasonably well in not only records, but also physically is the Queen’s Sconce in Newark.
There are excellent scaled drawings of bastions on sconces available. Papers from the Siege of Groenlo (1627, part of the Eighty Years War) show the sconces in great detail.
What I made was (more or less) the seventeenth century equivalent of a machinegun bunker: a protected position for a small, rapid firing (relatively) cannon.
Looking at the plans of the Groenlo and Newark sconces, and other information, gave me a general idea of how such a position might be laid out. Following a few sketches to fix the design in my mind, work started by taking a large block of packing foam and a Swann Morton PM8, and carving away all the bits that don’t contribute to making it look like a fortification.
The edges were shaped to allow the item to be modular. I don’t have any matching terrain, or any plans to make any, but hey, why not?


The immediate impression once the bastion was carved was that it was far too low. An additional sheet of foam glued to the bottom solved this. Once dry it was carved to match and the gaps filled with painters’ caulk. If you don’t know about it, it’s marvellous stuff. It comes in tubes you use in a sealant gun, and it can be squeezed out to fill gaps and holes in most substrates. It dries moderately fast, depending on the thickness of the layer, and best of all it takes paint a treat. Note: don’t confuse it with silicone sealant, which does all of the above except take paint. Silicone rejects paint almost totally and will therefore spoil your whole day.

The back of the bastion would have been secured with timber revetting, to stop the soil collapsing. The revetting is made of cocktail sticks, held in place with spruce strips. Walkways would have been constructed from timber (planks, split logs or simply small tree trunks), to prevent the whole thing becoming a quagmire. These are balsa, since the additional thickness (compared to the spruce) can be more easily concealed.
The sides of the opening have wicker hurdles cast from Fimo clay and supported with cocktail stick timbers to support them.
A generous coat of PVA and a layer of sharp sand start to remove the impression of waste plastic.


A base coat of Nearly Black (panzer grey to us) paint was followed by repeated drybrushes with various shades of grey and brown. A coat of flock went, then more drybrushing, then Pledge floor wax, with W&N matt to finish. Here's the completed position.


The cannon is an Armati products falconet, from Cornwall Model Boat Supplies. The falconet is a beautifully made two-piece kit in brass. Here, it has had a couple of washes of sepia ink but otherwise is as it came out of the packet. Although thought of as a naval weapon, there is no reason to believe that such a gun would not have been used in a defensive works (and indeed there is some evidence that they were). Falconets were not infrequently breech loaded, using prefilled breech pieces held in place with wooden wedges (“thundermugs”) and ready-made packs of small shot. A good crew could manage the almost astonishing rate of fire of two rounds per minute, as long as the thundermugs lasted!


 Infantry slogging forward into this hail of fire could be cut to ribbons. Here's an attacker's eye view.


The two herberts manning the gun are TAG renaissance figures, in this case making the pretence of a couple of old codgers who are either in the wrong place at the wrong time or simply trying to prove they can still do it like they claim the used to be able to. I’ve got some more appropriate (i.e. more professional) crew on the stocks to replace these two hooligans, but at least they illustrate the scale.

Enjoy!

Thursday, 14 July 2011

A Field Position, Gabions in Use

After making the gabions, the obvious step was to actually do something with them. Gabions were used to provide protected firing positions for field artillery, so this seemed like the obvious thing to do. Whilst these are intended for my ECW army, gabion positions like this were familiar on battle fields from more or less the dawn of artillery up to the end of the nineteenth century, so hopefully this will find wide application.
A bit of hardboard cut to shape on the scroll saw and covered with PVA made the base. Casting plaster was added to give a bit texture. Casting plaster actually isn’t the ideal the ideal medium for this, I found. However, I only did it because I’d run out of the usual cheap and nasty decorators’ filler, and I won’t make a habit of it. It’s very unforgiving, I found. It probably responds better to a more expert touch than I have. The gabions were stuck down with impact adhesive. The short ones are full size castings cut down with a fret saw, which works very well. The plaster doesn’t crumble or splinter and you get a lovely neat cut. I put half on, and left it before doing the rest, so I had somewhere to pick it up.

I put some PVA and sand around the bottoms of the gabions to make sure they appeared firmly stuck to the ground. The real things would weigh in at just shy of three tons by my reckoning, so they are going to squat very heavily indeed!

 A coat of “Nearly Black” (panzer grey to the likes of us) emulsion paint provided a base to work on. This was followed by successive drybrushings of dark brown, mid brown and pale sand emulsions, and a coat of flock. I sprayed the whole thing with Pledge floor polish next to seal the flock, then drybrushed again, mainly on the flocked areas. A few tufts of static grass and two sprayed coats of Winsor and Newton Galeria matt varnish finished it.


Here’s an attackers’ eye of view of it occupied by my Reiver Miniatures heavy gun, and two more views showing how the gun sits neatly in the cutout.


It was great fun to build this, and once the castings were done, very quick. The whole thing was probably no more than a couple of hours work spread over a few nights.


Wednesday, 29 June 2011

Green Regiment of Foot

My new regiment of foot, recently completed and ready to stand for the King. These are Warlord plastics (because they’re cheap, and so am I!). I worked out that I could build regiments suitably sized for the 1644 rules set using part of a boxed set. What I did was to buy an extra sprue of foot, and build a regiment using two sprues of foot and odd bits and pieces.

The command sprues contain two well-dressed herberts intended as commanders and ensigns. I used one of these per regiment as the commander. The foot sprues have an extra pikeman body one each, for which there are no arms. Warlord suggest using them as sergeants, but with a bit of work, I turned two of them into ensigns, using the spare arms from the command sprue, and one into a fifer. The last body will be converted into a sergeant using spare arms from the firelock storming party box set.
Command, from the front
 and the rear
These other figures, the extra commander, ensign, drummer and sergeant will go with a second regiment I’m building.

The only problem with this approach is that the regiments formed have skewed pike / shot ratio. They could do with a few additional musketeers, to put them nearer a 2:1 shot to pike proportion. I’ve got some plans for this, but in the mean time hopfully they’ll pass muster.


 Here's the command, escorted by shot and pike.


Pike, deployed as a block. The pikes are made from stainless steel wire, which can be nasty if you put your hand down on them, but the plastic ones from the box set are far too flimsy for my taste.
Some of the shot, some firing the others moving into position.
The whole regiment, pikes in the centre and shot on the wings.


Again, this time with the shot to the front.

I'm looking forward to seeing if they can fight...

Friday, 10 June 2011

The Furie of the Ordonance!

Here are the finished guns! Two small “battalion” guns and a larger piece.
I left two of the gun carriages as bare wood, the larger one with an unpainted iron barrel


 and one of the smaller guns in bronze.

 The other small gun was painted in red with a black-painted barrel. A follower pointed out that red carriages were more commonly associated with Parliamentary forces, which given my army is meant to be Royalist might be a problem!

A bit of thinking found me a way out. Red paint would  have been fairly generic – red lead was commonly available, and popular as it’s a great preservative (unless you eat it…). Also, cannons were rare and highly desirable, and no general in his right senses would turn down a captured gun simply because he didn’t like the colour!


The figures are from 1st Corps, from their Thirty Years War range. These are one pack of the firing crew and one pack of loading crew, although mixed between the guns. There was no flash, limted joint lines to clean up and they painted a treat.

 These are lovely, characterful figures. There are a couple of well-dressed master gunners, and a selection of matroses and labourers who seem to range from the serious and capable to some who look like they need to be told to come in out of the rain. The powder loader on the left at the back here is a perfect example of the latter.  I loved the variety, and would recommend them without reservation.

 The accessories (budge barrels, buckets) are Amati model boat fittings, from Cornwall Model Boats. A bit of green stuff and some flytying thread made these useful little pieces into exactly what I wanted. The cannonballs on the large gun are angler’s split shot. These actually scale out as fourteen pound cannonballs, based on the magic of arithmetic. This fits perfectly with Reiver's description of the gun as a 12-24lb.

Here are all three guns as a single battery, ready to batter a slogging infantry regiment, or make mincemeat of a dashing cavalry force with canister.


Wednesday, 25 May 2011

An update! Artillery

Just because I haven’t posted any updates doesn’t mean I’ve been totally idle! Every army needs artillery, so I’ve built up mine considerably, and here it is.
The new guns are Reiver Castings items, from the 17th/18th century range. I got these at a show from Under The Bed Enterprises, who were a couple of all round good chaps, very friendly and helpful. I bought two battalion guns (catalogue number AP7) and 12-24lb field gun (AP3). The kits are sold in the usual neat and natty little plastic bags, as shown here.

Each is a four piece model (carriage, two wheels and a barrel), cleanly moulded in fairly soft metal. Mould lines are prevalent, but there was no flash on either example, and cleanup was quick and easy. Reiver have made no attempt to cast wood grain into the carriage, which is no bad thing. Scaled up, most kit wood grain would make a railway sleeper look well-finished. The wheels are narrow and delicate, and benefit careful handling. The kit goes together with minimal additional fettling. I reamed out the wheel centres a little, and squared up the axle shafts, to try to keep everything square during assembly.

Assembling the things was a bit of a grunt. Everything fitted well enough after preparation, but it’s by no means simple to keep everything square and true while the glue sets (I used Araldite). I got around it by using small offcuts of wood of the correct width as jigs to support the wheels, whilst clamping the whole thing in a plastic drill vice. This is one of the battalion guns undergoing the process.

They look right based on illustrations. I wouldn’t care to speculate on their precise dimensional accuracy, given these come from a time when all artillery was bespoke, the concept is probably meaningless anyway. Colourwise, yellow, red and black appear to have been popular, although whether based on preference or availability is perhaps open to conjecture. Here’s one assembled next to a Warlord infantry ensign for comparison.