Sunday, 12 August 2012

Saxon Great Hall, part 2

Making the roof offer many options, including the following: carve it from solid foam, make it up from foam sheets, foamboard, MDF, etc, etc.

I chose to make the sides of the roof from foamboard, using a single piece, scored in the middle to allow a fold, and ends made of MDF. I felt this offered a combination of strength and lightness. It was also driven by the fact that I didn't have enough foamboard to do the whole roof...

Roof parts, ready to go.

Cutting the foamboard is easy with any sort of knife. I cut the MDF with my mitre saw, then primed the edges with PVA. Assembling the roof is a pretty simple job using PVA, and some tape to hold everything in place while the glue dries.

The roof glued up and drying.

I added some internal structure to the roof (rafters, basically) with coffee stirrers. Some small wooden blocks, with compound angle cuts, will be glued inside the roof later to act as location markers. These will project below the level of the bottom of the roof, and be positioned to account for the thickness of the walls. They will keep the roof steady, in a position so that it retains some squareness, and doesn't appear to have been put on whilst the workmen had been sampling the local ale a bit too enthusiastically. Note also there is no chimney. Chimneys and smokeholes apparently have a nasty habit of drawing sparks and heat from open fires up and setting the roof alight! The smoke would have collected in the high roof (keeping down pests as a side-effect) and gradually percolated away through gaps, but it's probable the interior was a bit gloomy and smoggy!
Roof structure 

The roof could be thatch or shingles. I've got plenty of thatched buildings, so I went with shingles for variety. The Regia Anglorum's Wychurst website has some wonderful photos of their reconstructed great hall. These give a sense of the size, shape and layout of shingling. Shingling is a highly labour-intensive process, whether in scale or in real life. My shingles were cut in strips from Slaters planked plastic card. An alternative would be heavy cartridge paper (the same material I used for the quoins on the church) glued in place, but that would be even more laborious. It's worth noting that even though the shingles would have been split from solid timber with a froe, they were generally tidied up and fettled to fit, so the actual surface would have been quite smooth. Even more than planking the walls, this job is best approached in bursts. The shingles in the reconstruction are curved at the ends. There is no reason to assume this is universal - thankfully!  Getting this stage completed was stymied a bit by a lack of planked plastic card! When I finally managed to get to my local model shop, they had every size except what I wanted, so I had to succumb and mail order some. To cut a long story short, 2mm planked plastic card seemed to suddenly have become as rare as hens' teeth, and it took an age to locate and get some, so the build stalled, for quite a while. I formed the ridges from strips of 20 thou plastic card 6mm wide, folded in the centre, and applied lapped over. Fortunately, this was  less tedious than the rest of the roof. I'm about 85% happy with the result, but I think I'll shingle slightly smaller roofs in future!

The shingling finished - at last!

The temptation to really go to town with internal fixtures was pretty strong, but I managed to restrain myself. Some benches, built along the walls using balsa strip, foam and Wills Kits plastic board would have provided the seating (and sleeping) accomodation for most people.

 Comfy!

A central firepit was constructed from chunks of fired Fimo clay, glued down with PVA. 

Central heating and built-in oven

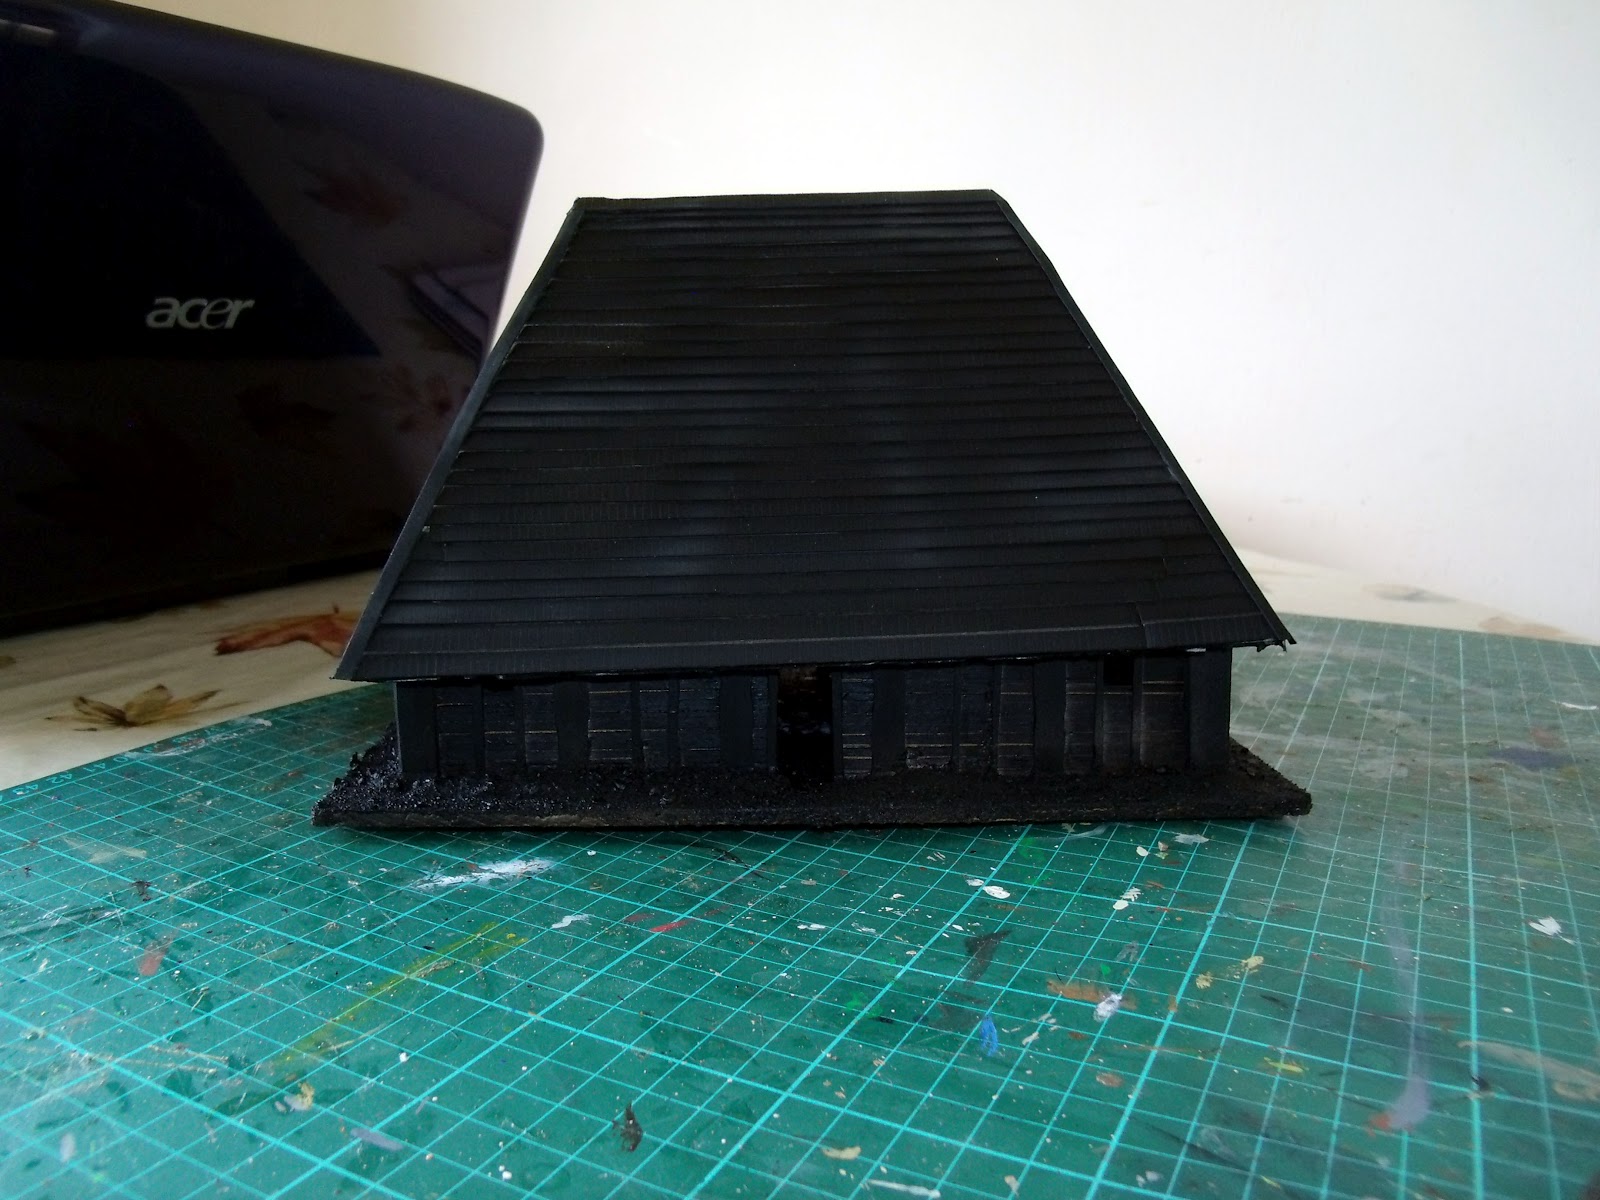
Basework outside involved some shreds of waste foam to make the ground look a bit uneven, then sharp sand. Next up was a coat of black spray over everything.

Roof off, showing structure

Roof on. Would you buy this house off-plan?

Here's a couple of shots of everything with the primer on, just as a taster. The last stage will be the painting and the final details. Anyway, I'm off on my holidays, so see you in a couple of weeks.

Enjoy!

Friday, 10 August 2012

Well, you asked for it...

To all who said nice things about the boar banner and wanted to know what else I'm working on, here's a work in progress shot of a Pictish banner.


This is (so far) coloured pencil on cartridge paper. The next stage is a great deal of knotwork, scrolls, triskeles and spirals. These will be in the borders and on the squares where the banner pole would go, as well as the tails. Inking these in is a one time only, one chance job, so I'm doing a lot practice off the original before proceeding. The knotwork will be a good deal bigger in this one than the gold scrolling on the boar banner (occupying the full width of the two separate border areas), so with a bit of luck it should really pop on the finished item. Once the knots etc are done, I'll expand the colours outwards as well.

Lots still left to do, but for now, enjoy!

Wednesday, 8 August 2012

Something new at last

Finally back in a working condition with my home computer.

I have finally scanned my first painted banner, ready for use.

Here it is, large as life and twice as nasty. From here it was be pasted into something like Word where the size can be altered and a second copy added in to produce the other side. Feel free to copy and use the file for your own purposes, but please don't try to sell it to anyone. This is a fairly low-resolution version, but it's still a biggish file. By the time you get it down to about 1.5 x 1 cm it probably won't matter too much.


This is largely Winsor and Newton inks on cartridge paper. I'm not unhappy with the result, but I'm pretty sure the guys at Little Big Man Studios aren't quaking in their boots quite yet! For future reference I would increase the size of the scrollwork around the sides and try to make that more contrasty. This after the effort I made to keep it small! The gold work is a gold gel pen, outlined with a Faber sepia ultra-fine graphic pen. The shading / highlight has worked reasonably well on the boar and on the banner tails, but the colour differences have disappeared a bit on the red.

I've got a couple more on the stocks at the moment but I'll refrain from scaring you with too much of my artwork for now.

Enjoy!

Tuesday, 7 August 2012

Now it's all kicking off!

I've had a massive computer failure! Currently I can write and post stuff like this (cos I can do that anywhere), but anything requiring pictures, photos or scans is right out. Added to all of this joy is a total lack of access to all my soft copy resources. So, when I thought "Never mind, I'll look for some nice pictures to copy for the shields on those Saxon character figures and paint 'em", I then thought "Oh no I flaming well won't, cos all of that stuff is on the PC as pdf files!" Gah!

I'm getting back to a working position, re-installing more or less everything but it's hellishly slow - it took over FIVE HOURS for the Windows updates to sort themsleves out last night!

Oh well! Sassafrassarassum Windows failures!

Thursday, 2 August 2012

Lots going on, just not here...

At a glance it might look like I'm not doing a fat lot at the moment. This isn't the case - it's just that none of it is on here!

I've got a bunch of Pictish skirmishers on the go, along with a re-model / repaint of most of my Pictish cavalry.

Saxon command and characters continue to progress as well.

The common theme with these is that I'm working on some artwork for the banners for these units. Now, I'm no great shakes with computer graphics packages, so I've gone the old-fashioned way. I'm drafting these on paper, then inking and painting them. The plan is to scan them, then shrink them to size. It's a lot easier doing knotwork and scrolls on an A4 size version than doing it on the final banner I can tell you!

The kicker is that my scanner is playing silly beggars at the moment. I would have liked to do some work in progress shots so you can see how it's going but that's a non-starter right now.

Monday, 9 July 2012

Pictish Curragh, Part 2


OK, with a couple of sets of photocopied plans, it's time to get a start. To plunge-mould the hull, I'll need a master. Here goes!

First, I cut a nice piece of 20mm thick straight-grained timber a bit longer than the longest dimension of the hull, trying to avoid knots wherever possible.

 Timber blank, ready to go

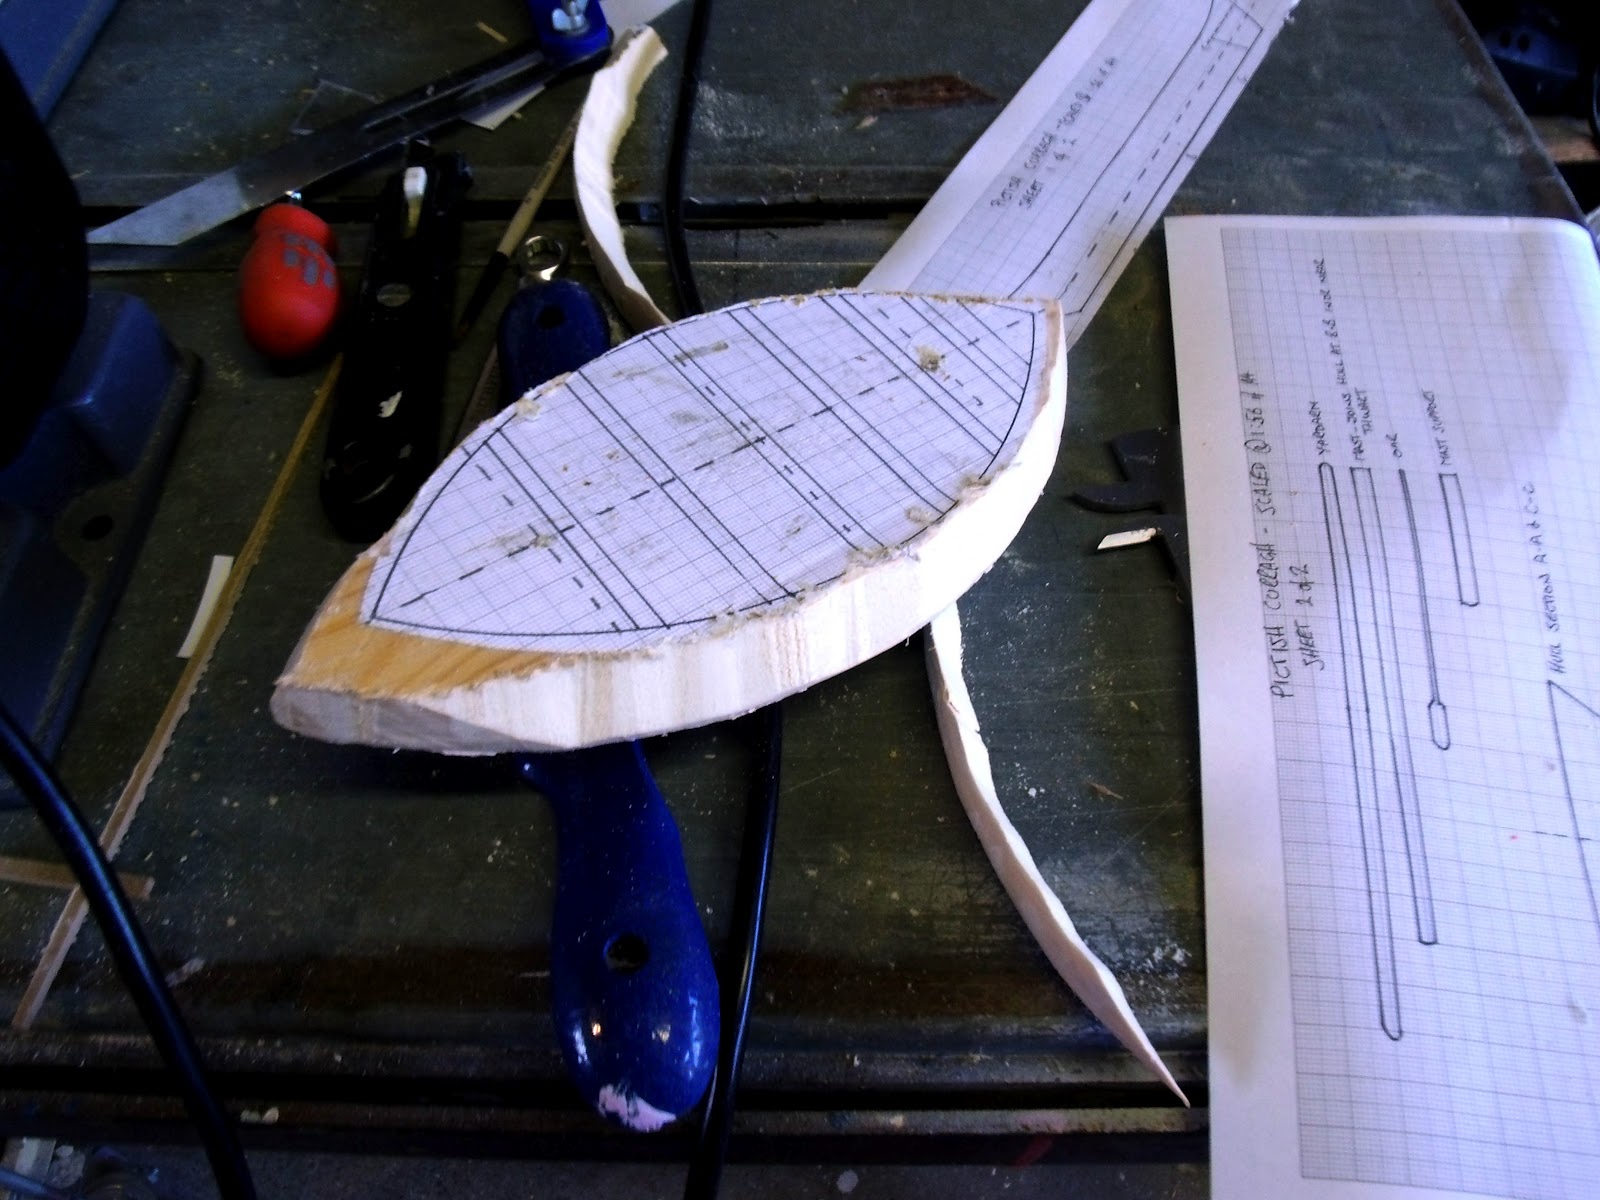
Next, I glued a deck plan onto the top, and drilled two small holes, at a couple of marked points.

Blank with top plan in place

Where these points are doesn't matter, (I picked where the hull contour lines met the centre line) provided they're lined up on both bits of the plan. They allow you to line up the second bit of plan (glued to the bottom of the timber), by putting a couple of cocktail sticks through the timber, and spiking them through the corresponding points on the bottom plan. This has the effect of allowing you to ensure that critical things like the centre line of the hull are perpendicular.

Bottom plan, arrows show location pins

So, with the plans glued in place, it's time to rough out the hull. I used my scroll saw, as it's quick and easy, but a fret saw will serve. The first cuts are to form the outline - aim to just leave the line, so there's a little wood to work back to.

Cut in progress...

...And finished!

Next, using a sliding bevel on the plans, I set the table on the saw to allow me to rough out the hull sides. By setting this to the shallowest angle, there's no change of over-cutting the hull, especially if you stay well back from the gunwale area. You can miss out this step and go straight to carving, but it's easier to de-bulk the wood like this first if you can.

Set the angle...

...And make the cuts!

From a rough-cut hull, it was a case of working gradually with planes and spokeshaves to shape the hull. If the tools are sharp, it's pretty quick work. Doing it over a bin made cleaning up a doddle! Keep checking the hull shape, regularly. The sections drawn on the plans will act as a guide, but it must be symmetrical! The symmetry is much more important that the actual shape you get. Remember to keep doing this at all stages from now on.

Getting shipshape now.

I got to a point where I had to abandon the edged tools and go over to a rasp for final shaping and removing toolmarks.

 Now that's what I call rough!

Now, some sanding, to get a really smooth finish. The random orbit sander made short work of this. Every home should have one, and not just for modelmaking, either!

 A proper smoothie!

The more observant among you may have noticed above that I managed to gouge a deep notch in one side of the hull with the spokeshave. For the people who were making a cup of tea at the time, here's a replay, with the PM8 acting as pointer.

Oh dearie me!

Annoying, but not insurmountable. The best stuff for fixing these sorts of problems, I've found, is some sort of two-pack wood filler, like this one. Now, this stuff is at the obnoxious end of the scale as far as modelling materials go, particularly from a safety perspective. Both components are irritants, and it absolutely must be used in a well-ventilated area, or the fumes will whisk you away to Dingley Dell in no time flat!

The remedy for holes...

While I had some mixed it up, I also took the opportunity to fill a knot that wasn't apparent until I cut into the timber. The advantages of this stuff are that it doesn't shrink, it doesn't crumble and it's gone off ready to make progress on in about 15 minutes.

Problem solved!

A bit more sanding, and it was job done. This whole stage took about an hour overall, including the waiting time for the filler.

Job's a good 'un!

Enjoy!

Sunday, 1 July 2012

Pictish Curragh, Part 1

This is going to be a long, rambling set of posts. It's likely to be a big job, and I'm pretty sure that there will be a number of points at which I am going to ask myself if I should have just bitten the bullet and bought a Gripping Beast resin version!

A build like this obviously has to start with the hull. As usual, there are several possible ways to approach this.

1 Carve it from a solid block of timber. I don't think foam would work - it lacks the rigidity, so it's a timber job. The upside is that this would be cheap. On the other hand, it's going to be almost impossible to get anywhere near a realistic, in scale thickness for the hull, and it would be incredibly easy to crowd a chisel through the thin sections and ruin the whole thing as you go, so I'm forgetting this.

2 Built it like the real thing. I actually considered this, then asked myself if I had gone insane. The curragh is a framework of timber (possibly laths and battens, possibly wickerwork), with some larger timbers and a layer of tarred hide over the outside. The end result might be realistic, but I suspect it would last a fast five minutes on the gaming table, and the intricacy of the build would be soul-destroying.

3 Mould the bloody thing! Two possible ways occur. Each starts by building an outer form for the hull by carving it from timber (see 1 above). Since there is no reason to hollow out the hull, it's much simpler and much stronger this way. Then, either plunge mould the hull from sheet styrene (the way I used to make replacement canopies for model aircraft in the days when giants walked the earth), or use glass fibre matting and resin.

The former potentially gives a weaker hull, and it will need a LOT of internal detail added from stretched sprue / microstrip, but it's easy, and the methods and materials are relatively innocuous. The glass fibre version will be stronger, and will have the advantage that the glass scrim will resemble a woven inner structure. However, it's ghastly stuff to work with, and the possibility that the hull won't release from the mould is very real - and very difficult to remediate.

Anyway, before all of that, I needed a set of plans, so here they are. Printed at full scale (A4), with the main grid lines set at 10 mm, these are good for 28 mm minis. Adjust the scaling as necessary for (eg) 15 mm.


There wasn't a cat in hell's chance of it all going on one sheet, so the hull is on one and the rest is on the other. Note that the mast, mast support, yardarm etc don't have any allowance for tenons to join them to each other and the hull!  It isn't abundantly clear exactly how the mast is stepped. The lightness of the structure seems to indicate something other than the huge block of timber (kerling) used on Viking longships. I've had a good look at pictures and plans of Inuit umiaks, which are structurally similar, and there just seems to be a hole in the thwart and a corresponding hole in the keelboard, and the mast just drops in, which look a bit hit and miss if you ask me!

Anyway, that's enough to be going on with. Enjoy!