I'm not sure that this qualifies as "simple".
I'll let you decide.
The key reference for this build was "Anglo-Saxon Houses at Chalton, Hampshire", by PV Addyman, D Leigh and MJ Hughes, published in Medieval Archeology, vol. 16 (1972), pp 33-56. This is very helpfully available for free on the web,
here.
The Archaeology Data Service website (
archaeologydataservice.ac.uk) is a fantastic free resource, with tons and tons of information and inspiration. Go to the archive section then into the journals, series and books area for as much reading matter as you can manage in quite a while!
The first thing to note is that this is a substantial building. The two reconstructed buildings "A" and "B" are both large structures, larger than the church I built and dwarfing the Grubenhaus. Not withstanding the spiritual standing of the church, this would be the most important temporal building in the settlement. I've drawn mainly on the reconstruction of Buildings A1 and A2 as shown in Figure 14 of the paper. The plan I produced derives from this drawing. Note that buildings of this general form are thought to have been in use back into the Post-Roman era
(see, e.g. Osprey Fortress 80, British Forts in the Age of Arthur), so this might be of wide use to people.
The key dimensions are as follows. The overall length of the building comes out as 197 mm, with a width of 113 mm. Lengthways, the building divides into five "bays", each about 20 mm. Doors are 18 mm wide, and whilst on the reconstruction go from the floor to the full height of the wall, I left them at about 33 mm to give some strength to the model.
The main structural posts supporting the walls and roof are squared, and roughly 8 mm thick. The smaller supporting posts are set at 10.5 mm centres and are about 2-2.5 mm.
The hip roof is suggested in the reconstruction, due to the technical ease that a roof of this type offers. Let me tell you that to the wargamer it provides no such advantages. Compared to a gabled roof, it's more difficult and labour intensive to construct. On the other hand it provides a further visual distinction from the other buildings, and I think that's a good thing. The last thing you want is to reproduce the Anglo-Saxon equivalent of a modern housing development, where the only differences are the numbers on the doors!
The roof height, above the wall line, is about 104 mm, which gives hip angles of about 64 degrees. This appears to be hellishly steep - modern tiled roof angles are about 40 degrees, but thatches need to be much steeper to shed water, and especially snow, which otherwise will overload the roof.
I succumbed to the lure of a building with an interior. Hence, it gets a lift-off roof so that you can put figures inside. I found this placed restrictions on the construction. If I wanted to lift the roof off and on, and since the roof is relatively large and broad, I determined the walls needed to be fairly robust. The only thing I felt would be strong enough whilst still being reasonably thin, allowing planking inside and out and not appearing to be about a man's height thick, would be sheet MDF. I cut some strips about 38 mm wide using my table saw. If you haven't got one, then hand sawing will work, but the power tool is quicker and more reproducible. Top tip - cut a good bit more than think you need. You WILL need it!
Wall sections cut out and ready.
The outer wall structure is relatively simple: it's just square cuts, then add cutouts for the doors and windows. Take care when cutting the doors and windows to allow for the position of the structural posts! It's worth marking all of these on the walls from the word go.
Marked out for structure. Hatching indicates large posts, single lines smaller posts, cross-hatching openings.
There's a doorway in each long wall, and one in one of the end walls. A couple of narrow windows is all that's needed. You need to go a bit carefully here to avoid breaking the relatively thin pieces left, but that's all.
Openings cut with scrollsaw and chisel.
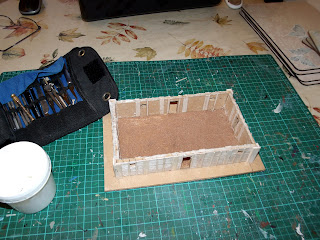
Now glue the walls together, directly onto the base. One thing with MDF is that it soaks up glue like pouring water into a hole in the sand! I primed all the glued edges here before assembly, and gave the base a good coat of PVA, which was allowed to dry fully, before even starting. Here's the hall with the walls together. A quick run round with a brush will deal with any excess glue. As the magician Max Malini said, "I only cheat a little": - the steel angles are very helpful in holding small pieces of timber in place while the glue sets. Useful on many household repair and DIY tasks too!
Walls glued up.
Whether you build the roof next or start detailing the walls is up to you. The two pieces are separate sub-assemblies.
The next step with the walls requires sticking huge numbers of small pieces of balsa wood to them to provide the planked construction. Unless you possess infinite patience, this is best done in short bursts... Door posts, lintels and window frames are added at the same time, providing a nice planked structure. The corners are formed by mitring the wood roughly and filling the gaps with caulk.
Outer walls planked.
The interior walls are plaster, represented by a layer of tissue paper, like the cob on the Saxon church, for several reasons. Whilst being historically accurate (reason 1), it also provides a visual distinction between the inner and outer walls (reason 2) and is much quicker and simpler than planking like outside (reason 3)! I included the main structural posts, door and window framing on the inner walls, but left out the rest of the woodwork, since it would be concealed. The floor could have been packed earth, planking, or a mixture of the two. I went for packed earth, represented by soft sand over PVA. The archaeology doesn't suggest the presence of any posts inside to add support to the roof, so these are left out
Interior: walls plastered, posts fitted, floor sanded.
Well, that's part 1 done. Part 2 is the interior details and the roof.
Enjoy!


