Monday, 27 December 2010

Can't Photograph Miniatures For Toffees (2)

Went back to the problem and kicked it around a bit more. After quite a lot of to-ing and fro-ing, I established something that seems to work.

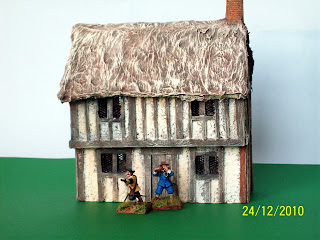
These are a couple of simple conversions from Warlord 28mm infantry. I'm sure you can see the problem! The shine is annoying, given that in "real life" the finish shines like rough concrete...


So, I tried something else. With the camera in closeup mode, on a tripod set about 40-50cm from the work, I positioned the figures in front of a window, to get daylight as the main light source. The backdrop was a simple piece of kraft paper, and a piece of green card for the "floor".

I used a halogen lamp, place on one side as fill-in illumination, but left the overhead room lights off. I then took the pictures, using averaged metering, both with and without flash.

Post-exposure, all the pictures got a little bit of processing via PhotoShop. I used autolevels on all of the pictures, and in some cases on the non flash shots, it appeared necessary to reduce the red level via the Colour Balance function.

Flash has a habit of burning out closer parts of the shot - the colour disappears from the edges of the subjects. Also, any highlighting (and most of the shading!) is lost. Finally, the flash pushes some pictures to a very blue colour balance that I didn't think was very helpful.

The end result is this. The same two figures, photographed as above. The house, incidentally, was made as per the "Building Simple ECW Houses" instructions in an earlier post.


Not perfect, but I'm happier with it.

Thursday, 23 December 2010

Redoubt Enterprises ECW Dragoons

One half of my dragoon regiment was made up from a pack of Renegade Miniatures mixed mounted and foot figures. I have reviewed those separately, here. The other half of the regiment, including all the command figures (officer, ensign with guidon and drummer) came from Redoubt Enterprises.
Overall,  the anatomy on the Redoubt figures is very good, and they are nicely proportioned – they are roughly the shape of normal people, which is rather a difference to the Renegade examples! Sizewise they matched to Renegade and the larger ranges of figures, rather than Perry / TAG / Warlord for example.
The figures come with armoured or unarmoured heads, which you select which at the time of ordering. Redoubt’s website works well and delivery is good. My figures have arrived after a couple of weeks, which to a person brought up on “please allow twenty eight days for delivery” is perfectly adequate. The armoured heads are all in three-barred helmets, which aren’t terribly appropriate for dragoons, so I went with soft hats except for the commander, to further set him apart from the rest of the rabble.
The clothing is varied, well sculpted and appears authentic, based on the sources I have.  All except the drummer have swords moulded in place. These are relatively simple “mortuary swords” or tucks, and are totally suitable for the figures.  In neither the foot nor the mounted figures does the ensign get a flagstaff. I’m not sure what the correct terminology here is – “real” cavalry have Cornets, and apparently dragoons used a similar type of staff, but the flag was, even at this time, a swallow-tailed guidon. However, I’ve never heard of the flag bearer referred to as a “Guidon”!
None of the human figures, mounted or foot, suffer from any real amount of flash. There is a little around the arms, but this wafer thin and easily removed. Mould lines are easily removed with knife or burnisher. The metal used is quite soft and given the small amount of work required, drastic tools like coarse files and Dremel burrs are totally unnecessary.
The separate heads are easy to fit. The “necks” are overlong, and need cutting down to the appropriate length. This is facile with a side cutter. Interestingly enough, all of the mounted figures fit ALL of the horses without any additional modification! This is really quite unusual, as some mounted figures I have bought required significant chopping of horse and rider to achieve a decent fit. I milled a bit of metal from the standard bearer’s coat to improve the fit but this was more in the nature of fettling than serious metalwork.
One slight hiccup is that the figures have carbines, not muskets, in many cases. Dragoons really ought to have muskets, not carbines. I’m not sure if this indicates that the figures are actually cavalry doing double duty as dragoons, but I haven’t let it spoil my day. I left the foot figures carrying carbines as they were, but decided that the mounted men really ought to be put right.
The task was relatively simple. Cut away the existing forestocks and barrels, drill into the hands and replace with new barrels made of steel wire. I then added a thin layer of green stuff to the forestock and butt, to build up the initial bulk, and to give the barrel some support. When this was dry, additional green stuff was used to build up the musket. Ramrods were modelled from the green stuff forming the forestock, barrel bands were created by incising the putty with a scalpel and lockwork, where necessary, was added at the end. The results can be seen in the photo. When I get a bit further, I’ll add some further pictures.

Can't photograph miniatures for toffees!

I can't seem to get the light consistent, either with fill-in or using flash. Flash seems to burn out the highlighting I've done, and my two layer highlights vanish and look like I've just slapped on the base coat and left it!

If I had a bit more sense I'd note HOW I do each set and when I get any that work I could go back, but do I? Do I hell!

Sunday, 19 December 2010

1st Corps Swedish Musketeers - A Review

I bought a pack of eight 1st Corps Swedish musketeers at Wapnetak at York earlier this year. They were bought direct from the manufacturer (seemed like very nice people!), so I can't comment on mail-order service .
The figures are 25mm from the sole of the foot to the eye, and seem reasonably well proportioned. The musket barrels are 19-20mm, and by my reckoning this works out very close to the 46-47 inches quoted on page 17 of Brzezinski’s MAA235. According to a correspondent on the Miniatures Page, this isn't a coincidence, as the figures were commissioned based on the information in that book.

There was no flash on any of the figures, and the mould lines were small and easy to clean up with a scalpel and file. The detail is crisp, clear and deeply cut. Things like the cords holding individual shot pouches on the bandoliers and bows on the trousers are present, and very delicate. The muskets are nicely sculpted and look like the pictures I’ve seen, but the musket rests seem odd to me.

The poses and anatomy seem plausible, except for the “shelflike” calves that 1st Corps don’t have a monopoly on. The faces are nice, but possibly a bit narrow, with very “sharp” features. The hats, helmets and coats resemble the photos I’ve seen of contemporary items.

The figures took paint well, and the deep detail made it easy to do. I’ve attached a couple of photos so you can see what sort of fist I made of this. The basing (or rather lack thereof) is pending my deciding what to do with them.  I thoroughly enjoyed doing them, and at £7.50 for eight figures, I liked the price too.


Please ignore the dates on the pictures - they're totally spurious and only there to confuse me. These chaps may end up as an additional unit of shot to bolster a 1644 regiment of foot, but until that time, here they are.

Sunday, 12 December 2010

Building Simple ECW Houses - Part 1

I thought I’d put together some instructions on how I made some simple houses for ECW wargaming. They’re built from packaging foam (largely) with odd bits of foamboard and other materials for details. I started with a drawing – hand-done the old fashioned way with ink on graph paper, I’m afraid. The footprint of the building is sized according to the 1644 rules requirements, for 28mm miniatures. The plan is here as a PDF file. Printed full size, it’s set up for 28mm, but reduced to 54% it ought to work for 15mm. The window heights placed on the plans are arbitrary, but seem to work for me. The number and position of windows and doors is determined by preference and whimsy only – houses of this type in the real world are all unique.


First, assemble the materials. I’ve got sheets of packaging foam here, plus random stone pattern plastic card, foam board, spruce and balsa sheet, matches and Wills Kits tiled roof sections (p/n SSMP206). The Wills Kits range are sold in railway modelling shops, and I find that there are a lot of really useful products in the range. Given that they are designed for railway modelling, there is quite a lot of stuff that I would struggle to find a use for (corrugated iron sheets have limited value in the ECW), but stone and tile patterns, nailed timber board sections, slated roof sheets and the like are useful and far quicker than making your own.


I cut the plan into bits in order to transfer the measurements onto the packaging foam. I find this works for me, but other people may find that they can simply work “off plan”. Whatever works for you. The packaging foam is somewhat “squashy” and has an open texture that I find makes drawing lines with anything other than a marker pen challenging.


With the measurements transferred, cut out the wall parts. I cut out the windows and back fill the openings, rather than appliqué windows directly onto the structure, but this isn’t based on anything other than preference. The honking great big knife in the picture is a Swann Morton PM8, which I find ideal for cutting foam of all sorts. A chisel is quite handy for cutting out windows – it’s just like cutting mortices in timber, except a lot easier!


I assemble the walls dry, using dressmaking pins, to check for fit, and if necessary, fettle the parts a little to ensure that they go together properly. The time to do this is now, not when you’ve got glue on them. I don’t put internal floors in my buildings, and the roofs are fixed in place. If you wanted to put in internal details, now would be the time.

In the next post, I'll go through making and fitting the roof, and starting to add details.

Tuesday, 30 November 2010

Rosemary and Company Brushes

I initially bought three brushes from Rosemary & Co, by way of a trial. These were a #2 pure sable (Series 99), a #1 sable blend (Series 401) and a #2/0 Kolinsky (Series 33).
I bought from the company website, which was quick and easy to use. The brushes arrived three days later. They were securely packaged, being bound to a board with an elastic band all inside a strong padded envelope. All the brushes had good, heavy-duty protectors over the points. Some might question whether this is sufficient protection, but having bought on several occasions now, the same method has been totally trouble free.
A careful examination showed excellent points and not a hair out of place once the gum Arabic had been rinsed away. Size-wise, the brush heads compare closely with both Pro Arte and Winsor and Newton, so if you stick with the size you know from these manufacturers you shouldn’t get too many surprises. The handles are glossy black and feel well- proportioned. Overall the brushes are very close in length to the equivalent sizes from other brands. Note however that many of the brushes are available with long handles as an option. A “long” handle is about 4” / 10 cm longer than a standard, and feels very different.
I put the brushes to work straight away. I use mainly artists’ acrylics on figures, and am used to a fairly stiff, slightly rebellious paint that has to be put firmly in its place.
 The sable blend was the cheapest and very obviously so. It holds a nice, but not perfect, point. There is a decent sized belly that holds a good, but not massive, volume of paint. There is less spring than the pure bristle types, but the filaments respond well. The brush has, it must be said, stood up far better than similar types of brush from other makers. I’ve used quite a lot of Winsor’s Sceptre Gold II’s and Pro Arte Series 100’s over the years and they can become very ragged very quickly. This is a far better brush than equivalent sable mixes I have used.
The pure sable is nice – one would say brilliant were it not up against its stablemate (see below). The point is quite short and tapers quickly, giving a good belly to act as a reservoir, whilst allowing you to get in to do fine work with the point. Filaments are very even and possess a lovely feel and crispness. There’s no evidence of “hooking” at the point and it has stood up well to a good deal of use. Overall, a very nice brush indeed, fully the equal of pure sables supplied by other makers at a far higher price.
The piece de resistance is the Kolinsky. The point is exquisite, with wonderful spring and resilience. The precision of the brush has to be felt. The saying that you don’t notice good tools could have been written for these – they work so well that you need expend no effort on thinking about the brush, it simply goes where you want. I have no complaints about the life of the brush – it’s holding up well. I would without hesitation say these brushes are every bit the equal of the famed Winsor and Newton Seven series, at a fraction of the price. I’ve subsequently bought a number of other Kolinskys from Rosemary, in sizes from 10/0 to 2 and the above applies equally to all of them.
Later, I got a couple of the “Ivory” brushes. These are a synthetic hogs’ bristle imitation, intended for oils. I like stiff brushes like this for drybrushing. I find the ability to “scrub” the paint in is helpful. I bought a short flat and a filbert. In an ideal world, I’d be able to get an angled brush (side loader / shader type) too, but I suppose you can’t have everything!
If you want exemplary brushes at decent prices, give them a whirl.
Visit the company website

Perry 9lb Falcon Review

I also got the Perry Miniatures 9lb Falcon at Wapnetak in York. This is such a sweet little kit! With no flash and minimal mould lines, preparation took no time at all.
The cannon measures out “right”, although given that the things were all bespoke, true scale accuracy is probably not especially meaningful. The moulded woodgrain looks lovely, and takes paint a treat, but there’s no way you can say this is even close to “scale” – raised to full size this would be beyond rough!

Not withstanding that, the cannon more or less assembles itself, going together with just a touch of epoxy, and no filler anywhere. The figures are all equally nice – lovely proportions and anatomy, good posing and they take paint wonderfully well. I made no effort to portray any sense of uniformity among the crew, simply trying to represent a set of four industrious fellows, well turned out in civilian garb. The whole thing makes a beautiful little vignette, with three of the crew straining to manoeuvre the cannon whilst the forth goes back and forth like a fiddler’s elbow to shift all of the other detritus that will be needed to get into action. This brings me to the only minor niggle – the rammer staff and scoop carried by one of the crew is moulded in a curve against the figure’s shoulder – I couldn’t straighten this and although it doesn’t detract too much from the whole I was a tiny bit disappointed.


The set is based according to the conventions in the Victory Without Quarter rules, which since they group artillery on a large, single base (as opposed to separated to allow figure removal, as in e.g. 1644), suits a group like this. The basing is temporary at present - hence the slightly unfinished edges. If I decide to leave it as is, I'll tidy it up. Another possibility is to re-base the set in some sort of fortification. We shall see.

New Blog - New Start

I've been meaning to do this for a while but haven't got around to starting. Now, finally, the tuit has been found and since I'm stuck at home because of the weather, I've decided to give it a go.

Don't get your hopes up for anything very exciting, groundbreaking or wildly different. It's just my take and experiences on wargaming and modelmaking. I'm not any sort of professional painter or builder, I just enjoy what I do, and I hope you find some of it interesting or useful too.

If I have a "theme" to my working practices, it's being cheap! I hate spending money more than I absolutely have to, and I'm a great one for picking up what I can to make stuff from. Luckily, I'm very seldom in a hurry to get anything on the table, so I can trade time on my work for money spent on it.