Showing posts with label SAGA. Show all posts

Friday, 20 June 2014

Viking Levy for Saga

In keeping with the view in the Rulebook that these troops are drawn from the lowly, insignificant peasants, the poor old levy don't even get a Led Zeppelin quote!


The levy are extremely simple. A pack of Gripping Beast Dark Age warriors will provide everything you need. The rules recommend building levy armed with slings or bows, and the kit provides more than enough sling-equipped hands to do this. For the purposes of Saga, it doesn't make a blind bit of difference whether these men have slings or bows, as the weapons have the same characteristics. Converting the GB warriors to bowmen would take a great deal more effort, but would be possible if you really wanted some variety.

Since levy are dirt-poor, the chances of them having weapons other than their slings (apart perhaps from a knife) are very low, and the chances of them having a helmet is about nil. Therefore, the kit bare heads are all you need, and a bit of greenstuff or spares from the Viking Hirdmen box adds knives easily enough. I didn't give all of them knives - those with them are the ones with aspirations to rise to the dizzy heights of warrior status!

Clothing would all have been dull, natural (ok, grubby) colours, as you would expect for people without two coins to rub together who spent most of their time doing vile, dirty jobs. This is of course nice and easy, and since you can get away with a fairly limited palette, it's also relatively quick.

 Here's a dirty looking bunch...

You could almost feel sorry for this lot. Almost. They're probably aching for a chance to get into a WAB game, where their impact could be greater and their status is less miserably low.

...And they don't look smarter from this side!


The beauty of these is of course that whilst they've been painted up for use as Vikings, they are almost totally ubiquitous. They will slot seamlessly into almost any Northern European army from late Rome to roughly the First Crusade. Which is about as much praise as this lot are going to get!

Merry meet again!

Wednesday, 21 May 2014

"We also come from the land of the ice and snow" - Viking Warriors for Saga

Ah-ah-ah!
We come from the land of the ice and snow,
From the midnight sun where the hot springs blow.
How soft your fields so green, can whisper tales of gore,
Of how we calmed the tides of war. We are your overlords.

On we sweep with threshing oar, Our only goal will be the western shore.

So now you'd better stop and rebuild all your ruins,
For peace and trust can win the day despite of all your losing.
Led Zeppelin, "Immigrant Song"

The warrior elements are slightly trickier, not in modelling terms, but based on what you actually want. Basically, you can't get what you want out of one box. The majority of Viking warriors are going to be equipped with a spear and other weapons like a saex or handaxe, a shield and most likely a helmet. On the other hand, most of them probably would not have a sword or mail, as these were high-cost, and hence high-status, items. Saying that, the odd one might: the sort of men who were aspiring to join the ranks of leaders or hearthguard.

 One set, one point

So, I made them up with unarmoured Dark Age warrior bodies, but used the spare helmeted heads from the Viking Hirdmen kit. A unit of warriors in Saga is eight men, and I decided one or two per group with a sword might be reasonable, and possibly one with armour, but in his case, no sword. All these chaps got slightly colourful clothes - if they were even a bit successful they ought to be able to afford an odd bit dyed with a brighter colour or something with some embroidery or decoration. I went to town with the shields. Maybe a bit over the top, but they certainly standout.

Second point's worth

Here's the whole two points' worth of warriors. All told, I think these look the part. Lock up your valuables - these lads will half-inch anything that isn't nailed down and red-hot, and clobber anyone that tries to stop them. Alternatively, if you attack them in their homes, anything you come away with will have been pried from their cold, dead hands - assuming you survived trying.

All together - altogether trouble!

Merry meet again!

Monday, 21 April 2014

Beowulf

I first read Beowulf when I was about nine or ten years old. I don't recall who's translation it was - if I had to hazard a guess, I would say it was Rosemary Sutcliff's. It wouldn't be fair to say it was the one book that set me onto the path that has led me here: that honour belongs to The Hobbit, which I read around the same time. But that version of Beowulf was certainly one of the things that led me to other versions of the same work, and then to read The Sagas, the Fight at Finnsburg, Y Gododdin, Sir Gawain and the Green Knight, the works of Mallory and so many others.

I own what might perhaps be called a Beowulf bore's collection of different versions. I should say at this stage that I am far from being a scholar of Old English. I can pick out words and phrases, and understand how the language was structured, but I cannot claim to be highly qualified to comment on the accuracy of any translation!

William Morris's version has a feel I like, but there are parts where he seems to translate things differently to all the other versions I've read, so it sits uneasily. It has the advantage of being available for free.

Michael Alexander's version is my personal favourite. My copy is dog-eared, heavily overwritten with my own notes and much repaired. I love the feel and tone of it. The alliterative structure Alexander has produced, to me, really drives home the idea that Beowulf was written to be read aloud, recited in front of enthusiastic listeners, rather than pondered over in a quiet corner.

Marc Hudson makes no attempt to create alliteration, but his version is light, accessible and accompanied by a thorough, thought-provoking commentary.

John McNamara's verse translation is unfortunate in that it came out in 2005. By then I was firmly wedded to Alexander's version, but I would recommend McNamara's version without hesitation to any new buyer/reader. The poem text is excellent and benefits from a fantastic set of supporting notes and commentary.

So here's my Beowulf. This is Musketeer Miniatures version of Aelle. Their figures are fantastic sculpts and casts, and the character figures have so much life that I almost regret having built parts of my Anglo-Saxon and Sub-Roman armies with the figures I have, even though at the time I bought them I loved them. I already have an Aelle, so there was an opening for this figure to do something else.

Never have I seen
a greater earl on the earth than one of you,
a man in his war-gear. He is no hall-retainer,
ennobled with weapons, unless his looks belie him,
given his peerless form.

That description was the one given by Hrothgar's coastguard when he first sees Beowulf and his companions arrive. This mini is almost "straight out of the packet". The only difference is that I replaced the shield, with a version made from 10 thou plastic card, engraved and embossed to represent rivetted construction in three bits. When he hears about the dragon, Beowulf orders his armourers to make him a shield of solid iron, as he believes (quite rightly) that a wooden shield will fail against the dragon's fire.


The champion of warriors, the chief of the nobles,
ordered a wondrous war-shield to be made for him,
entirely of iron, since he knew for certain
that a wooden shield could provide no protection,
when fire attacked wood.

The other figure here was sold with the Aelle/Beowulf as a banner-bearer. He gets elevated to the status of a real character: Wiglaf.


This was Wiglaf, Weoxstan's son,
well-loved shieldman, a Scylfing prince
of the stock of Alfhere; 


Wiglaf is the only man among the Geats with the courage to stand with Beowulf when he fights the dragon. All the other members of Beowulf's hearthguard, the toughest of the tough, turn tail and run, and only Wiglaf remains, striking the blow that gives Beowulf the chance to make a killing stroke against the worm.

Here are the two, together, ready to take on anything that threatens the land of the Geats. I put these two on 1p coins as bases, rather than the 2p's I normally use for characters, with the plan that they could be sabot'ed onto a single base as a unit in a game (sort of "kill one, you still have a king" idea).


They killed the enemy, extinguished its life; 
by their courage, the kinsmen, acting as one, 
worked its doom. So should men do when there is need.

Of course, it wouldn't be complete without a couple of shots of the heroes confronting the dragon, so here goes:


Merry Meet Again!


Sunday, 6 April 2014

"We come from the land of the ice and snow" - Viking Hearthguard for Saga


Ah-ah-ah!
We come from the land of the ice and snow,
From the midnight sun where the hot springs flow.
The hammer of the gods will drive our ships to new lands,
To fight the horde, singing and crying: Valhalla, I am coming!

On we sweep with threshing oar, Our only goal will be the western shore.
Led Zeppelin, "Immigrant Song"


Whilst I could scratch up a Viking force from existing figures I have, it wouldn't be terribly authentic, and anyway, where's the fun in that? Based on very favourable experience with them, I decided to build my Viking army as far as possible using Gripping Beast plastics. As all Saga-ites know, a warband consists of three types of troops, hearthguard, warriors and levy plus the warlord.

Two and a half points of Hearthguard

The Hearthguard are successful professional warriors, who would be expected to be well equipped, so these are all fully armoured and heavily armed, with sword, axe and spear, and dressed in (for the time) colourful clothing. Two units of hearthguard requires eight Viking figures, but in the first instance, I did a sprue-full.

First point...

A single sprue from the Viking Hirdmen box contains ten armoured bodies, all without heads. Some have the shield arm moulded in place, some are separate. This allows double-armed men to be built very easily. Each sprue gives you shields, fourteen heads, numerous spare arms and a slew of extra weapons to use where you like.

Second point...

The sculpting is as usual for GB - crisp and clean, with deep cut detail. Anatomy is good, and these are solid, strongly built men, reflecting their status (and hence access to the best grub!).

Moulding is good, in the usual hardish Renedra plastic. Mould seams are minimal and easily removed. In one or two places, there is evidence of some flash appearing - hope the moulds aren't wearing out!

Last few.

Assembly is easy, and all parts fit well, and allow for plenty of variation. I have to say that one or two of the poses you can come up with are not entirely convincing, so playing about and doing lots of dry runs (old modellers' term there!) before reaching for the glue is definitely worthwhile. Blu-tak is your friend in this.

These chaps get relatively brightly coloured clothing - reds, greens, yellows, even a bit of blue. The shades are slightly muted, since these were vegetable dyes, but certainly a bit more eyecatching than the usual variety of greyish browns and brownish greys! The clothing is further jazzed up with details on collars, cuffs and hems. Bright, contrasting colours work well here, and would appear to be historically correct.

Fighting to the last

The final step of course is shields. These are not the sort who are going to enter a fight with a plain white, black or grey battle-board. These need a variety of colourful backgrounds with bright, vibrant designs on top. Home-made decals were my solution, as freehanding the whole lot is a bit too much like hard work!

So, I now have two and a half points worth of troops. I'll do a couple more at some point and round out the hearthguard to three points. But next, some rank and file!
  
Closeup view - might be the last sight you ever have!


 Merry Meet Again!


Sunday, 23 March 2014

Making Saga Dice

Although it's quite possible to play Saga with ordinary D6's, the special Saga dice are part of the "feel" and add to the spectacle.

Sets of Saga dice are not cheap. Not. At. All.

So, if you want four (or more!) sets, it comes to a significant pile of money. So, as per my normal practice, I made my own.

The Saga Forums have the graphics you need, in various forms, so there's not really any clever art to do. At this point, there are obviously a number of options on how to proceed. You could print onto adhesive address labels, onto paper and stick it on, or print onto decal paper, which is what I did.

I imported the graphics into InkScape, and added them onto circles matched (as closely as I could) to the background colours of the dice. By doing this I could print onto white decal paper, which gave me better contrast and opacity. White decal paper is about £1.60 per A4 sheet, and one sheet will do all four sets with enough left over to make an army's worth of shields.

The blank dice came from The Dice Shop, and cost just over nine pounds for all 32 dice to make up the four sets. They do a ton of different colours and sizes in blank dice, so you ought to be able to get anything you want.

Cutting out and decalling up the dice is an easy job, but time consuming. Do it in front of the television, over a night or two. Several coats of clear lacquer sprayed on after the decals are dry protects them in use. The laquer was about four quid for the can, did all these sets,plus  tons of other stuff (measuring sticks and shield decals) and there's still plenty left for other projects.

Ready to roll!

Here are my Anglo-Saxon/Anglo Danish dice, along with my Scots and Norse Gael set. The Viking and Welsh sets will follow when I regain sufficient will and sanity to cut out another 96 decals! You get the idea. All up, the cost shook out at under £15 for all four sets. Works for me...

Merry meet again!

Saturday, 22 March 2014

Measuring in SAGA 2

On page 7 of the main rulebook, it clearly states "real warriors prefer steel". Not wishing to be thought of as less than a real warrior, I obviously started cutting metal!

My intended raw material was recycled metal cargo strap. However, nylon seems to have replaced it totally. One possibility was cutting long strips from a sheet but I decided it was too much grief, so I had to put my hand in my pocket and buy a strip of metal. Unfortunately all I could get was aluminium. Now, someone is going to mutter how this is lightweight (well, it is) and not suitable for a "true" warrior. Anyone who subscribes to this view can be disabused of it rapidly by having the "Long" measuring stick jammed smartly up their nose, followed by twisting it round and round a few times. Aluminium or not, it'll bring tears to their eyes, guaranteed. Even Ragnar from the rulebooks could be brought round this way!

I formed the finished sticks by carefully cutting to length, then marked out a mitre on each corner. About five seconds on the bench grinder mitres everything beautifully. All the edges were thoroughly de-burred at this stage, because even real warriors find great lumps of razor-sharp swarf in their fingers detracts from their enjoyment of the game!

 Still haven't tidied up much!

I toyed with the idea of chemically etching designs into the sticks. I've done this before on steel items and got good results, but aluminium is funny stuff, what with oxide coatings and such, and I wasn't sure how well I could get it to work. Engraving was my next idea.


Pondering what to do next

The results at this stage look far from promising: grotty, grubby loooking bits of metal with no appeal. I decided on a Viking raven design, but struggled with transferring it onto the metal to scribe it in. Carbon paper didn't work and the design was too small to use a pounce wheel. I decided I had to print off the design in decal form, then engrave.


Yuck!

At this point I started adding the decals, ready to engrave the designs, but as soon as I put one on, I had a sudden change of heart. The decals really popped against the metal, so I quickly printed off another one, and decided it was time for a little bit of magic: the buffing wheel on the bench grinder!


Filthy job!

 Once the pieces were buffed on a cotton wheel, first with grey soap to take off the worst of the gnarls, then finished with pink soap, I added the decals, followed by two coats of laquer to prevent tarnish and fingermarks. This is what you get. Job done!


Shiny!

All ready to use now. Merry meet again!

Monday, 17 March 2014

Measuring in SAGA

Most wargames call for some sort of measurement and SAGA is no different. However, where SAGA does diverge a bit is that there are only four measured distances, called (imaginatively enough) Long, Medium, Short and Very Short. The old reliable tape measure will of course deliver, but for speed and simplicity, measuring sticks are prefered in the game.

There are a number of ways you can proceed. The rulebook contains templates for measuring sticks, which are also available on the SAGA forum. Printing/copying these, cutting them out and sticking them to cardboard will give functional, if rather flimsy and short-lived measuring sticks. If you are time-poor, or not handy with making things, a number of companies will sell you a set of MDF ones, in many cases laser-cut with nice faction designs on them. Or you could make you own.

Of course, I made my own.

These, quick and easy, came out of a strip of hardwood bullnose moulding. The length (enough for several sets) came from a DIY store for a couple of quid. Just to prove I can do it, this was strictly a hand tools job. I marked off the lengths, cut them on a mitre box, then gave the ends a  light chamfer with a block plane. Some sanding (carefully, so as not to alter the length!) and it's job done. Fifteen minutes, end to end.

Excuse my mess!


They can be painted, waxed, varnished, engraved, tarted up with decals or marked with poker work (or any combination thereof!). I went with decals, with length symbols from the furthark and Aniron fonts, plus a couple of boars. Looking for other potential markings was the dodgiest bit of all. Surf the net for Saxon or even "English" symbols and it seems as if you're only ever one click away from some extremely unpleasant and unrighteous content! Those of you doing this on company computers - beware.

Spray booth is looking tatty - give it another coat!

Three sprayed coats of laquer was fine on the decals, but it was soon obvious it would need about thirty to make any difference on the wood, so I brushed on one coat of yacht varnish that sorted everything out. You need a nice glossy varnished surface to apply the decals over (old scale modeller's trick!).

 Ready to go!

 Here they are with the decals in place, and a couple of furhther coats of varnish to protect them from rough handling and aggression (by players or miniatures!)


Sorry lads, better luck next turn!

So here we are, demonstrating to the Anglo-Saxons hearthguard that they are just barely out of range to mash the Scots warriors - or have a go, anyway.

Merry Meet Again!


Thursday, 13 March 2014

Yan Tyan Tethera - Strathclyde Welsh Cavalry

“Yan tyan tethera” means “one two three”, in the Cumbric language once spoken across a wide tract of the north-west of England and south-west Scotland. The language now survives in some place names, and a few vestigial bits of dialect like this, used by farmers to count.

This was the language of a country, variously called Ystrad Clud or Alclud, Rheged or Strathcylde, that once stretched from Loch Lomond in the north to Rochdale in the south.

This part of Britain is generally not a soft, comfortable landscape. Anyone who has not visited it can get a fantastically evocative and extremely accurate view of it by reading George MacDonald Fraser's excellent "The Steel Bonnets". Whilst the main subject of this book is the later Border Reivers, the geography that forms the backdrop is unchanged. Much of the country is bleak, formed of bare, stony fells and harsh-carved hills. In many other, gentler, parts there is only a thin layer of poor soil laying over the same rocks just below. Outside of the coastal plains, this makes for poor farmland, hard to plough and harvest. If it is hard to plough now, how much harder would it have been with an ox-drawn ard plough? The land does, however, provide adequate grazing, for cattle lower down, and tough sheep on the higher slopes.

This hard land has always bred hard people. Apart from Cornwall, this was the last part of England that retained its Celtic language. Long before the Angles arrived, the people of Strathclyde had already spent centuries fighting off the Picts and Scoti, and having resisted them quite successfully they went on to resist Northumbrian dominance longer than anywhere else in the North. The northernmost part remained a semi-autonomous area even later, allied to but separate from, the Kingdom of Scotland. 

Referred to in Saga as “Strathclyde Welsh”, these men, used to a mobile life following their herds, fight mainly as cavalry. Riding men, armed with spears and raiding indiscriminately, were of course a feature of this area even later. In a sense, these cavalry seem the direct ancestors of the later Border Reivers.

Here are the first of my Strathclyde cavalry warriors. These are all built using Wargames Factory Ancient Germanic Cavalry, with some weapon arms taken from Gripping Beast Dark Age Warriors, and a selection of GB Saxon thegn and West Wind Sub-Roman heads.

The only, very slight, issue is that the men with the shield arm held close to the body are problematic in terms of what shields to use. These figures are obviously designed to work with the elongated hexagonal shields in the kit, and the round shields simply do not fit convincingly, and nor did any others that I had in the spares box. A quick measure up gave me a figure for the maximum diameter I could use. A swift rifle through the workshop turned up a length of steel tube of this diameter, which was sharpened to make a disc punch. I used this to chop out a series of discs from a sheet of planked plastic card. A bead of thick cyanoacrylate added around the circumference, allowed to dry and sanded slightly flat formed the shield rim, and the boss was a small disc of plastic card, punched out, with a drop of CA in the centre. Lovely!

In order to get these finished, I built the horses "out of the box". The next ones will get a little more work, to make them more like Fell ponies. It won't be a lot - WF have done a good job with the sculpting, so a bit of feathering on the hooves and a longer mane will do it.

This first set are conveniently numbered yan tyan tethera (from left to right). Yan has a GB Saxon head and upright spear arm, tyan has a West Wind Sub-Roman head, while tethera has GB head. In the last two, the arms ars from the original kit.

Yan, tyan, tethera... 

A 28mm cavalry figure on the table for just over a pound is a really bargain, and with the tiny bit of work I've done I'd say these stand up well against figures I've paid a good deal more for. For those prepared to make the small changes required, I would recommend these without hesitation. As well asSaga, these will give good service as British light cavalry in Dux Brit or Dux Bell, which makes them even better value.

And again!


Comparisons are sometimes helpful, so here's one for you. From left to right we have a  Gripping Beast late Roman on a Conquest horse,  the three WF Strathclyde Welsh and a Newline Design Pict,.


Unlikely looking allies!

Here they are again, side on. I don't know if this matchup is any more plausible!

Let's do it!

Merry meet again!

Saturday, 22 February 2014

Wagons Roll! Part 3, Beasts and Men

With the wagons assembled, it's time to make them mobile.

Here are the yokes, with the cattle. The yokes were made by laminating two layers of 40 thou styrene sheet and filing/carving out the shape. Two pairs of holes were drilled, and neck holder were made up from soft wire to fix the oxen to the yoke. The yoke was attached to the shaft with a chain on the real thing.


One final thing. A two-wheeled cart is normally "driven" by having someone walk alongside the ox and guide it. A four-wheeler actually needs someone sitting on the seat yelling and using a stick. My drivers were converted from Gripping Beast Dark Age warriors. These two photos show the original figures and how the changes will be done.


These next two show the results of the cutting and grinding. I've put them on the carts to make sure they fit. It's a trial and error process.


Here are both drivers, assembled, green-stuffed to bung up the gaps/re-texture where necessary, and given a coat of primer. 


So, here's the two wagons, painted, hitched and based, just awaiting their drivers. The basework is some flock from Treemendus. It's fantastic stuff, totally awesome to work with, totally different to the "normal" flock I'm used to. Highly recommended.


After getting the drivers painted and mounted up, all I needed was a bit of static grass to get them on the table. Here's a quick closeup of the drivers. I think the conversions have worked well enough.

Rough looking pair! 

So, time for a couple of shots of the finished articles. These two, with the two-wheeler I built here, give me enough transport for the wagon train scenarios in both the Dux Brit and Saga rulebooks. Tons of fun!


Like Arthurian Britain's answer to Eddie Stobart!

Merry meet again!


Wednesday, 12 February 2014

Wagons Roll! Part 2, Four-Wheel Wagons

Four wheel wagons are slightly more complex to build than the two-wheeler, but not a lot. Obviously there's twice as much wheel building, and in my case a driver's seat bench, but frankly they don't challenge the building skills much more.

Here's two: one assembled, the other a kit of parts. The keen-eyed among you will notice a couple of design differences between this and the smaller one.

Ready to assemble...

First, a two-wheeler steers by telling the ox where to go, a four-wheeler actually has an articulated front axle. To be clear, the model doesn't: the axle is fixed and the bits and pieces just give the impression that they could turn. There's such a thing as too much detail!

Second (and more importantly) a two-wheeler has ONE ox, between TWO cartshafts. A four-wheeler has TWO oxen, with ONE shaft and a yoke.

Making a functional cartshaft isn't a problem - a length of plastic stock, with a slight upward curve at one end makes it.

What was more of a problem was attaching my existing cattle to the wagon! In the two-wheeler, the oxis removeable, so it can be used elsewhere. Try as I might I couldn't find an elegant but robust way of doing the same thing with two yoked oxen. I finally gave up and bought some more cattle from Irregular Miniatures. You can see them here.

So, here are both carts, assembled and primed.


And again, with a black ink wash applied. I'm leaving final assembly to another post, so...


Merry meet again!


Friday, 7 February 2014

Sub-Roman Hearthguard - More Knights

When I built my Sub-Roman hearthguard for my Dux Brit army, they came from a pack of West Wind minis, with a total of 20 figures in it. Having built ten as the hearthguard and as the command section, I was left with ten more figures. Well and good, but those ten were all in only two different poses. I really can't handle the idea of Dark Age warbands having this level of uniformity, so it was out with jewellers' saw and bench peg, to start changing the look.

Various arms were cut off, re-posed and pinned in place, with hands moved and angled. One slight problem was that the arms on the cloaked figures didn't really lend themselves to much re-posing. Solution? I've got a boxful of arms with spears, swords and axes left over from the Gripping Beast plastics, and a bit of filing, fitting and fettling soon sorted out the problem. Greenstuff solved the inevitable slight mis-matches, mended lost bits of cloaks and replaced missing chainmail.

The results of the sculpting/modelmaking gave me this lot:

Ready for paint

Prime and paint came up a treat (I thought). I went with nice solid colours (actual dyed colours, rather than various shades of dirt) as befitting a paid, retained warband. The different clothing colours were so that if I had more than one hearthguard unit (cough Saga cough...) there is some distinction. As usual I made up my own shield decals. 

Fighting wedge

For Dux Brit, I don't actually need another ten armoured hearthguard. However, I'm not one to throw anything away (no surprises, eh?) and so here we are. They'd obviously make (all together) a smashing elite unit for WAB (Age of Arthur is a favourite of mine), or three to four points of elite troops ready for the day when Gripping Beast get round to producing an Arthurian supplement for Saga!

Single point Saga units.


Painting these was caught up in the delay caused by my chest infection, plus the fact I had run out of bases! I was only a week away from Vapnartak, so I decided to pick up some from Warbases when I was there and save myself the postage, but the sight of the figures sat there unbased was driving me mad. Made the bases up from plastic card and got them finished, just in time to get a start on the new projects I've bought at Vapnartak!

Merry Meet Again!

Thursday, 16 January 2014

Fortlet - Walls for a Watchtower

Way back when I built the Sub-Roman watchtower, I said it would be no problem to add some walls. I had forgotten about this. Playing various watchtower games in Dux Brit, it became clear that if you withdraw your force to a watchtower, unless there's some sort of wall, there actually isn't anywhere much to withdraw into.

This superb post by Emilio woke me up to the reality of what I needed. Also, his post shows a nice use of the walls as a standalone enclosure. On the grounds that there's nothing about it to not like, I built one.

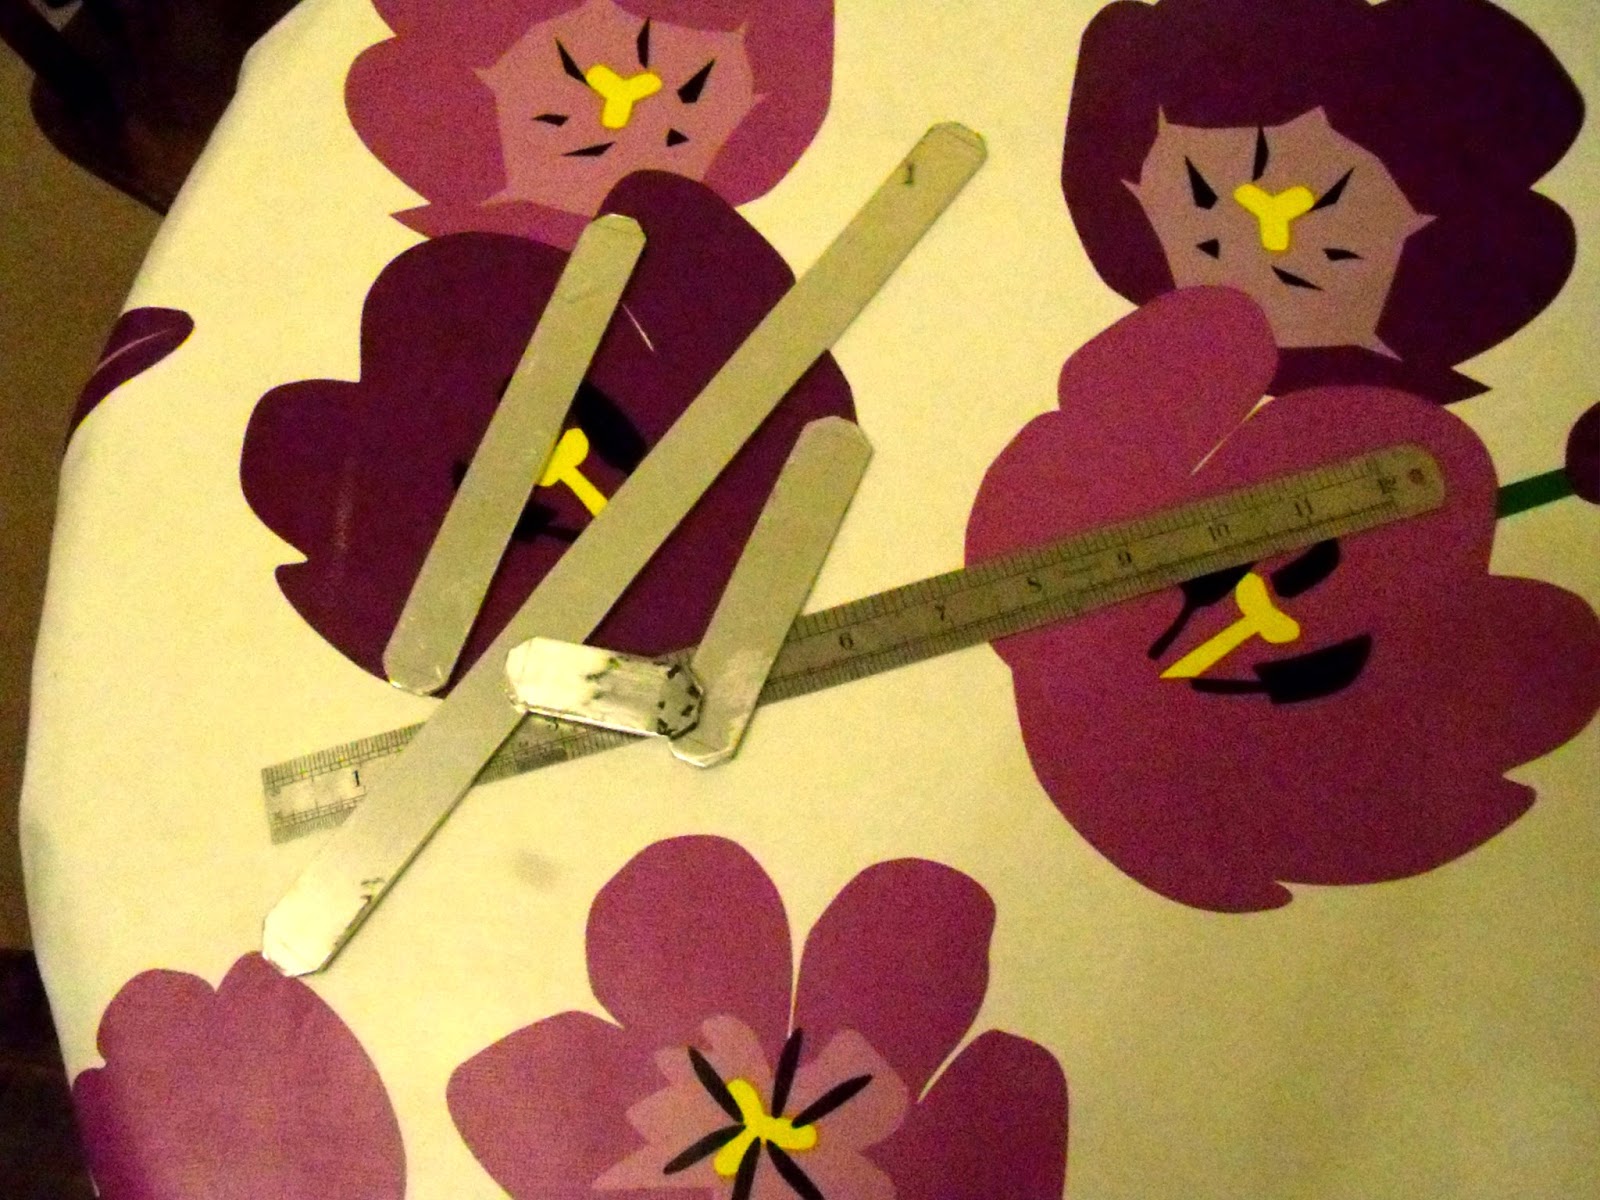
Here's a lump of foam. Very cheap, somewhat cheerful, not really very nasty at all.

 Never seen a start like this, have you? Not more than several times!

And here it is, measured and marked out. The dimensions of the wall are derived (fairly roughly) from the reconstructed turf rampart with a wooden pallisade built at Vindolanda. The top of the wall is designed to be wide enough to take a mini on a 20mm base, and for there to be a space wide enough for a mini to stand in between the botton of the rampart and the tower wall.


The magic of a Magic Marker!

Now, cut out. Turf walls like this are fairly ephemeral. Unless regularly repaired, they will rapidly degrade due to the effects of weather and animal action. What this means is that your structure can be fairly rough and ready, and it will be totally authentic. This one was intended to end up being a reasonably neat version, kept in good repair because the place is under constant threat. The result was, well, you'll see.

Vaguely fort-shaped now


Next, loads of posts, cut from balsa, get fitted on three sides. I deliberately didn't cut the entrance at this stage, to make use of the rigidity provided by keeping the structure intact, so I also left the posts off that side. The posts are pushed into pilot holes in the foam and fixed with a drop of CA glue.

Think of the archaeology this lot would make!

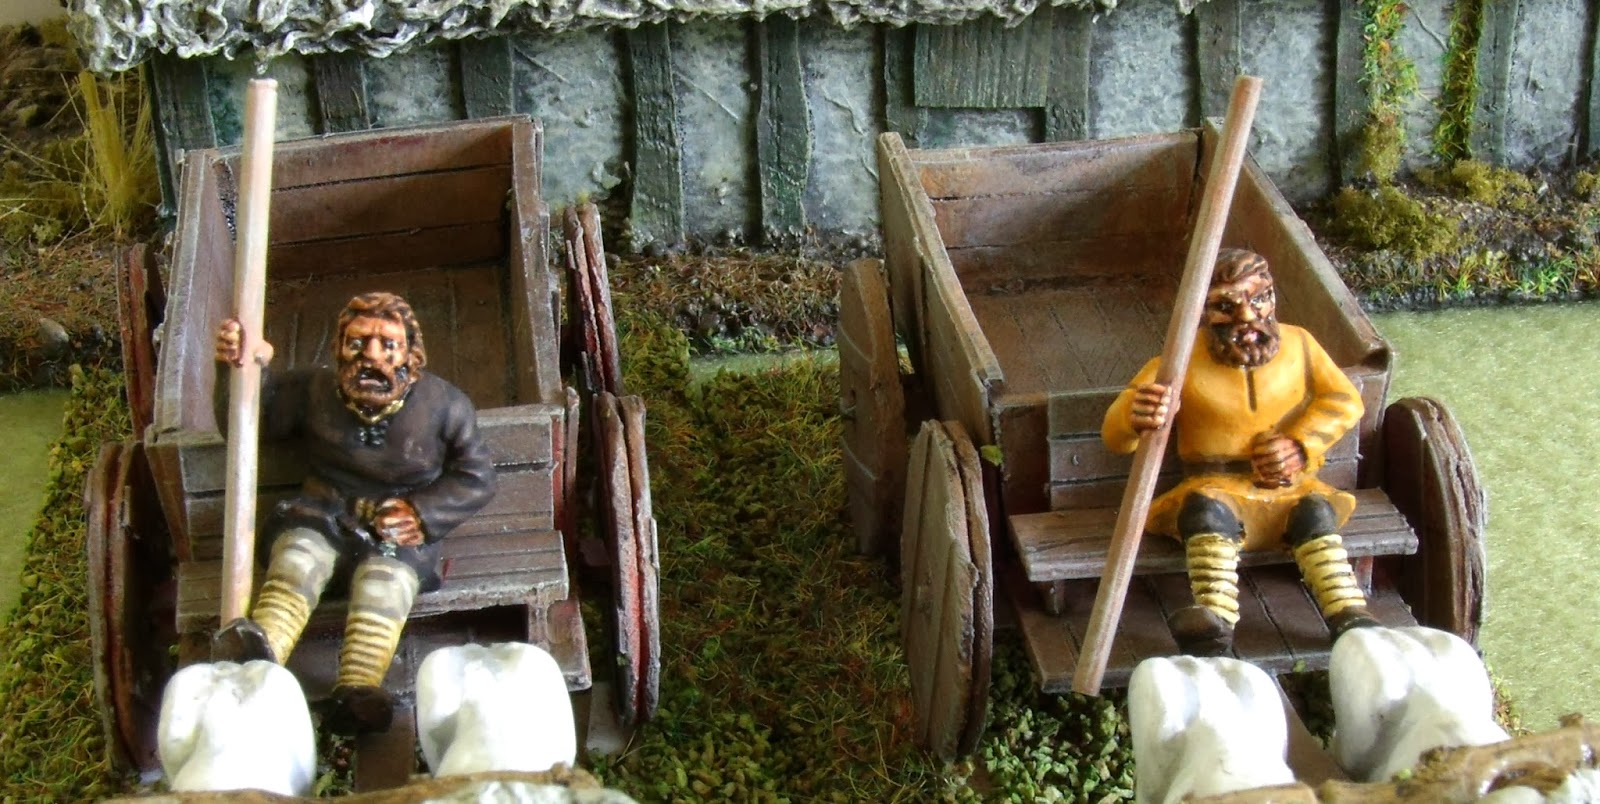
I glued it to a base made of 3mm hardboard (cheap and somewhat nasty) with own-brand impact adhesive (cheap and VERY nasty!). The entranceway is cut wide enough to allow the smaller ox cart I built here to enter (to deliver food, weapons and, most importantly, beer for any garrison). Now before anyone laughs, there's a letter among those found at Vindolanda where a fort commander is pleading with the commissary for beer as his men are becoming deeply restless! At more or less the same time, I added the posts on the gateway side.

Base? Check. Gate? Check. What am I missing?

Now, here's a thing. On the Gask Ridge, up in Scotland, the Romans built a whole series of little watchtowers/fortlets like this (admittedly several centuries earlier) and several have been excavated. Where the site is well enough preserved for decent archaeology, the remains of the turf walls, banks and ditches and of postholes marking the corners of the tower can all be found. The entrances through the banks and walls are also pretty clear. What none of them seem to have is any evidence of postholes in the entrances, as would be needed to fit any sort of gate.

So, onward. Start cutting a couple of hundred short lengths of balsa, 3-6mm wide. Planks would have been sawn or riven out of whole trunks, in varying widths, and all used.

The first of very, very many...

And stick them all to the uprights. Best done in bursts, with breaks to do something else to regain your sanity. Ask me how I know...

Raw materials stored ready for use...

Having eventually planked the whole wall (which only took two evenings...), I gave the woodwork (and then everything else) a coat of PVA to help bind all the wooden pieces together, and provide a key for the rest of the groundwork. Next thing is some details on the ground: basically, turf wall sections are not very resistant to foot traffic, and the areas where people go up onto the walls are going to become a quagmire in no time flat. 

                
Walls, completed.

So, at the bottom of the wooden palisade go loads more short bits of balsa (another really interesting job!) laid on the ground, would prevent the garrison sinking up to their knees at the wrong moment. The corners, where planking is difficult, I added some hurdle sections, cast from  polymer clay. Making them (mould and item) is covered here.

I marked out in the centre for the location of the pre-existing tower, then started a horrible messy task: carefully covering all the foam and wood with a thin layer of painters' caulk. What a grotty job! The stuff gets everywhere.

I sprayed all the woodwork black, then went over the groundwork with a mix of brown emulsion, sand and PVA. Here it is ready for colour and details.

            
Walls, walkways, centres. All ready to detail.

Flock, dirty washes, drybrushing, clump foliage, more drybrushing, ivy (moss strands and hedgerow mix) and even more drybrushing follows, applied across the whole thing. Nothing you haven't seen before. Static grass completes the appearance.

Finally, some accessories. The open gateway is a thing. One possibility is that the defenders made something like a cheval de frise to block the entrance. The basic concept was well known in Roman times, so Sub-Romans could certainly have one. And, of course, once it started to rot, it would have gone straight on the fire and left precisely no archaeological evidence! My cheval (chevaux) de frise was made up from bamboo skewer, and an old favourite of mine, headless brad nails. All of these were painted to represent weathered wood, except for the tips of the arms, which were darkened. Whether this represents fire-hardened points, horse muck to promote infection or a subtle combination of both I leave to your imagination.

Two chevaux, one for this and a spare for the ECW!

Here's the finished article. A Warbases ladder got cut down to make two short pieces, which were glued on two sides of the internal bank. It would be a bit steep to climb in a hurry, especially if it's raining (and in England, what are the chances?).

Rain? What rain?

View through the gate

 Here's the fortlet, with a garrison. It's a motley collection of levy, warriors, skirmishers and slingers, with one elite companion trying to keep order. Good luck with that.

Tough nut to crack, this.

Attackers' eye view. Don't fancy it myself.

And again, with the tower in place.

Looking down into the fort.

And another attackers' view. Like this one even less.

Merry meet again!