Showing posts with label terrain. Show all posts

Saturday, 18 January 2014

Hedges, to mark edges...

Hedges are great. Ideal as markers, cover or edges on the battlefield.

Now, I don't mean privet or box or anything lightweight like that. I mean a proper hedge. Hawthorn, or better yet, blackthorn. These hedges, if they are carefully maintained and trimmed,  every few years, can be "laid". This is a process where thicker vertical stems are cut partway through, then pushed over at an angle to provide an interlocking wall of growth, going horizontal and vertical.

Basically, you can't force your way through a well-laid hedge with anything much smaller than a decent sized tractor. And climbing over it isn't recommended either. The thorns will cut you to ribbons (with the added attraction that if it's blackthorn, the cuts inevitably seem to fester - yuck!). It's like a barbed wire entanglement - just more attractive to wildlife and much nicer to look at!

There seems to be evidence of deliberate hedging and hedge laying in the British Isles going back to the Bronze Age, so a set of hedges is a useful addition to a battlefield in any era. Over that time, different styles have devloped, in response to different requirements (to mark a boundary, or retain sheep as opposed to cattle for instance) and variations in climate. So it is possible you could get a hedging expert who will tell you your Yorkshire-style hedge has no place on a southern battlefield, but I'm prepared to take the risk!

I prepared my MDF strips by champering the edges:

 Six inch and four inch sections

Then added a thin coat of caulk to give some semblance of unevenness.

Some texture

And gave them a coat of brown emulsion mixed with sand and PVA.

Very earthy!

 This is a block of rubberized horsehair (from the nice chaps at Treemendus), to form the body of the hedge sections.

Funny old stuff!

The next thing is to cut the horsehair to size. Having tried (very sharp) scissors and (ditto) scalpels of varying sizes, I can't really decide what's the best tool for this. They all seem to struggle! Anyway, strips need to be about 20-25mm high by 10-12mm thick. A hedge this size is proof against most things except tanks. You can leave the top flattish, or straggly and tapered, depending on how well-maintained you want the hedge to look. Glue the horsehair down. I use impact adhesive. In theory, you could use them like this for winter-set games.

 Bare and cold-looking - Brrr!

Once all is dry, give the hedge a spray with diluted PVA glue from an atomiser bottle. If you don't have one, get one. Three bits of advice: firstly, clean it out carefully after use as any glue in the nozzle will block it; secondly, don't pinch it from your daughter or wife as this may dramatically reduce your life expectancy, thirdly, filter what you spray through it - this will extend the life of your atomiser. Sprinkle with an appropriate hedgerow mix (mine comes from Treemendus, and I think is better that other brands I've tried) and allow to dry. Once dry, I repeated the process on two of the sections, to give a sense that some bits of the hedge are desner than others (as per reality!). Finally, I gave them another coat of dilute PVA to seal everything in, and allowed them to dry again.

All covered in foliage - feeling warmer already!

Carry out your normal approach to groundwork on the bases, and varnish to taste. My experience is that these hedge sections are significantly less robust than fencing, and so benefit from being stored carefully - i.e. not under a Sub-Roman church!

 Finished, with groundwork.

Here they are, in use. First with some Saxons carefully picking a way through. Carefully because you never know what might be the other side.


Carefully does it!

And here, with my ECW dragoons. The native environment of dragoons is, of course, lurking in place like this to make life uncomfortable for other people. This, therefore is a good test of the suitability of the hedge sections!

Ideal for an ambush!

Merry Meet Again!

Thursday, 24 October 2013

Fields of Crops, Quick and Cheap!


Want some very quick terrain? Try this.

Get a coir fibre mat to represent growing crops (cereals, mostly). I bought a short pile (20mm) version from my local “if we don’t sell it, you probably don’t need it” farmers’ stores, for the princely cost of about four quid.

Then you cut it into appropriately sized rectangles with a big knife.

And that’s it.

I suppose I should wipe my feet!

If you want a bit more, a simple variation is to cut out a section in the middle of the piece, so that it looks like any troops in the field are standing in the crops, not floating in mid air. A word of advice. Trim a piece off each side of the inner piece. That way it's easy to get in and out. The off-cuts could be used to make narrow, but (in my opinion) totally unconvincing hedges.

Dense enough to hide in - but is it realistic?

There’s a school of thought that says that coir matting doesn’t look like a cereal crop field, and I can see why, especially if you just do the above - cut off lumps of it and plop it down on the table. So, invest a fraction of the time it would take to make another terrain piece and ginger it up a bit!

The colour tends to be a bit dark, but I’ve seen plenty of old, weathered barley crops that look that colour, and if it’s a big deal there’s always drybrushing.

Another argument is that as it is, it’s too dense. I got around this by carefully setting my table saw to cut less than the depth of the pile of the mat, then running the section through to produce parallel rows of stalks. This took a long time, as the single-kerf blade took several passes to cut each row. Norm Abram’s stack head dado cutter would have done it in no time! Oh, and the mess it creates is breathtaking! Then, trim it short around the edges, and add a bit of flock/static grass/clump foliage there, to represent the weedy bits on the headlands of fields. Lovely!

Miles more authentic, this one!

Here's the same piece, with the centre cut out.

Take a stand in the middle of a field!

Here's a close up. These ruffians are the first btach of Pictish raiders, with an armoured noble to try to keep some semblance of order among them. Good luck with that...


Right lads, here we go...

Merry meet again!


Sunday, 11 August 2013

Swamp Music!

Hound dog sing that
Swamp, swamp, swamp, swamp music
When the hound dog starts singin'
I ain't got them big ol' city blues!

Swamp Music - Lynyrd Skynyrd

Whether you call it a swamp, a marsh or just a muddy hole, a bit of terrain where it isn't quite land, but isn't quite water either is always good for a few interesting moments.

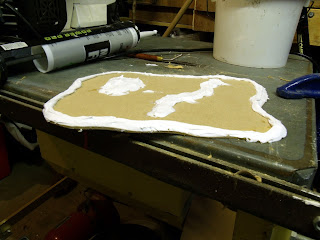
I started with a nice flat piece of MDF, rough cut it to provide a reasonably random shape and chamfered the edges with a plane.

A spokeshave also works!

Next step was to add some caulk around the edges, to define the banks of the swamp.

Stay on the bank!

Then, some more caulk into the middle, reasonably randomly placed, to indicate drier patches - a small island and a treacherous path.

Oh look, a path...

All the solid gound gets a good coat of PVA and sharp sand, then add flock to the dry ground, and apply a wash of very dilute burnt umber acrylic.

Getting there - at least the dry bits!


My experience of rivers, lakes, ponds and (most importantly in this case) swampy areas goes back decades, and something I have noticed about shallow, niffy bits of water at the edges of large lakes is that the colour is actually quite uniform. Unless the water is really quite clear, the small differences in depth don't really show up. Having picked my way around bits of ground like this in wooded, nutrient-rich areas as well as around lochs and lochans in Scotland which are about as mineral and nutrient depleted as it gets, the effect is actually pretty uniform. So there you go...

A characteristic of marshy, swampy areas is marginal plants - sedges, rushes, flag iris (my favourites) and even lilies. These were added at this stage (except for some of the lilies) using sisal string, brush bristles, coloured paper and anything else that seemed appropriate, painted and drybrushed as necessary. The reeds are tufts of fine string sold for this purpose, fitted by drilling holes and pulling bunches of the stuff through with a wire hook then fixing with cyanoacrylate. The discs of paper added at this stage model those lily pads that are below the surface, as some always are.I added some rocks here and there, for variety. Next, drybrush the dry ground as you see fit, then it's time to move onto the water!

 Loads of plants!

I started with burnt umber, stippled on various shades of green and brown, then decided I didn't like it, so gave the whole thing a wash of black to kill most of this, then went with a fairly uniform drybrush of brown. Actual water followed the advice of Jimbibbly over at the Lead Adventure Forum: yacht varnish. Lots of yacht varnish. Eight coats in this case. I remember building fishing rods,  putting eight or ten coats of varnish on the ring bindings - that was tedious too, and discovering one-coat high build epoxy varnish was a revelation! Maybe next time...

One down, another seven to go...

Well, that brand of varnish requires 24 hours between coats, so progress might best be described as sedate. Final touch was to add a few more lily pads, this time at the surface, plus a small tree on the island. These are sort of places where you always seem to find gnarled, stunted alders or hawthorns, so why should this be different? Here is is with some people wondering if taking a short cut across here is a good idea...

Come on, it's not deep..."

 Somewhere between coats five and six, something went a bit Pete Tong, and it all went wrinkly. I'm justifying keeping going with this on the grounds that it looks like the wind was blowing, and whipping up the water a bit. It might look quite good as the surface on a flowing river (assuming you got it the right way round) but for the life of me I can't figure out HOW it went like this. Answers on a post card...

I don't care, I'm still not getting my boots wet!

Merry meet again!

Something A Little More Complicated - A Sub-Roman Church part 6 (and last!)

A final heavy drybrush with old English white sets up the interior for detailing.

The floor offers opportunities for more or less complexity. Options could include flags, a cement surface, mosaics or a combination of these. I went with a combination! The side aisles went with a cement surface, solid, plain and simple to do. This was dark grey-brown emulsion, (who would buy it to use on their house?!), mixed with some soft sand, followed by a series of drybrushed shades.

The nave and apse can have a bit more flash. Now, some early churches had absolutely breathtaking mosaics (as indeed did many secular Roman buildings). Here, in a small, poor church built at the edge of the Empire close to (or immediately after) the end of the Roman era, I don't think anything that spectacular would be justified. But a little bit would be nice, so I compromised with a flagged floor and a nice bit of mosaic at the altar end, extending into the apse.

I thought about thin card, cut into squares to form the flagstoned areas of the floor, but when I realised it would involve cutting and gluing close to 100 tiles, I lost heart. Inspiration in the form of a sheet of very thin extruded polystyrene saved the day. This was measured, cut and fettled to fit:


So far, so good...
Then marked with a pen:

8mm - roughly 18" square in scale

The tiles were embossed with a pencil, and the whole thing got a coat of  PVA to seal it and stop it absorbing paint like a sponge. 


Just like real flagstones, with the joints.

I painted the whole thing black, carefully picked out random stones in shades of brown, and drybrushed with raw umber. 

Multi coloured slabs - just like the real thing

The tiled section is then glued in place.


Very fancy indeed!

As for the mosaic, I cheated and copied a section of existing mosaic and printed it out to size. After a bit of to-ing and fro-ing it ended up going all the way into the apse (oo-er!), so I had to knock up another flagged section.
What a gorgeous apse, with that mosaic!

The church gets an altar at one end and a font at the other. 

The altar is made from spruce stock. It's a simple wooden table, with a crucifix (made from brass strip and green stuff), a chalice (made from green stuff and a pin as an armature) and an icon (printed and glued to plastic card, frame from spruce). The keen eyed among you will note it's the same icon as is on my Dux Brit warlord Arthur's shield.

 There's a bloke in the village knocks those icons out for three buckets of ale a go!

The table got a wash of burnt umber, mainly to cover the excess superglue, and the items were painted with brassy gold paint and washed with a mix of burnt sienna and sepia inks - whether these are gold, bronze or brass is left to the imagination


Finished and ready to be added.

The font is a piece of elm stock, with details carved in.
Here's the carving:
Rough (very rough) carving

And here it is after a coat of paint, a black wash and a drybrush:

Ready for a baptism - all we need is a baby!

Note there are no pews. Pews are a later feature - by many centuries!

Well, here's the end result. From the outside first, looking across the battlefield. Bedwyr is outside, for scale purposes.
Very atmospheric!

A bit closer this time. I think it works well enough.

Can't see my apse from this angle!

 Having added the interior and details, I'd better show how they look. I'm content with the results.


 Some people will fight anywhere!

Here's another view, showing the main event as Bedwyr and one of Arthur's companions see off the Saxon raiders.
Thieving mawks off our plate!

Well, that's the end of a very long project - I think it was worth it, and I hope you've enjoyed it as much as I have!

Merry meet again!

Saturday, 29 June 2013

Hundredth Post! Trees, going cheap!

Well, I never thought I would get to one hundred posts. Three or four maybe, but not one hundred.

As regular readers know, I have ambitions to be the cheapest modelmaker on the net. So, here we have my take on making trees on the cheap. Given the underlying theme of stinginess and skinflinting that has underlaid  this blog, I thought something like this would be totally in keeping for my one hundredth post!

Now, trees are not expensive, not on a per-item basis. If you just want a few, somewhere like Minibits is the place to go. There stuff is really, really nice, reasonably priced, and they are VERY nice people. The trouble is that you might need a LOT of trees. For a piece of terrain two feet by one,  (as per Dux Brit rules...) that might potentially be up to a couple of dozen of them. That number of trees starts to come to serious money. 

This is a roll of MIG welding wire. This is a gash one, it’s rusty and won’t feed so I picked it up for nothing. They retail at about five quid, for roughly 200m of wire. Now, this stuff is very stiff, springy and unyielding. Great for feeding through motor driven welders, but not for much else.
So, a metre of wire is two and half pence. Keep that in mind – it’s important. Six metres of wire, say 15p total?

 From stiff, springy wire...

Now, a few seconds with a blowlamp, heating the wire red-hot and letting it cool slowly anneals the stuff so it twists, bends and flexes, becoming malleable and ductile. Heating five or ten metres of wire in one go is the way to go. A few pence worth of gas is all it takes.

To soft, malleable wire!

Cut the wire into roughly 10cm lengths, like this. Mount the whole lot in a vice and start twisting! Let out some filaments as you, to provide branches as you go along. Squash the end down to make a sort of “spike” to get the thing into the ground.

Twist!


Until it gets tree-ish!

Now, mummify the whole thing with masking tape. Watch it, this is a nasty prickly job! A metre of tape will do half a dozen trees, so call that roughly two pence worth. Are you keeping a running total?

All taped up.

Give the whole thing a coat of something to add texture. This is acrylic modelling medium, a quid a tub from Lidl. You could use PVA mixed with sawdust otherwise. Adds less than a penny to the cost of the build.


Roughed up a bit.

Paint everything your favourite shade of mud/chocolate/bark/other substance brown. I use emulsion match pots, and all the half dozen trees uses about a penny’s worth of paint.

Basic brown...

Drybrush with lighter browns, greys and bit of green to represent moss or algae. Less than a penny.

Bring out that texture!

Liberally dabble all the branches with suitable glue, whether impact or PVA, and add clump foliage. This is where the price goes through the roof! The bag of clump foliage cost six pounds, and I think I’ll struggle to get more than fifty or sixty trees out of it! So, ten pence per tree to the total. Keep adding up!

Now we're getting somewhere! 

Once the glue is dry, mount all the trees on a block of wood or a bit of waste foam, and give the whole lot a spray with diluted PVA. I buy PVA at the builders' merchant's, five litres for nine quid, so my 5ml costs less than a penny! Diluted out in my spray bottle, it’s simplicity itself. A line of PVA and some flock give you ivy up the trunk if you want...

All sealed up!

A coat of matt varnish dulls everything down and finishes the job.

OK, so let’s recap. Fifteen pence worth of wire, two pence each for gas and tape and three pence worth of paint, comes to 22p for the painted armatures. Add SIXTY whole pence for the clump foliage, and a penny’s worth of PVA. We’re up to 83p all up. I’m going to be horribly pessimistic and round it up to an eye-watering 90p to include other costs (matt varnish, impact adhesive, etc). We have six trees for 90p, or 15p each. Cheap enough?

Here they come!

Here they are in situ. Drosten, the Pictish noble are pulled his remaining elite warriors up onto a small wooded hillock, pursued by Arthur, Gawain and Arthur's companion infantry. On the whole, even with a bit of a bonus for cover and elevation, things are not looking good for Drosten...

Let's have this out like men, then...


So he's managed to persuade Arthur to settle it man to man, and Drosten's infantry have scarpered before Arthur changes his mind! The lighter-coloured tree on the left is a Minibits tree. I think the different trees work well together, different species growing naturally.

Merry meet again!


Sunday, 2 June 2013

Something A Little More Complex - A Sub-Roman Church, Part 2

With a church shaped wall outline, it was (I thought) a case of cracking on with decor and a roof!

And then Red Orc, over at the Lead Adventure Forum, said "...it should really have an apse. That's pretty much the mark of a church in the late Roman period in Britain, I'd say... British churches practically demand apses, as they do have late Roman models" 

I found his arguments (that above is the edited highlights - for the full discussion, go visit) compelling. So I added an apse. To do this, it was off out to the big workshop. This was too much work for my dining room table, needing big vices and such like.

The basis of the apse was a plastic bottle, about 40mm in diameter. Standard plastic waste pipe is about this diameter, but I didn't have any offcuts on hand, so this bottle (surplus due to the lack of a lid) stood in.

A church, and a bottle.

 The top and bottom get cut away with a hacksaw. The cuts are inevitably rough, but I'm not too worried.

Even I can't find a use for the top and bottom!

The resulting tube is cut into two pieces, along the conveniently provided lines, using shears.

 An apse, and a spare apse...

The position of the apse is marked...

X marks the spot...

 ...And a couple of large holes are made through the wall of the nave of the church.

...Where you DON'T drill the holes!

Next, the aperture for the apse is is cut out with a fret saw (my least favourite tool!) using the holes for access for the blade, then neatened up with a round rasp.

A neat hole - eventually!

After roughing up both sides of the plastic with some VERY coarse sandpaper, the plastic is fixed in place with cyanoacrylate.

An apse!

Now, the kicker is obviously that the rest of the walls are 9mm thick, and the apse is about 0.8mm, which stands out a bit. How to add the thickness was a bit of a poser. I toyed with gluing on some wood or plastic battens and making up the thickness by plastering over it with one strike filler, then decided to use extruded polystyrene foam.

Blue foam like this is obviously a great substrate, having a decent thickness and being easy to paint, scribe and so on. However, it isn't very keen of taking on cylindrical shapes - at least not in this thickness. I tried scoring and bending, with no success, before forming it to shape using the old hairdryer in the picture. This was cast off as "broken" at some point, but was repaired and now serves in the workshop! The heat does collapse the foam a bit, and I found I needed to be careful to get enough heat to make it flexible without going totally flat. The one here is only about the third go!

Now the walls are thick enough!

The scheme for adding an apse was not much different to how I would have done it had I decided to add one at the outset. It was just more difficult as an afterthought!

After this slight interlude, it's on with the rest of the construction!

Merry meet again!