Hound dog sing that
Swamp, swamp, swamp, swamp music
Swamp, swamp, swamp, swamp music
When the hound dog starts singin'
I ain't got them big ol' city blues!
Swamp, swamp, swamp, swamp music
Swamp, swamp, swamp, swamp music
When the hound dog starts singin'
I ain't got them big ol' city blues!
Swamp Music - Lynyrd Skynyrd
Whether you call it a swamp, a marsh or just a muddy hole, a bit of terrain where it isn't quite land, but isn't quite water either is always good for a few interesting moments.
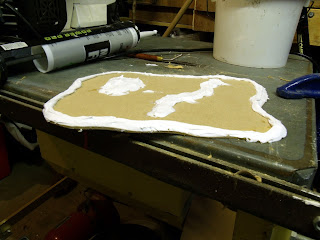
I started with a nice flat piece of MDF, rough cut it to provide a reasonably random shape and chamfered the edges with a plane.
A spokeshave also works!
Stay on the bank!
Then, some more caulk into the middle, reasonably randomly placed, to indicate drier patches - a small island and a treacherous path.
Oh look, a path...
Getting there - at least the dry bits!
My experience of rivers, lakes, ponds and (most importantly in this case) swampy areas goes back decades, and something I have noticed about shallow, niffy bits of water at the edges of large lakes is that the colour is actually quite uniform. Unless the water is really quite clear, the small differences in depth don't really show up. Having picked my way around bits of ground like this in wooded, nutrient-rich areas as well as around lochs and lochans in Scotland which are about as mineral and nutrient depleted as it gets, the effect is actually pretty uniform. So there you go...
A characteristic of marshy, swampy areas is marginal plants - sedges, rushes, flag iris (my favourites) and even lilies. These were added at this stage (except for some of the lilies) using sisal string, brush bristles, coloured paper and anything else that seemed appropriate, painted and drybrushed as necessary. The reeds are tufts of fine string sold for this purpose, fitted by drilling holes and pulling bunches of the stuff through with a wire hook then fixing with cyanoacrylate. The discs of paper added at this stage model those lily pads that are below the surface, as some always are.I added some rocks here and there, for variety. Next, drybrush the dry ground as you see fit, then it's time to move onto the water!
Loads of plants!
I started with burnt umber, stippled on various shades of green and brown, then decided I didn't like it, so gave the whole thing a wash of black to kill most of this, then went with a fairly uniform drybrush of brown. Actual water followed the advice of Jimbibbly over at the Lead Adventure Forum: yacht varnish. Lots of yacht varnish. Eight coats in this case. I remember building fishing rods, putting eight or ten coats of varnish on the ring bindings - that was tedious too, and discovering one-coat high build epoxy varnish was a revelation! Maybe next time...
One down, another seven to go...
Come on, it's not deep..."
I don't care, I'm still not getting my boots wet!
Merry meet again!


Brilliant...next on the shed to do list
ReplyDeleteTbh, the wrinkling effect makes it look even more realistic. A blessing in disguise me thinks.
ReplyDeleteThanks guys! Gunbird, I'm not unhappy with it - I've spent enough time by windy water to know what it looks like. I just wish I could work out how to replicate the effect!
ReplyDeleteIt looks like maybe the surface you were on is not quite level and it flowed to one side. That being said it is a fortuitous "mistake" because it looks great.
ReplyDeleteLooks grand to me!
ReplyDeleteVery nice, I plan to do something similar myself in the future.
ReplyDeleteThat's a nice looking piece of swamp you got there. Thanks for sharing.
ReplyDeleteThanks for sharing. I need to build some of these.
ReplyDeleteOhh, nice one.
ReplyDeleteYou do not want to sink there.
Looking very nice to me!!
ReplyDeleteVery nice! I really like the ripples, I was wondering how you'd managed to achieve that effect. ;-)
ReplyDelete