Saturday, 26 November 2011

Grubenhaus, part 2 - the roof

Putting the roof on the grubenhaus is a more involved job than shaping the building. The main thing is that you will only get one go at the process: if it goes wrong, there is no way (as far as I know) of proceeding except to throw the whole thing away and start again. Whilst the components are cheap, getting to this stage has involved some investment of time, so I prefer to go carefully.

The roof components are shown here. The grubenhaus, with the purlins in place, a piece of fur fabric considerably larger than the house, and impact cement. If you feel that the fur fabric is not going to represent the depth of a thatched roof sufficiently, at this stage add an "under-roof" of foamboard or thick card, then proceed as below.


Apply plenty of glue to the grubenhaus roof and purlins, and a good layer to the back of the fabric. I've found that a largish sized woodscrew forced into the foam gives a decent handle, with plenty of purchase. And you definitely need it! Impact cement has a habit of getting all over everything, dripping and oozing, and the least little bit on your finger will stick to something awkward at the most inopportune moment. The vice helps to keep things under control. 


Once the impact cement has gone from wet to tacky (almost dry to the touch), fit the roof to the fabric. It's much simpler to do it that way around than to try to drape the fabric onto the roof. Place the roof down onto the glued area firmly. Once it's pressed down, the chances of you getting it apart in such a way as to have a second attempt are about nil, so go carefully!


Now simply roll the roof over onto the other glued section of fur, and there you go, a thatch! Albeit a pretty wild, out of control one.


The wild wooliness is then controlled. Wait until the glue is totally dry - if you don't, you'll never get the fuzz out of the knife you use! Then carefully trim away the excess fabric. I've found a knife works better than scissors, unless you've got ultra-nice heavy dressmakers scissors. My wife has, but let's not go there...


Next step is to dress up the ends, to cover up the foaminess.

Enjoy!

Thursday, 24 November 2011

Grubenhaus, part 1

I put the plans and description of a Saxon grubenhaus up a little while ago. Making one for the wargame table is easy enough.

The basic material is the polyolefin packaging material I've used before on the field fortification and timber frame houses. Wonderful stuff, and since it gets thrown away otherwise, so very cheap!

A standard block of waste packing foam...


With all the bits removed that don't contribute to making it grubenhaus shaped! Blue foam (glue problems not withstanding), balsa or even offcuts of timber would all work as alternatives, albeit with more effort.


Purlins are added from cocktail sticks, attached with a good stiff layer of contact cement. You need purlins at both ends - I just hadn't got to the other end by the time I took the picture! The overhang of the purlins is given on the plan, but needn't be too precise.


The next thing to do is to add the roof, but that's a post on its own. Whilst you're clicking to the next post, this will give plenty of time for these bits to dry!

Enjoy!


Tuesday, 22 November 2011

Newcastle's Whitecoats

The Marquis of Newcastle's Regiment of foot, known variously as the Whitecoats or Lambs, are probably best known for their defiant last stand at the Battle of Marston Moor. I'm only about 25 miles from the battle site, and when I drive past the image of the last stand often goes through my mind.

With this in mind, please meet my latest ECW foot, my take on Newcastle's Whitecoats.

Here they are, standing in a row, or two rows actually. Warlord figures, just for a change, but I modelled most of the shot with bonnets. Warlord only include one bonnet per sprue of foot, so the rest were added by me from greenstuff. This gives some variation, of course, but these bonnets would not have been a standard issue item.  One other thing I did with these figures was to paint the whole lot at once, except for the command. To be honest this was too much - I got heartily sick of shading twenty jackets, pairs of trousers or faces at a a time. Normally I do no more than a dozen figures at a time, and I think I'll go back to that from now on.


The command. The ensign is based on the designs in Osprey's Campaign series volume on Marston Moor. The sergeant, complete with partizan, is a spare pikeman body with arms added from the many extra pairs to be found in Warlord's Firelock Storming Party.


And the command again, from the side this time. The camera flash has been unforgiving as far as showing apparent shine on the ensign, unfortunately.


Shot, showing the bonnets. The fellow is the sash is getting to act as a file closer. I did a few shot with other headgear for variety.


Pikemen. The figure at the back is wearing a helm that I added using plastic card and greenstuff. I'd modelled helmets before on assorted Dark Age figures, but this was more difficult, largely as a result of the brim. I wanted nearly all of the pike to have helms, though and this was the simplest (OK cheapest, if I'm honest) way. There are various sources showing a wide selection of widely different helmets being used, from ultra-crude to relatively refined. Those I have modelled may err toward the former...


The regiment, drawn up three ranks deep this time. One disadavantage of the approach I've used for this and my Greencoat regiment (i.e. use two Warlord Infantry sprues per regiment  and cobble up the command from a single command sprue and whatever is left) is that the pike to shot ratio is way off what it ought to be. In this case, I have 16 shot and 12 pike (command is figured  as included with the pikes), for a ratio of 4:3. This ought to be more like 3:2 or even 2:1 in favour of shot, so I need to think about adding between two and eight additional shot to the regiment. I like the way Redoubt look with Warlord figures, so I'll probably go down that route.


Enjoy!

Sunday, 20 November 2011

Size comparisons (Saxons)


Over at the Lead Adventure Forum someone asked if anyone had any comparison information between figures from various ancients miniature suppliers.

I answered with the usual "Well these are about the same as those but these ones are a bit smaller" sort of thing, but on the grounds that a picture is worth a thousand words, I've got these two.


Left to right, we have figures from Black Tree Design, Renegade, Gripping Beast and Crusader. The Vallejo paint pot is for external reference. All the miniatures are based by gluing the metal base to a 20mm square of 40 thou plastic card, with a strip of magnetic sheet attached to the bottom, so this should be uniform (at least, it's intended to be!)


A closer view, without the bottle, gives more of a sense of the shape and proportion. Heightwise there's virtually nothing between them. Black Tree and Gripping Beast are more slender: realisticly proportioned would be a fair term, with Renegade significantly more "blocky" looking. Crusader are somewhere between.

My experience is that the within-range variation is very small: all the figures from one manufacturer match each other very closely. Between-range variation within the same manufacturer seems to follow the same pattern: I've got Saxons and Picts from both BTD and GB, and Picts and Saxons in both cases match extremely well size-wise within and between manufacturers.

Enjoy!

Friday, 21 October 2011

Thegns!

At last I've got something finished to show off!


These are Gripping Beast Saxon Thegns. These were the first, and only, thing I've ever bought from Gripping Beast that were not perfect. In the original set I ordered, one of the figures had a miscast arm - essentially it was missing the forearm and hand. I've never had a miscast from GB before or since (I've bought a fair few things from them too, by no means all of which are on here). I contacted them, and I was blown away by their response.

I had half expected them perhaps to say I should return the bad one and they'd send me a replacement, or to offer some credit against a future purchase. But no, the chaps at Gripping Beast sent me an ENTIRE PACK as a replacement, free of charge!

Let no one say that GB don't look after their customers. I've met the chaps from GB at a couple of shows, and they are great guys in the flesh too: chatty, helpful and fun, as well as selling great products. Their demo games are well worth seeing, I can tell you.

The figures themselves are among (I think) slightly older castings from GB, in that they have attached shields. Most of the later / current ranges have separate shields. The castings were slightly flashy, but since the metal used is soft, cleanup is very easy.


I bought these a while back but they languished half-done while I had the bit between my teeth with my ECW army. I finally gave them the attention they deserve and got them finished. There's a nice lot of variation between figures in terms of dress and accoutrements (pouches, weapons etc) and the faces are very expressive. Being from a time when uniformity in an army was a contradiction in terms, these are great. My painting probably doesn't do justice to the character and individuality you get in these figures. The GB ranges mix nicely with Newline Design, Black Tree and Renegade at least (in my opinion), to provide a wide selection of poses. Note that the figures DON'T come with spears. You will have to provide your own, or other weapons to your taste. The ones here are from a job lot of spears I bought from Newline Design, who, I might add are equally helpful, obliging and  all-round good chaps too.

Enjoy!


Monday, 10 October 2011

Saxon Buildings

I'm resurrecting my Anglo-Saxon army. It has largely languished, part-finished and part-based for DBA since I came to the conclusion that no one was playing DBA in 25/28mm! At roughly the same time I got the ECW bit between my teeth and consequently nothing had happened for quite a while.

I decided to rebase the minis for WAB, re-paint a few and go that way. I'll post some stuff about the figures as I get them ready, including some new stuff that had sat around unpainted for too long.

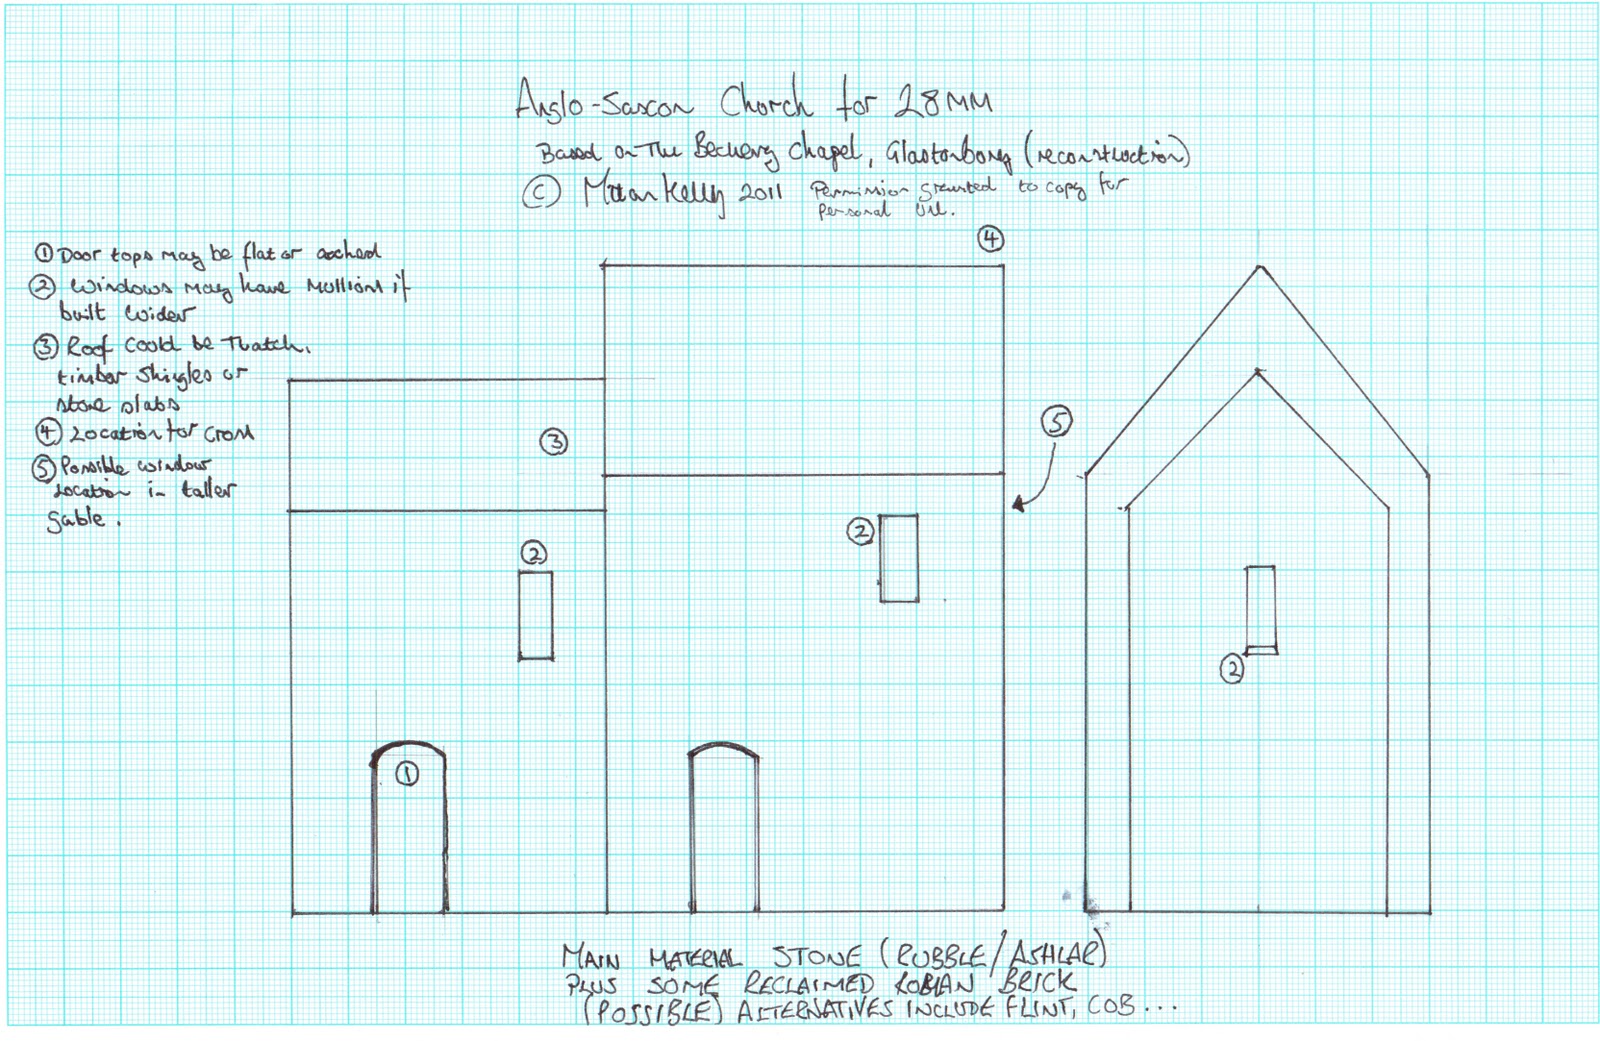
However, in the mean time, here are some drawing for a grubenhaus and a small Anglo-Saxon church. The originals are A4 size, so if you print them as full A4 documents you can scale straight off them for 28mm.

Grubenhäuser are small, semi-subterranean buildings (literally "pit houses") that seem to have been common across the Germanic world, and Anglo-Saxon England was no exception.


There seems to be debate over the use of Grubenhäuser: whether they were dwellings or essentially just workshops. Some of the smaller ones that have been excavated contain what are identified as loom weights, which supports the hypothesis of being workshops, but this doesn't seem to be univerally the case.

The plan is for a much larger building than the 2 x 3 m structure that is suggested as a "typical" Grubenhaus, although it's certainly within the range of sizes of sunked floored buildings that have been excavated, according to the literature. See, for example Sussex Archaeological Collections, volume 140, 2002, pp 41-47

My dimensions came from the reconstruction at West Stow Country Park. I have a picture somewhere with someone helpfully standing outside the door and I scaled it from him. Scaling up or down wouldn't be difficult, especially regarding the length of the building - just chop it off!


The Church is derived from from this reconstruction of the Beckery Chapel at Glastonbury in Somerset. Again, I sized it from the doors and bodged the other dimensions to fit. This sort of "two cell" church is considered typical of Anglo-Saxon village / settlement churches. They were, it seems, often constructed from stone, frequently being the only stone buildings among the timber structures around them. Alternative construction methods other than true masonry apparently included rubble and mortar, cob and even reclaimed roman brick! Roofing might be thatch, timber shingles or possibly stone slabs.


Enjoy!

Monday, 3 October 2011

Work in (very slow...) progress

I haven't put a post up for a while. It isn't that I haven't been doing lots of stuff, but I seem to be in one of those phases where everything is "in progress" and nothing is actually getting done!

Stuff seems to creep forwards but that's about it. Maybe I've got too many things on the go at once, but I can't make myself put any of them completely onto the back burner.

Oh well.