Sunday, 11 August 2013

Swamp Music!

Hound dog sing that
Swamp, swamp, swamp, swamp music
When the hound dog starts singin'
I ain't got them big ol' city blues!

Swamp Music - Lynyrd Skynyrd

Whether you call it a swamp, a marsh or just a muddy hole, a bit of terrain where it isn't quite land, but isn't quite water either is always good for a few interesting moments.

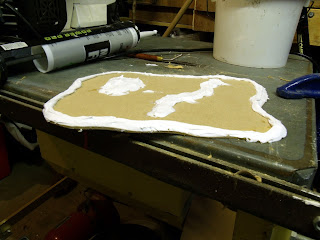
I started with a nice flat piece of MDF, rough cut it to provide a reasonably random shape and chamfered the edges with a plane.

A spokeshave also works!

Next step was to add some caulk around the edges, to define the banks of the swamp.

Stay on the bank!

Then, some more caulk into the middle, reasonably randomly placed, to indicate drier patches - a small island and a treacherous path.

Oh look, a path...

All the solid gound gets a good coat of PVA and sharp sand, then add flock to the dry ground, and apply a wash of very dilute burnt umber acrylic.

Getting there - at least the dry bits!


My experience of rivers, lakes, ponds and (most importantly in this case) swampy areas goes back decades, and something I have noticed about shallow, niffy bits of water at the edges of large lakes is that the colour is actually quite uniform. Unless the water is really quite clear, the small differences in depth don't really show up. Having picked my way around bits of ground like this in wooded, nutrient-rich areas as well as around lochs and lochans in Scotland which are about as mineral and nutrient depleted as it gets, the effect is actually pretty uniform. So there you go...

A characteristic of marshy, swampy areas is marginal plants - sedges, rushes, flag iris (my favourites) and even lilies. These were added at this stage (except for some of the lilies) using sisal string, brush bristles, coloured paper and anything else that seemed appropriate, painted and drybrushed as necessary. The reeds are tufts of fine string sold for this purpose, fitted by drilling holes and pulling bunches of the stuff through with a wire hook then fixing with cyanoacrylate. The discs of paper added at this stage model those lily pads that are below the surface, as some always are.I added some rocks here and there, for variety. Next, drybrush the dry ground as you see fit, then it's time to move onto the water!

 Loads of plants!

I started with burnt umber, stippled on various shades of green and brown, then decided I didn't like it, so gave the whole thing a wash of black to kill most of this, then went with a fairly uniform drybrush of brown. Actual water followed the advice of Jimbibbly over at the Lead Adventure Forum: yacht varnish. Lots of yacht varnish. Eight coats in this case. I remember building fishing rods,  putting eight or ten coats of varnish on the ring bindings - that was tedious too, and discovering one-coat high build epoxy varnish was a revelation! Maybe next time...

One down, another seven to go...

Well, that brand of varnish requires 24 hours between coats, so progress might best be described as sedate. Final touch was to add a few more lily pads, this time at the surface, plus a small tree on the island. These are sort of places where you always seem to find gnarled, stunted alders or hawthorns, so why should this be different? Here is is with some people wondering if taking a short cut across here is a good idea...

Come on, it's not deep..."

 Somewhere between coats five and six, something went a bit Pete Tong, and it all went wrinkly. I'm justifying keeping going with this on the grounds that it looks like the wind was blowing, and whipping up the water a bit. It might look quite good as the surface on a flowing river (assuming you got it the right way round) but for the life of me I can't figure out HOW it went like this. Answers on a post card...

I don't care, I'm still not getting my boots wet!

Merry meet again!

Something A Little More Complicated - A Sub-Roman Church part 6 (and last!)

A final heavy drybrush with old English white sets up the interior for detailing.

The floor offers opportunities for more or less complexity. Options could include flags, a cement surface, mosaics or a combination of these. I went with a combination! The side aisles went with a cement surface, solid, plain and simple to do. This was dark grey-brown emulsion, (who would buy it to use on their house?!), mixed with some soft sand, followed by a series of drybrushed shades.

The nave and apse can have a bit more flash. Now, some early churches had absolutely breathtaking mosaics (as indeed did many secular Roman buildings). Here, in a small, poor church built at the edge of the Empire close to (or immediately after) the end of the Roman era, I don't think anything that spectacular would be justified. But a little bit would be nice, so I compromised with a flagged floor and a nice bit of mosaic at the altar end, extending into the apse.

I thought about thin card, cut into squares to form the flagstoned areas of the floor, but when I realised it would involve cutting and gluing close to 100 tiles, I lost heart. Inspiration in the form of a sheet of very thin extruded polystyrene saved the day. This was measured, cut and fettled to fit:


So far, so good...
Then marked with a pen:

8mm - roughly 18" square in scale

The tiles were embossed with a pencil, and the whole thing got a coat of  PVA to seal it and stop it absorbing paint like a sponge. 


Just like real flagstones, with the joints.

I painted the whole thing black, carefully picked out random stones in shades of brown, and drybrushed with raw umber. 

Multi coloured slabs - just like the real thing

The tiled section is then glued in place.


Very fancy indeed!

As for the mosaic, I cheated and copied a section of existing mosaic and printed it out to size. After a bit of to-ing and fro-ing it ended up going all the way into the apse (oo-er!), so I had to knock up another flagged section.
What a gorgeous apse, with that mosaic!

The church gets an altar at one end and a font at the other. 

The altar is made from spruce stock. It's a simple wooden table, with a crucifix (made from brass strip and green stuff), a chalice (made from green stuff and a pin as an armature) and an icon (printed and glued to plastic card, frame from spruce). The keen eyed among you will note it's the same icon as is on my Dux Brit warlord Arthur's shield.

 There's a bloke in the village knocks those icons out for three buckets of ale a go!

The table got a wash of burnt umber, mainly to cover the excess superglue, and the items were painted with brassy gold paint and washed with a mix of burnt sienna and sepia inks - whether these are gold, bronze or brass is left to the imagination


Finished and ready to be added.

The font is a piece of elm stock, with details carved in.
Here's the carving:
Rough (very rough) carving

And here it is after a coat of paint, a black wash and a drybrush:

Ready for a baptism - all we need is a baby!

Note there are no pews. Pews are a later feature - by many centuries!

Well, here's the end result. From the outside first, looking across the battlefield. Bedwyr is outside, for scale purposes.
Very atmospheric!

A bit closer this time. I think it works well enough.

Can't see my apse from this angle!

 Having added the interior and details, I'd better show how they look. I'm content with the results.


 Some people will fight anywhere!

Here's another view, showing the main event as Bedwyr and one of Arthur's companions see off the Saxon raiders.
Thieving mawks off our plate!

Well, that's the end of a very long project - I think it was worth it, and I hope you've enjoyed it as much as I have!

Merry meet again!

Friday, 9 August 2013

Lack of Progress...

It's lovely planning holidays and having relatives visit, but it isn't making anything here progress!

Actually, it would be grossly unfair to blame either of those things for my inertia.

I'm part-way through the regular infantry for the British faction for Dux Brit, and well on with the final main element, the missile troops (in this case, slingers). Maybe if I hadn't decide to blow time building the first reinforcement units and concentrated on the core army I'd have got further!

Also not helping is a nearly unavoidable desire to make more non-historic figures to go with Nimue. I wonder if I could busk having Merlin as an alternative to one of my units of spearmen? Perhaps not...

The Sub-Roman church is nearly finished, but in typical Pareto analysis fashion, the last 10% looks like taking 90% of the time. And as for the Pictish curragh, well, best to not go there.

Merry Meet Again!