Saturday, 29 June 2013

Hundredth Post! Trees, going cheap!

Well, I never thought I would get to one hundred posts. Three or four maybe, but not one hundred.

As regular readers know, I have ambitions to be the cheapest modelmaker on the net. So, here we have my take on making trees on the cheap. Given the underlying theme of stinginess and skinflinting that has underlaid  this blog, I thought something like this would be totally in keeping for my one hundredth post!

Now, trees are not expensive, not on a per-item basis. If you just want a few, somewhere like Minibits is the place to go. There stuff is really, really nice, reasonably priced, and they are VERY nice people. The trouble is that you might need a LOT of trees. For a piece of terrain two feet by one,  (as per Dux Brit rules...) that might potentially be up to a couple of dozen of them. That number of trees starts to come to serious money. 

This is a roll of MIG welding wire. This is a gash one, it’s rusty and won’t feed so I picked it up for nothing. They retail at about five quid, for roughly 200m of wire. Now, this stuff is very stiff, springy and unyielding. Great for feeding through motor driven welders, but not for much else.
So, a metre of wire is two and half pence. Keep that in mind – it’s important. Six metres of wire, say 15p total?

 From stiff, springy wire...

Now, a few seconds with a blowlamp, heating the wire red-hot and letting it cool slowly anneals the stuff so it twists, bends and flexes, becoming malleable and ductile. Heating five or ten metres of wire in one go is the way to go. A few pence worth of gas is all it takes.

To soft, malleable wire!

Cut the wire into roughly 10cm lengths, like this. Mount the whole lot in a vice and start twisting! Let out some filaments as you, to provide branches as you go along. Squash the end down to make a sort of “spike” to get the thing into the ground.

Twist!


Until it gets tree-ish!

Now, mummify the whole thing with masking tape. Watch it, this is a nasty prickly job! A metre of tape will do half a dozen trees, so call that roughly two pence worth. Are you keeping a running total?

All taped up.

Give the whole thing a coat of something to add texture. This is acrylic modelling medium, a quid a tub from Lidl. You could use PVA mixed with sawdust otherwise. Adds less than a penny to the cost of the build.


Roughed up a bit.

Paint everything your favourite shade of mud/chocolate/bark/other substance brown. I use emulsion match pots, and all the half dozen trees uses about a penny’s worth of paint.

Basic brown...

Drybrush with lighter browns, greys and bit of green to represent moss or algae. Less than a penny.

Bring out that texture!

Liberally dabble all the branches with suitable glue, whether impact or PVA, and add clump foliage. This is where the price goes through the roof! The bag of clump foliage cost six pounds, and I think I’ll struggle to get more than fifty or sixty trees out of it! So, ten pence per tree to the total. Keep adding up!

Now we're getting somewhere! 

Once the glue is dry, mount all the trees on a block of wood or a bit of waste foam, and give the whole lot a spray with diluted PVA. I buy PVA at the builders' merchant's, five litres for nine quid, so my 5ml costs less than a penny! Diluted out in my spray bottle, it’s simplicity itself. A line of PVA and some flock give you ivy up the trunk if you want...

All sealed up!

A coat of matt varnish dulls everything down and finishes the job.

OK, so let’s recap. Fifteen pence worth of wire, two pence each for gas and tape and three pence worth of paint, comes to 22p for the painted armatures. Add SIXTY whole pence for the clump foliage, and a penny’s worth of PVA. We’re up to 83p all up. I’m going to be horribly pessimistic and round it up to an eye-watering 90p to include other costs (matt varnish, impact adhesive, etc). We have six trees for 90p, or 15p each. Cheap enough?

Here they come!

Here they are in situ. Drosten, the Pictish noble are pulled his remaining elite warriors up onto a small wooded hillock, pursued by Arthur, Gawain and Arthur's companion infantry. On the whole, even with a bit of a bonus for cover and elevation, things are not looking good for Drosten...

Let's have this out like men, then...


So he's managed to persuade Arthur to settle it man to man, and Drosten's infantry have scarpered before Arthur changes his mind! The lighter-coloured tree on the left is a Minibits tree. I think the different trees work well together, different species growing naturally.

Merry meet again!


Friday, 21 June 2013

Something A Little More Complicated - A Sub-Roman Church, Part 4

In the case of the roof of the nave, I first made and fitted a ridge for the roof from 4mm dowel. I have no idea how big Roman ridge tiles were, but this scales out to what is currently in use! The ridge had two angled mortices cut into the ends, to rest on the point of the pitched wall. The cut ridge was then dry-fitted, as shown here.
This is NOT a carrying handle!

After this, I glued on two tiled sections, attaching them to the ridge only. You can't see all the blu-tak that supported it during the process!

Even looks vaguely weatherproof!

After letting it all dry, I turned it over and closed up the joints. After letting everything dry again, I fitted  internal crossbraces  to help strengthen and locate the main roof section. It has the added effect of looking like there are actual trusses in the roof! And of course, a truss is just the thing you need in your nave! As with any timber roof, there is a certain amount of chaffering and fettling needed to get the bits to fit...

Roof timbers...

Fitted in place!

The roof is assembled with horizontal purlings made from thin balsa. These have the effect of reinforcing the butt joints in the plastic sections, and at the same time acting as supports, holding the sections in the correct place, while making them removable.


One in place, one for show!

I will confess I had not given enough thought to how to tile a conical roof from flat sheets. When I did, the obvious answer came to me in a flash. "With great difficulty!" Accurate, but very unhelpful. After a LOT of head scratching, I discovered that suitably-sized plastic cones are extremely rare. A few tries with cutting the cone out of plastic sheet was not any more successful. So, I decided there was only one way - the way most of the buildings on here get constructed. Carve it out of a block of foam!

I've got this problem with my apse...

Before going any further, I decided to start painting. I think trying to add details then painting the inside especially might be a recipe for disaster.

After gluing the cone in place and doing a basic paint job in and out, it was a case of cutting and adding strips cut from the Wills sheets.  Lots and lots of little wedges of tiles, all individually cut and fitted, plus a bit at the top to fill in the gap. Ooh, what a pain in the apse!

...But I think it's getting better.

Merry meet again!

Saturday, 15 June 2013

Lady of the Lake

A lady in white will bring sun to the night,
Brighter than ever before.
I know she waits below,
Only to rise on command.
When she comes for me,
She's got my life in her hands,
Lady of the lake 

from "Lady of the Lake" by Ronnie James Dio

 A slight confession. Long before I was a wargamer, I was a rolegamer. Before I read Osprey titles, Bernard Cornwell novels and the works of Lesley Alcock, my influences were Tolkien, Michael Moorcock, Robert Howard, Ursula LeGuin and Alan Garner. All of this, plus a love of heavy metal mean that fantasy and sword and sorcery run through me like the letters in a stick of rock.

As a result, my take on Arthurian wargaming cannot totally decouple itself from my past (and still ongoing!) love of myth and magic. So here is one of my favourite Arthurian characters, Nimue, the Lady of the Lake.

A Lady in white, to bring the sun to the night...

This miniature was originally an elf from Middle Earth, from the Mithril range sculpted by Chris Tubb. I think she provides a suitably otherworldly look for a character who was a fay, magical woman of uncertain background - who may not even have been fully human! The shading on the white fabric was Daler-Rowney Payne's grey acrylic ink, mixed with Future and flow improver, then diluted to give me the depth I wanted. Once it was dried, a quick drybrush with white was all it needed. I'm pleased with how it came out - not as nice as wet blended oils, but better than I can do with layered acrylics on white.


Here's a final one, with Aelle the Saxon warlord, Bedwyr, one of Arthur's nobles, and Drosten, a Pictish lord. Magic, mischief or magnificence - which will follow?


Then a beam in the shade from a slivery blade, has shattered the edge of the night

Merry meet again!

Friday, 14 June 2013

Sub-Roman Nobles

Here we have the nobles for my Dux Brit army. The backdrop might look vaguely familiar...

From the front...

...And facing the tower.

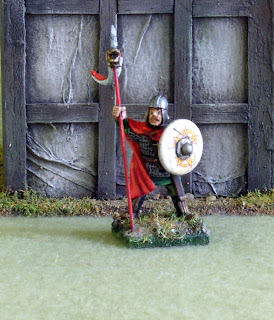
Here's Arthur. In white and purple, he looks every inch the warlord, with the hopes of his people, and his own expectations, hanging on his shoulders. The shield decal is an icon of the Virgin Mary, recalling Geoffrey of Monmouth's descriptions. The scale armour and oval shield help to mark him out as different. The oval shield has another reason behind it, too. A standard round shield totally hides his face, covering up all the work I did there!

 The warlord himself

 Here beside him is his nephew, Gawain, acting as champion and banner bearer. His shield carries the pentacle associated with Gawain, denoting the five knightly virtues. The banner is of course a late Roman Draco-type. What else? I might make a real, big, eye-candy banner at some time in the future, but for now this is enough.

The champion


Next comes Kai, Arthur's half-brother and seneschal, shown by his cross keys. Bluff, fierce and wily, Kai will, I suspect spend a lot of time controlling good quality troops as the strong heart of the army.

One noble


Finally, we have Bedwyr, Arthur's marshal, with his red hand shield overlaying the staurogram proclaiming his faith. What I really wanted with a figure of Bedwyr was to remove one hand, to really make him part of the old legends. Maybe in the future, I will revisit this. Bedwyr, I think, will get the questionable task of trying to keep together the levy. He will need every bit of strength and power he can muster!


And another, nobler still.

These all come from West Wind's armoured Sub-Roman spearmen pack. Lovely figures, these and I would recommend them. My only caveat is that my pack didn't contain many variants - In fact I think I've got about ten or twelve of one pose! Still, I like a bit of converting, don't I?

I confess to finding myself wishing I had waited just a fraction longer and gone with Musketeer Miniatures quite breathtaking Arthurian heros, but all in all, I'm happy with these.

These four will hold the line against Aelle. Watch out, Saxons. Albion may not fall as easily as you think!

Merry meet again!

Wednesday, 12 June 2013

Magnetic Movement Trays

Right, pay attention! Quick and easy magnetic movement trays, suitable for skirmish type games, in this case Dux Brittaniarum. Note that other early medieval skirmish type games are available!

Here are the basic materials: a metal biscuit tin, scavenged from my office, a sheet of 2mm MDF (A4 size), impact adhesive and painter's caulk.

Everything you need!

First, cut the rim off the biscuit tin lid - carefully, there's almost nothing like sheet metalwork for lacerating your fingers! This gives you a very rough sheet of very thin steel.

Mind your fingers!

Glue this to the MDF with a good thick layer of impact adhesive. Now leave it to dry completely before proceeding further. A wallpaper seam roller gives good service ensuring everything is properly stuck down. I  glued it down with the painted side up. Later coats of paint should be able to bond to this.

The basic material

Once it's dry, key the metal surface slightly with emery or wet and dry. Then mark out your movement trays with a suitable marker pen. I've gone for sections roughly 85x60mm, with slightly curved, but parallel, sides. This will allow me to place figures three wide and two deep, but with a slightly random arrangement. Before I did any marking out and cutting I spent an evening playing around with cardboard templates until I was happy I would get what I wanted, and then a good long time working out how to cut out what I wanted so as to leave the minimum waste. Just because it's cheap doesn't mean you should waste it! I managed to get five pieces that size out of the sheet, plus a single piece that will take four figures abreast.

 Laid out and ready to go

I cut the trays out using a scroll saw. Make sure the blade is set so the teeth point DOWNWARDS! You could use a manual fretsaw, but obviously it will take a lot longer. Twenty minutes (and only one blade!) later I had a pile of six pieces cut out. The edges aren't too bad, and everything stayed glued together through the cutting process. Clean the swarf away with emery cloth.

Tray-shaped pieces, ready for the next stage

Add a bead of painter's caulk to the edge of the tray. This will cover the rough metal edge, the metal to MDF join, act as a surface for adding basework, and stop the figures sliding off. What more could you ask? Use a wet finger to move the caulk into place and shape it once you've squeezed it on with a skeleton gun.

One thing to take note of. Make sure you use acrylic painter's caulk and NOT silicone sealant. The latter is more or less impossible to paint. Ask me how I know...

Icky sticky stuff!

The caulk dries in a couple of hours. Next, prime the trays, then add basework and a suitable colour in the middle section. Varnish to protect and matt coat to finish.

Spray varnished

One interesting and totally unwelcome fact: when I varnished the trays, suddenly the marker pen re-appeared through the layers of paint! These had got a coat of black car spray and about five or six different coats of stippled and drybrushed acrylics and emulsions, and there was no sign of the marker pen. A quick coat of Pledge floor wax and it stands out like a bucket on a billiard table (as my old man used to say).

Finished at last!

A few quick dashes of acrylic remedies this. Job's a good un! Here they are with Arthur's companions, some Saxon warriors and Pictish armoured spearmen to show how they work.


Three-way knock-down drag-out fight? I'm in!

Total cost for the six trays? Well, you'd struggle to stretch it to £1.50 for the whole set. Cheap even at my prices!

Merry Meet Again!


Tuesday, 11 June 2013

Knights of the Round Table - Sub-Roman Elite Companions

The first, and best, bit of Arthur's army is here!

These are the elite companion troops. The best of the best, true professionals, fully armoured, heavily armed and uniformly dressed. Not withstanding the scarcity of any actual evidence for a real Arthur, never mind him having a Round Table, or any knights to sit around it, any Sub-Roman warlord worth his salt would have had a strong elite guard around him, and it would in all probability have taken this form. So, this represents the nearest thing to what any historical version of the Knights of the Round Table would probably have been, a set of troops like this.

Protect the tower!

These are West Wind armoured Sub-Roman spearmen, built straight out of the box, except for the spears. These are home-made from annealed 0.7mm MIG wire.


Open order!

The shields have chi-rho symbols, some large, some small, in different colours. These were made the same was as before, as described here, using copyright free chi-rho designs from around the internet.


Form shieldwall!

There are plenty of people who will scream that there is no historic evidence for chi-rho symbols on shields. Well, there's barely any evidence for Sub-Roman shields, given the lack of inhumation goods in Christian burials. However, we are happy to accept the warriors actually did carry shields, and that there were SOME sort of designs on them, so why not these? I'm content with them, anyway.


After 'em! They went that way!

Well, on to the next bit - these can't fight off Aelle on their own!

Merry meet again!

Friday, 7 June 2013

Something A Little More Complex - A Sub-Roman Church, Part 3

Right, before going any further, I must give a shout out to Tom, over at Tom's Toy Soldiers. He is building a Sub-Roman church more or less in parallel to mine, to a different plan and using different methods. And a lovely job he's making of it too I say! Go over and have a look - and gasp in awe at the size of HIS apse! Oh er missus, titter ye not! An apse that size is NOT a tittering matter!

Anyway, innuendo not withstanding, bare MDF walls are a bit too smooth to be convincing, I think. You could wet plaster them, or use a paint / glue / sand mix, but I prefer to use a layer of tissue.

This is heavy-grade industrial wiping paper (for HANDS, not anything else!) Paper, PVA, brushes and scissors are all you need.
All you need, ready to go!

Prime the wall with PVA, apply the paper and wet it down with a good layer of further PVA. Once it's totally dry, cut out the doors and windows and trim the edges. Right, talk among yourselves while I do all the other walls (inside and out).

Plenty more to do!

Well here it is, all done finally, with the windows cut out and some slivers of waste foam glued at the foot of the walls to give a sense of the building being IN the ground and built up, not just plonked on the site as an afterthought. Even if it IS an afterthought!

Looks like a church now!

A bit of sand around the bottom of the building gives the basis for the outside groundwork. This is messy and has a nasty habit of getting everywhere, so I decided to do it now.

Bit of groundwork never hurts. What a skinny little apse!

Now, a roof. Tom has decided to thatch his - a nice option but I've got plenty of thatched buildings. I didn't fancy shingling the roof. The Anglo-Saxon Great Hall rather curbed my enthusiasm for shingling! So I went with a truly Roman option - tiles. I gave the building a coat of matt black car spray inside and out before going any further, then went out and bought a pack of Wills OO gauge scenics pantile sections. A quick measure up revealed that the four bits in the pack will do all of the flat roof sections. However, by adding the one spare bit I had in stock, it makes the number of joints more manageable!

Roof sections ready to go.

I ended up with two pieces per roof section. These two bits are fitted dry, to give an idea of how the finished roof will look. I think it will work perfectly well.

How the roof will look - eventually!

Well, that's enough to be going on with. 

Merry meet again!

Sunday, 2 June 2013

Something A Little More Complex - A Sub-Roman Church, Part 2

With a church shaped wall outline, it was (I thought) a case of cracking on with decor and a roof!

And then Red Orc, over at the Lead Adventure Forum, said "...it should really have an apse. That's pretty much the mark of a church in the late Roman period in Britain, I'd say... British churches practically demand apses, as they do have late Roman models" 

I found his arguments (that above is the edited highlights - for the full discussion, go visit) compelling. So I added an apse. To do this, it was off out to the big workshop. This was too much work for my dining room table, needing big vices and such like.

The basis of the apse was a plastic bottle, about 40mm in diameter. Standard plastic waste pipe is about this diameter, but I didn't have any offcuts on hand, so this bottle (surplus due to the lack of a lid) stood in.

A church, and a bottle.

 The top and bottom get cut away with a hacksaw. The cuts are inevitably rough, but I'm not too worried.

Even I can't find a use for the top and bottom!

The resulting tube is cut into two pieces, along the conveniently provided lines, using shears.

 An apse, and a spare apse...

The position of the apse is marked...

X marks the spot...

 ...And a couple of large holes are made through the wall of the nave of the church.

...Where you DON'T drill the holes!

Next, the aperture for the apse is is cut out with a fret saw (my least favourite tool!) using the holes for access for the blade, then neatened up with a round rasp.

A neat hole - eventually!

After roughing up both sides of the plastic with some VERY coarse sandpaper, the plastic is fixed in place with cyanoacrylate.

An apse!

Now, the kicker is obviously that the rest of the walls are 9mm thick, and the apse is about 0.8mm, which stands out a bit. How to add the thickness was a bit of a poser. I toyed with gluing on some wood or plastic battens and making up the thickness by plastering over it with one strike filler, then decided to use extruded polystyrene foam.

Blue foam like this is obviously a great substrate, having a decent thickness and being easy to paint, scribe and so on. However, it isn't very keen of taking on cylindrical shapes - at least not in this thickness. I tried scoring and bending, with no success, before forming it to shape using the old hairdryer in the picture. This was cast off as "broken" at some point, but was repaired and now serves in the workshop! The heat does collapse the foam a bit, and I found I needed to be careful to get enough heat to make it flexible without going totally flat. The one here is only about the third go!

Now the walls are thick enough!

The scheme for adding an apse was not much different to how I would have done it had I decided to add one at the outset. It was just more difficult as an afterthought!

After this slight interlude, it's on with the rest of the construction!

Merry meet again!